


-

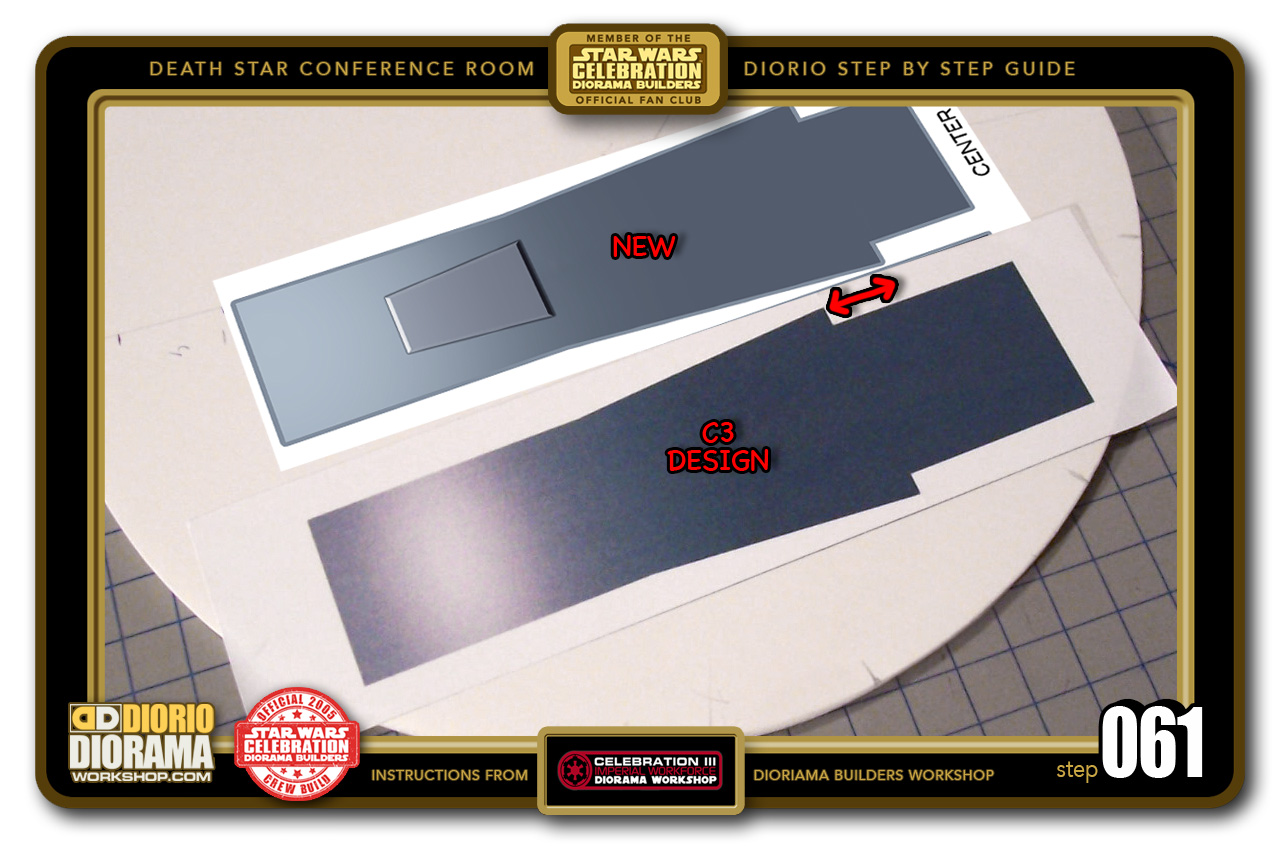
- STEP 061 > Peel back the protecive paper and apply it to a piece of Foamcore. Now when you cut out the shape along the edges, you will have a perfect flushed Decal. It's much harder to match Decals to already cut Foamcore, so this technique gives you better results 🙂 You can also see here the difference between the decals used in this tutorial (C3) and the NEW 2018 movie accurate updated version that you now print from the site's tutorial menu.
-
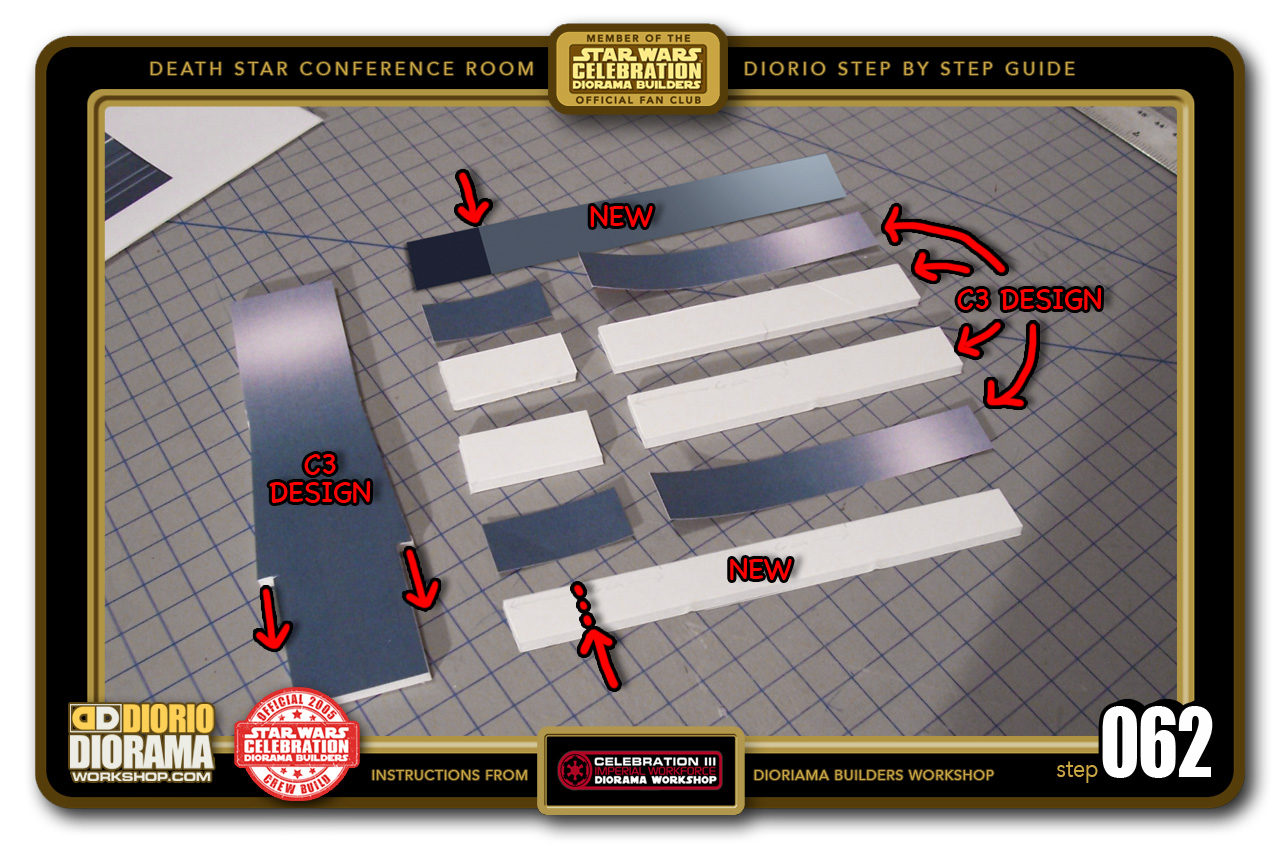
- STEP 062 > I want to try and avoid confusing you with the old and new decals, so I suggest you look at the following steps first before you cut anything just yet. Once you have your Main Rear Wall cut out, the Side labels indicate where to cut. You can see in the NEW decals the dark cutting line is lower than the C3 originals. With the NEW 2018 design and blueprints, you just cut ONE strip that you slice off the bottom, vs making 4 shapes as you see in the center of this photo.

-

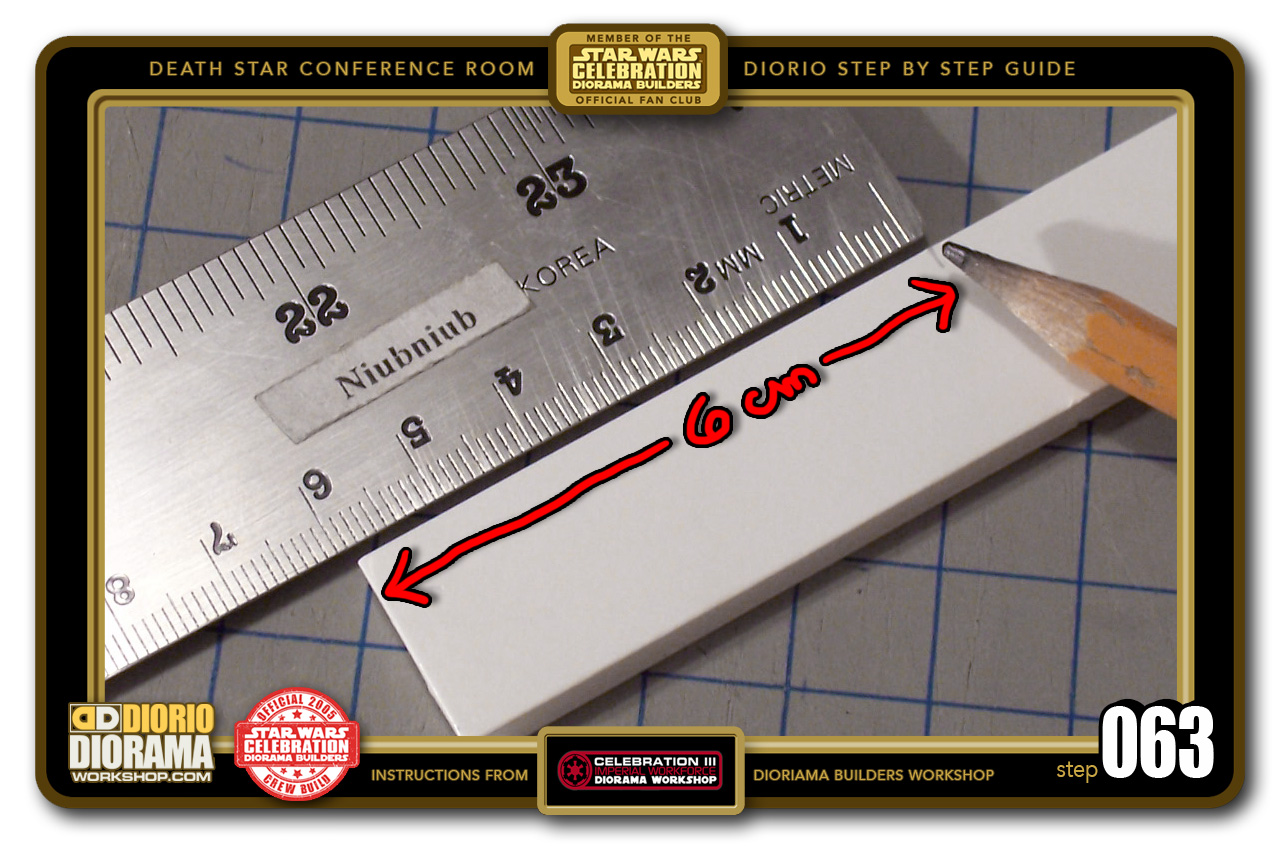
- STEP 063 > Take one of the 13cm Foamcore SIDE pieces and measure 6cm from the TOP end.
-

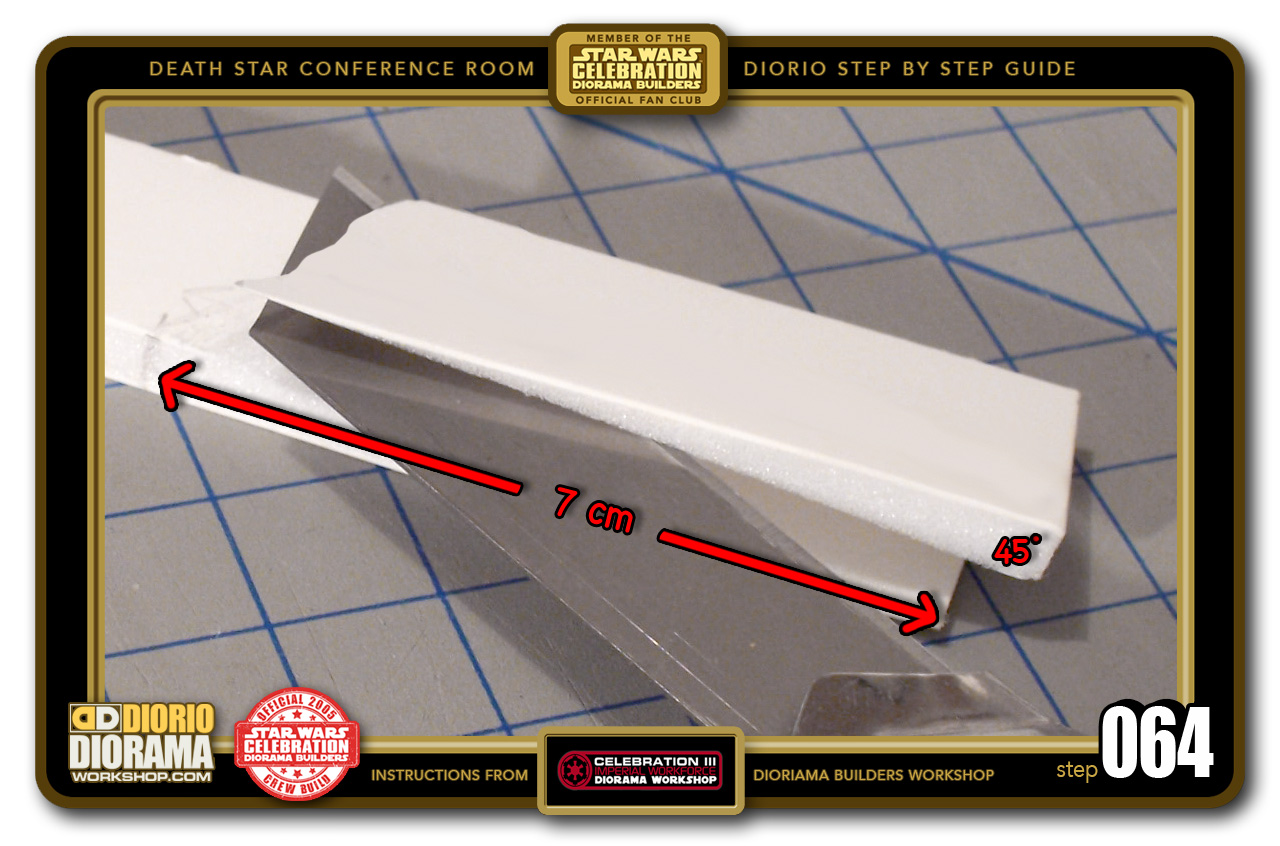
- STEP 064 > This part is a little tricky and why I rated this build 16+ age group. You now need to SLICE through the THICKNESS of the SIDE starting at your 6cm mark to the bottom of the Side strip. You can do it laying on the side or standing up if you find that easier.
-
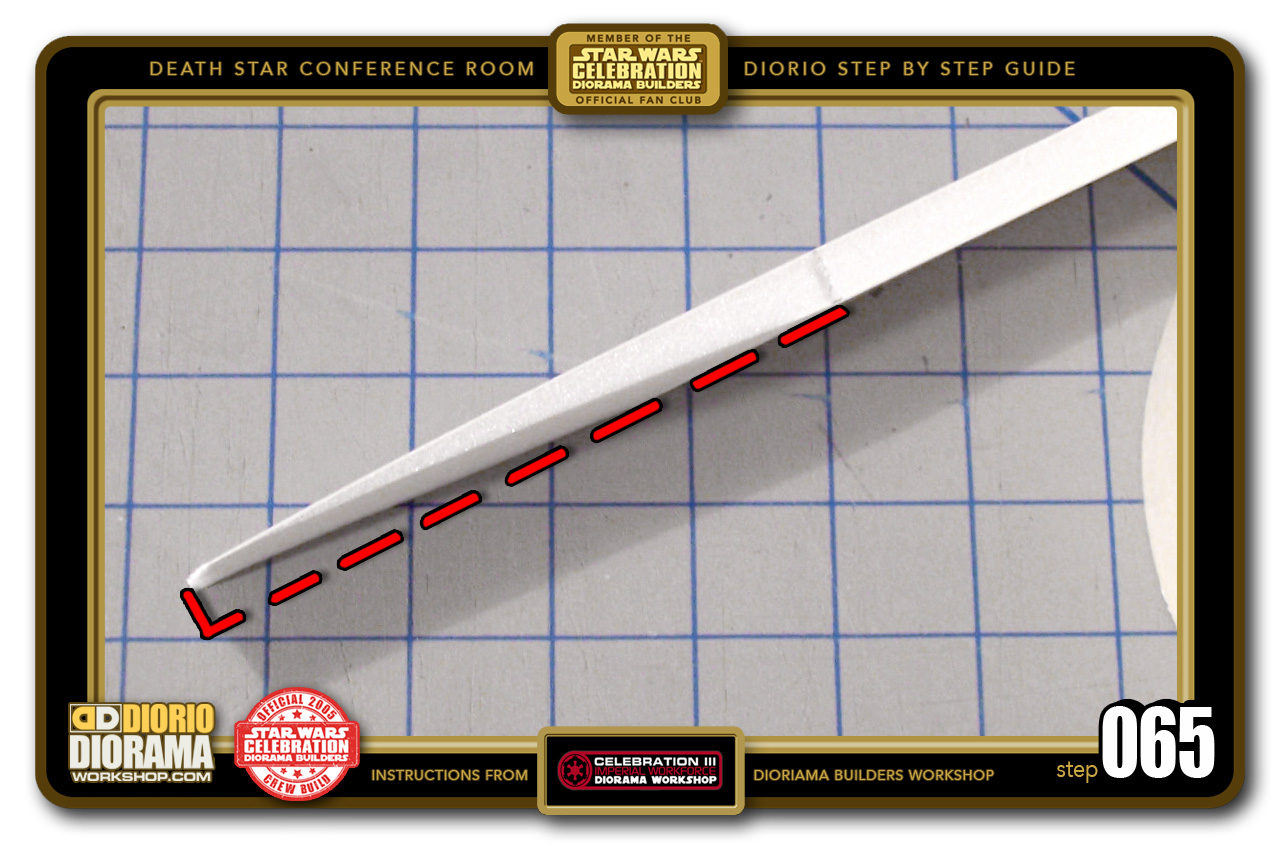
- STEP 065 > Here is what the Side piece looks like when you will be looking at it FACING you when glued to the rear wall. If you use a NEW SHARP Blade, you should have no problem creating clean smooth cut. Go SLOW and you will get perfect results. CAREFULL WITH THE FINGERS !!! IMPORTANT: When you slice the opposite side, it is a MIRRORED CUT. You always want the SLICED OFF piece to be on the INSIDE of your Side Piece.

-

- STEP 066 > in the C3 design you had 8cm Sliced Strips and 2X 4.5cm Strips. In the NEW DESIGN you can see the bottom cut is now 2.5cm. The 6cm from the top remain a STRAIGHT line (original foamcore thickness) and the remaining 7cm is where you do the angle slice. After you slice both Left and Right sides, you can apply the Inner side Strips Decals. Start them at the top and work your way down. This will help hide any texture/slice imperfections caused from the angled slices.

-
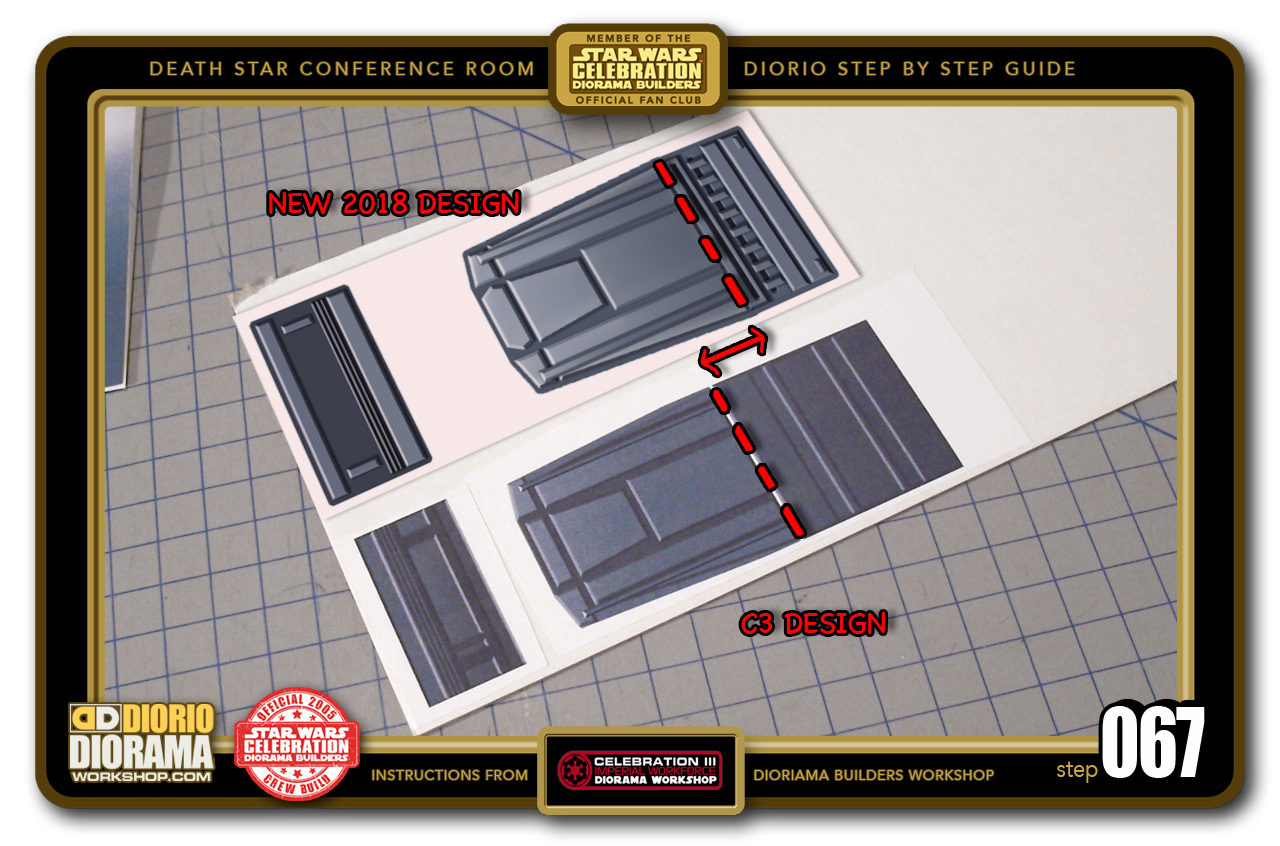
- STEP 067 > Apply the TOP and FRONT PANEL decals to a piece of CARDBOARD like you did for the table panels. DO NOT use Foamcore, that is too thick and will not look as good or work with my design. In the photo you can see the DIFFERENCE in HEIGHT of the FOLD LINE. The top is the same dimension but NEW improved skin texture. Once application is dry (if using gluestick) use your Xacto to cut out along the outside edges.

-
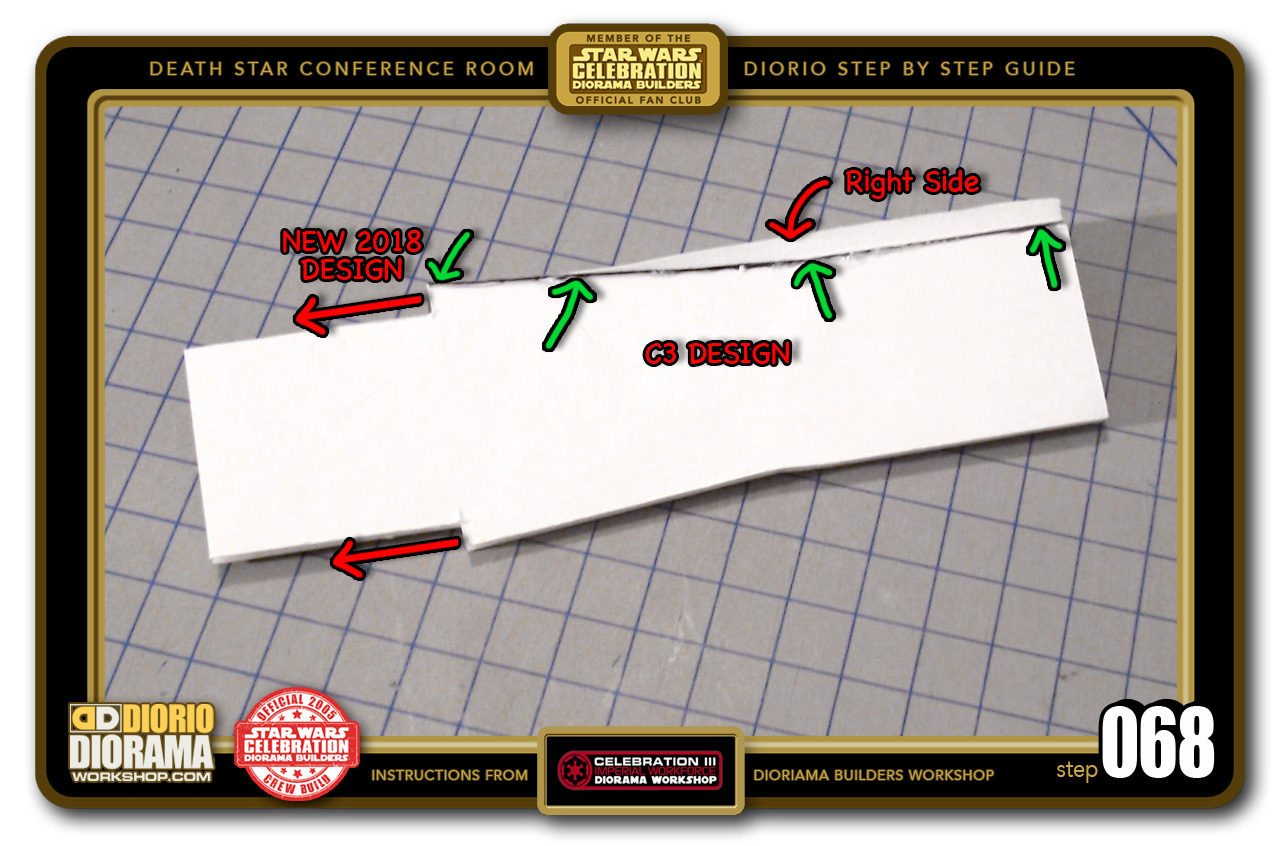
- STEP 068 > Assembly time... Take one of your Angled Strips, and Hot Glue it to the Top of the Wall Unit. Make sure it is flush (green arrows) with the back of the Main Wall piece. It is NORMAL that yours will not look exactly like the photo as this is the C3 design. YOUR WALL protruding edges will be LOWER with a slightly different angle shape.

-

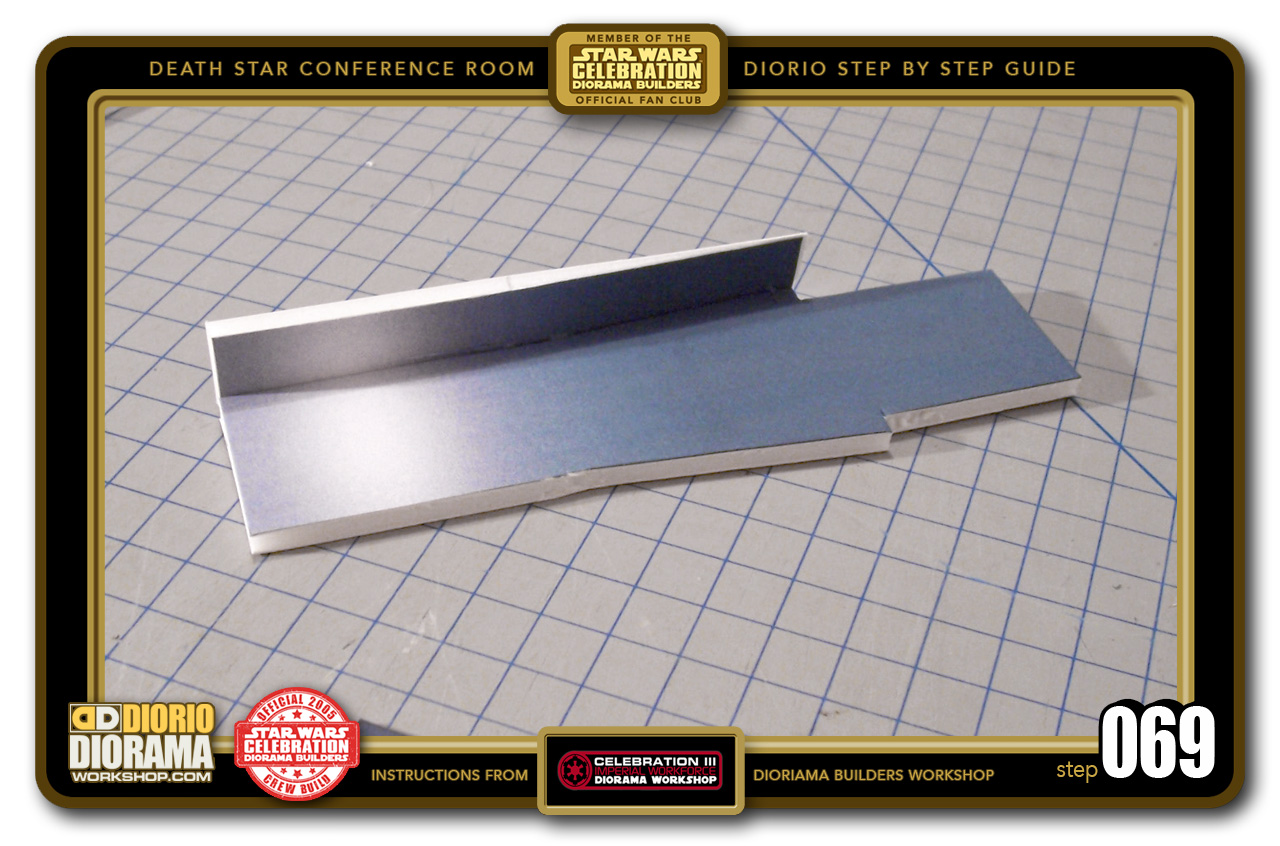
- STEP 069 > Here you see the other side of the Strip and how it looks with the Side Decal in place. Applying the Decal BEFORE attaching with the Hot Glue gives a cleaner look to the Wall unit. REMEMBER this is the C3 design, your base will not be a tall.
-

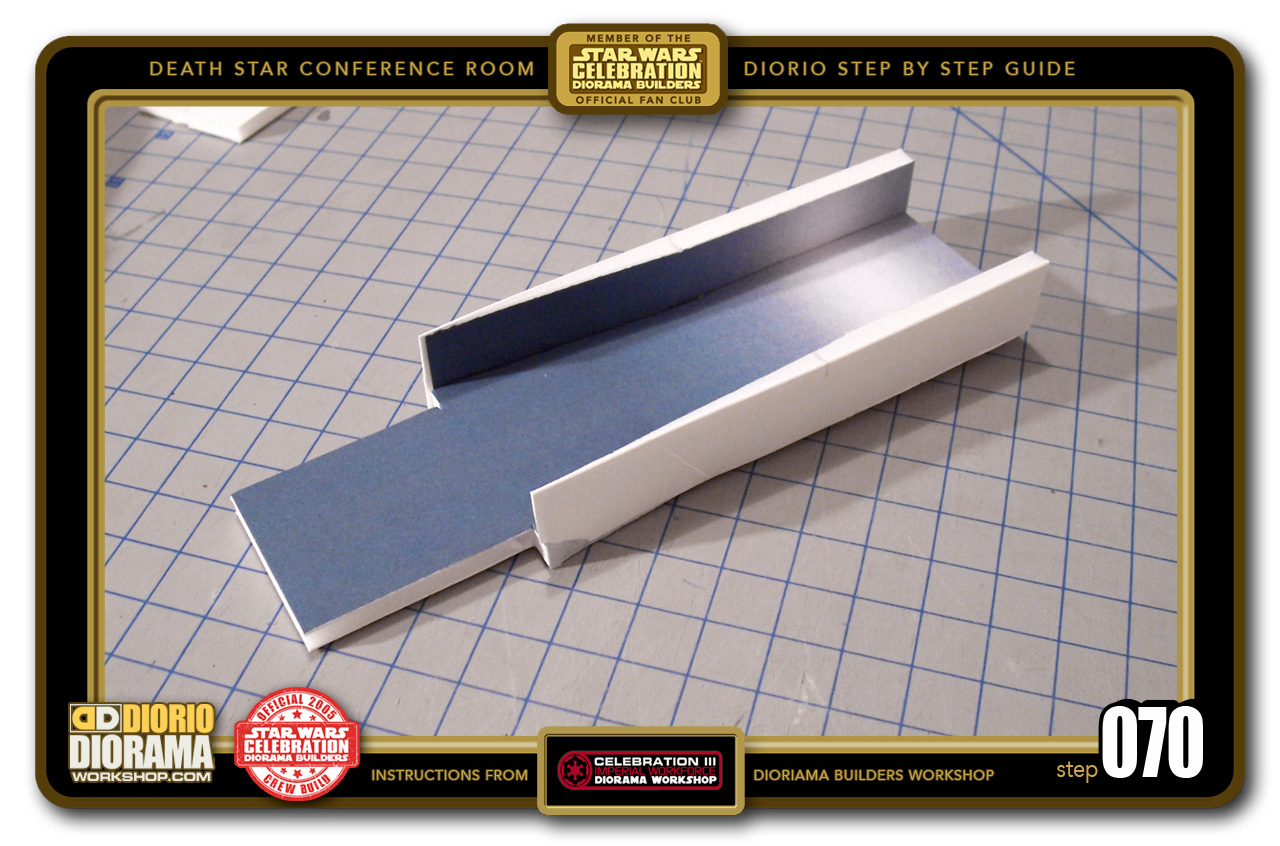
- STEP 070 > Repeat the procedure with the other Strip. make sure both are aligned with the Top and FLUSH at the REAR of the main rear piece. C3 design shown in photo
-
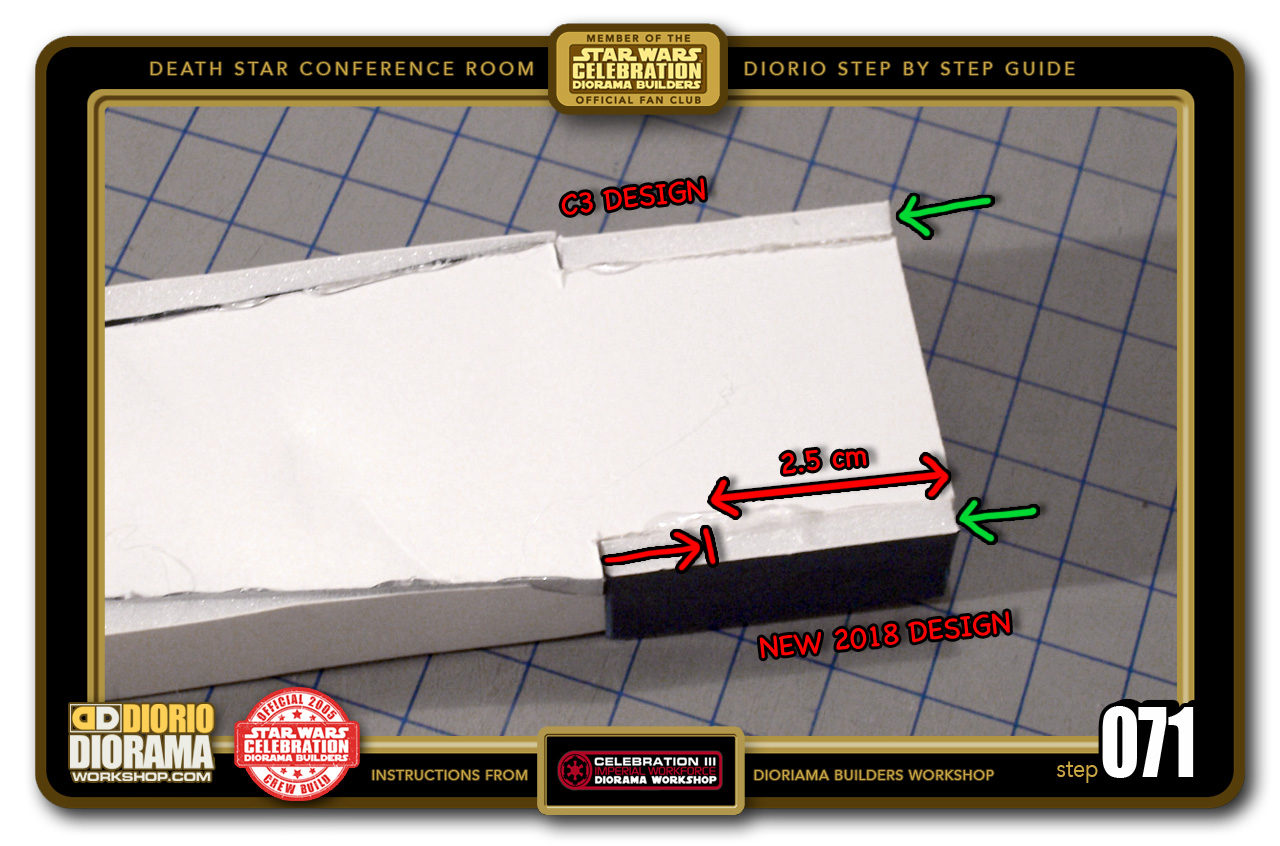
- STEP 071 > Remember those 2X 4.5cm pieces (C3 dimension) you ended up when cutting your strips in STEP 062? Use your Hot Glue Gun to set them in place at the bottom of the Wall Unit. Align Flush with the Back Rear Wall piece . They should fit perfectly in the slots of the Main Unit. REMEMBER THIS IS A C3 DESIGN PHOTO, YOUR 2 BOTTOM PIECES ARE 2.5cm TALL.

-
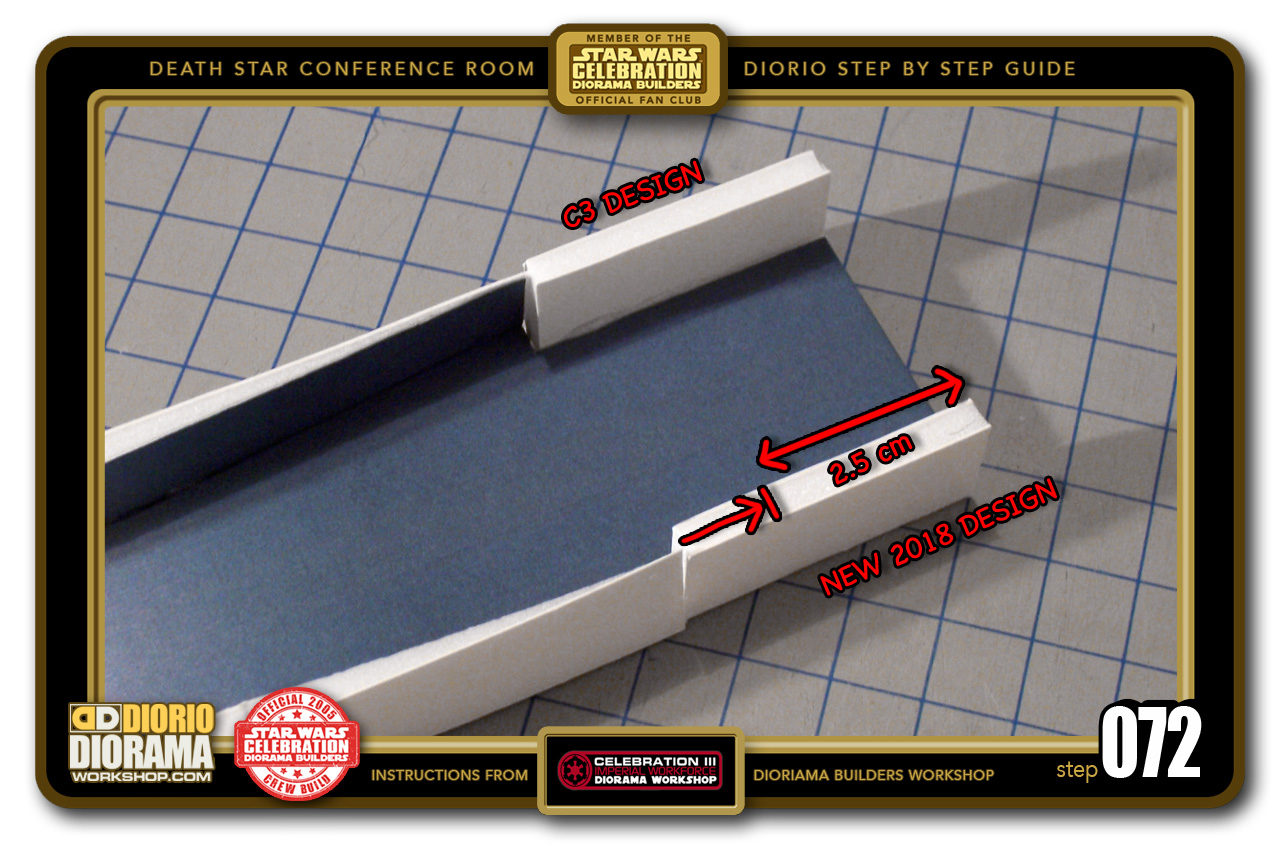
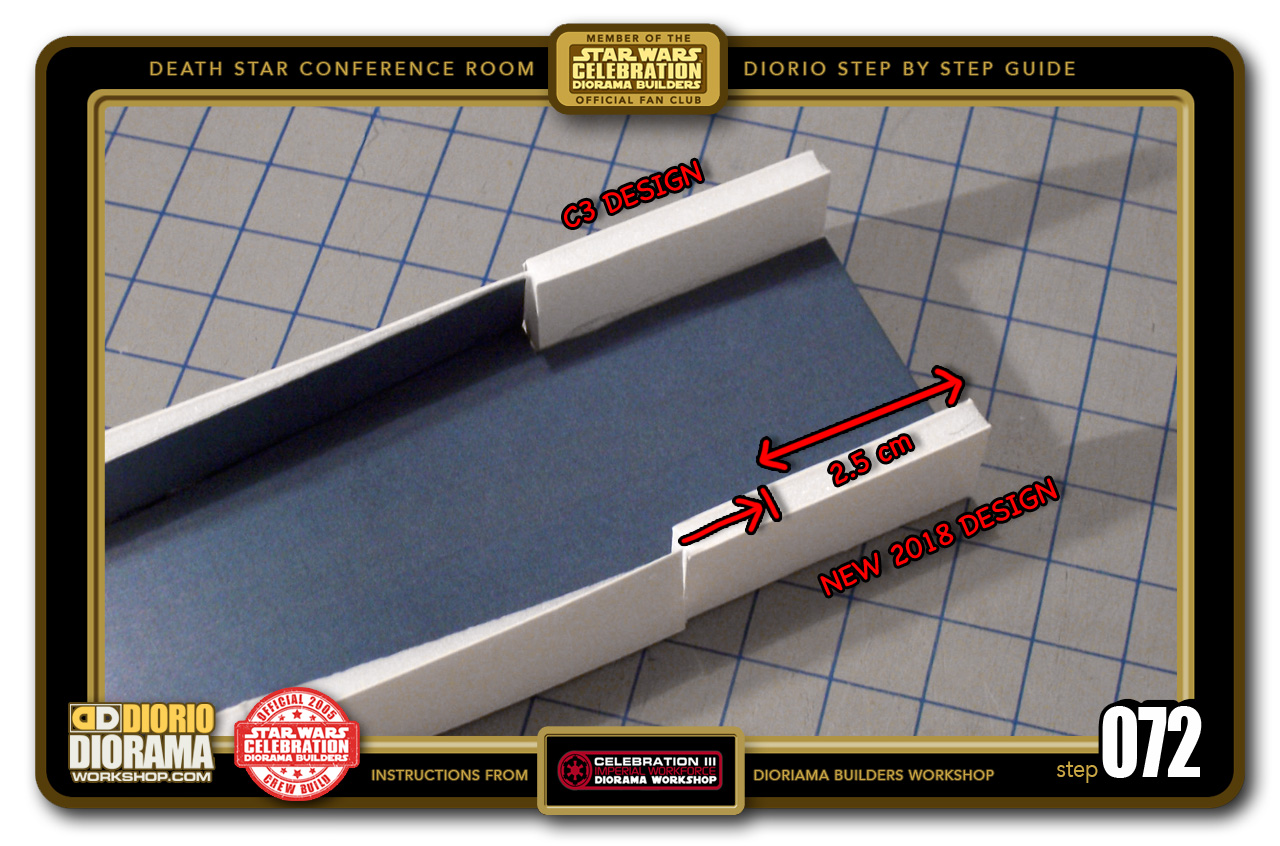
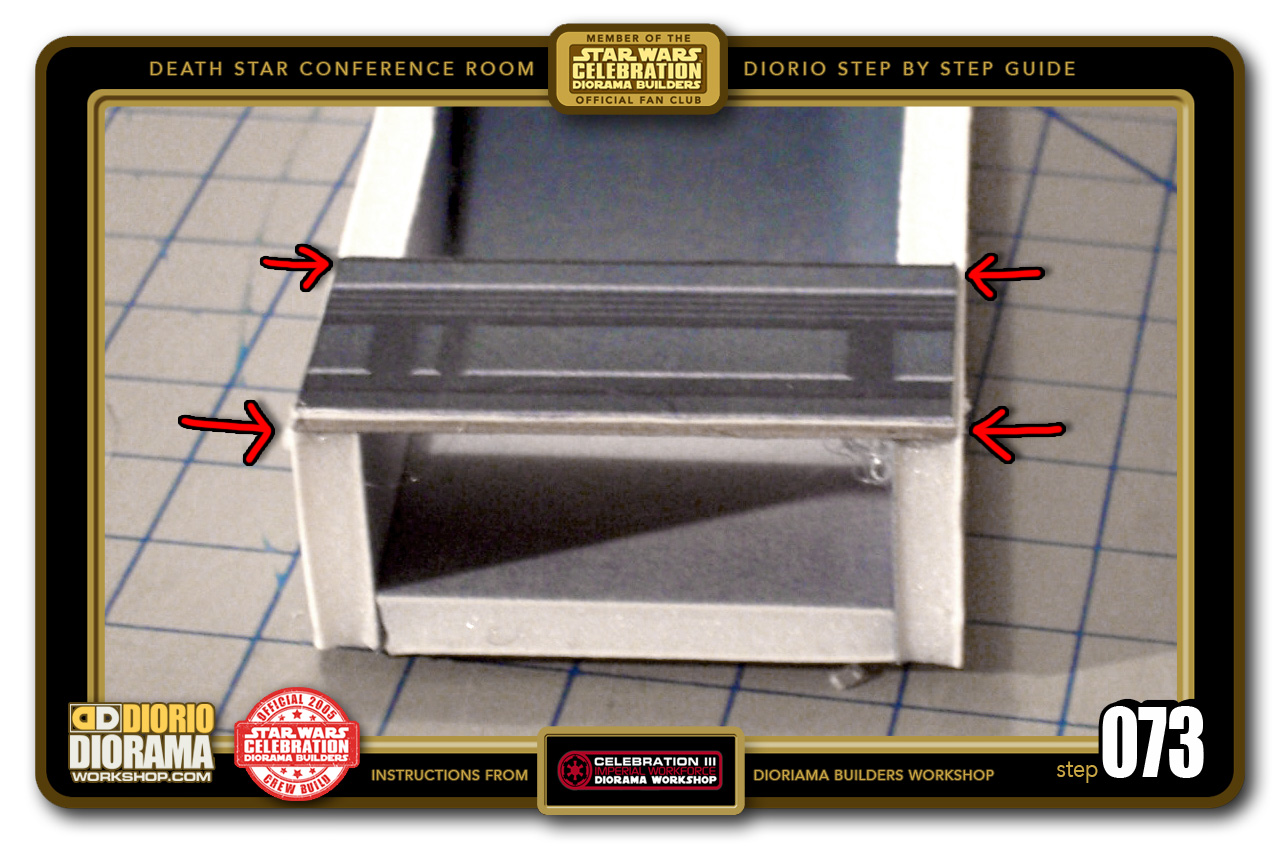
- STEP 072 > Here is what they should look like from the Front View. At the top what you see from the original C3 design, the BOTTOM arrows show you what YOUR pieces should look like for todays 2018 design build.
-
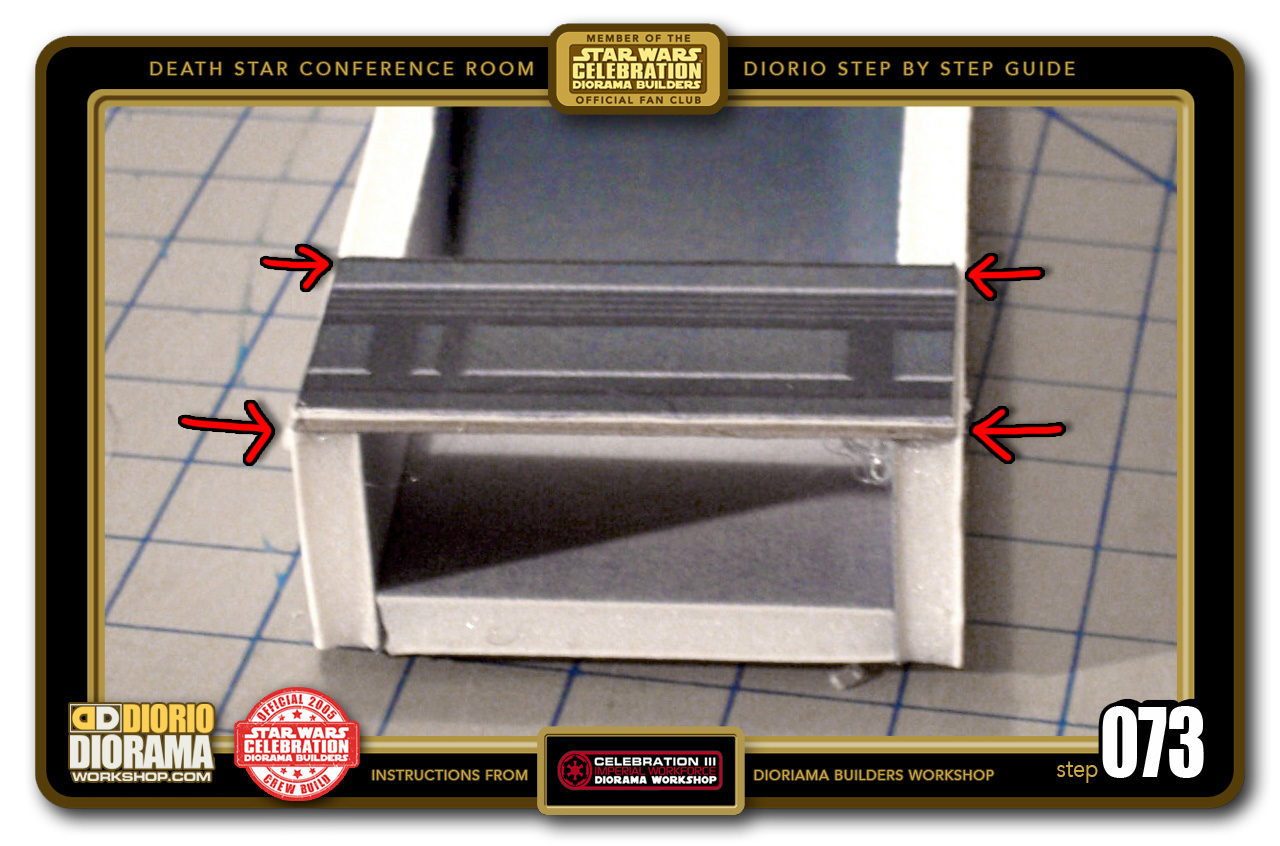
- STEP 073 > Take your TOP decal and hot glue it to the wall. Make sure that the edges align FLUSH with the wall sides.
-

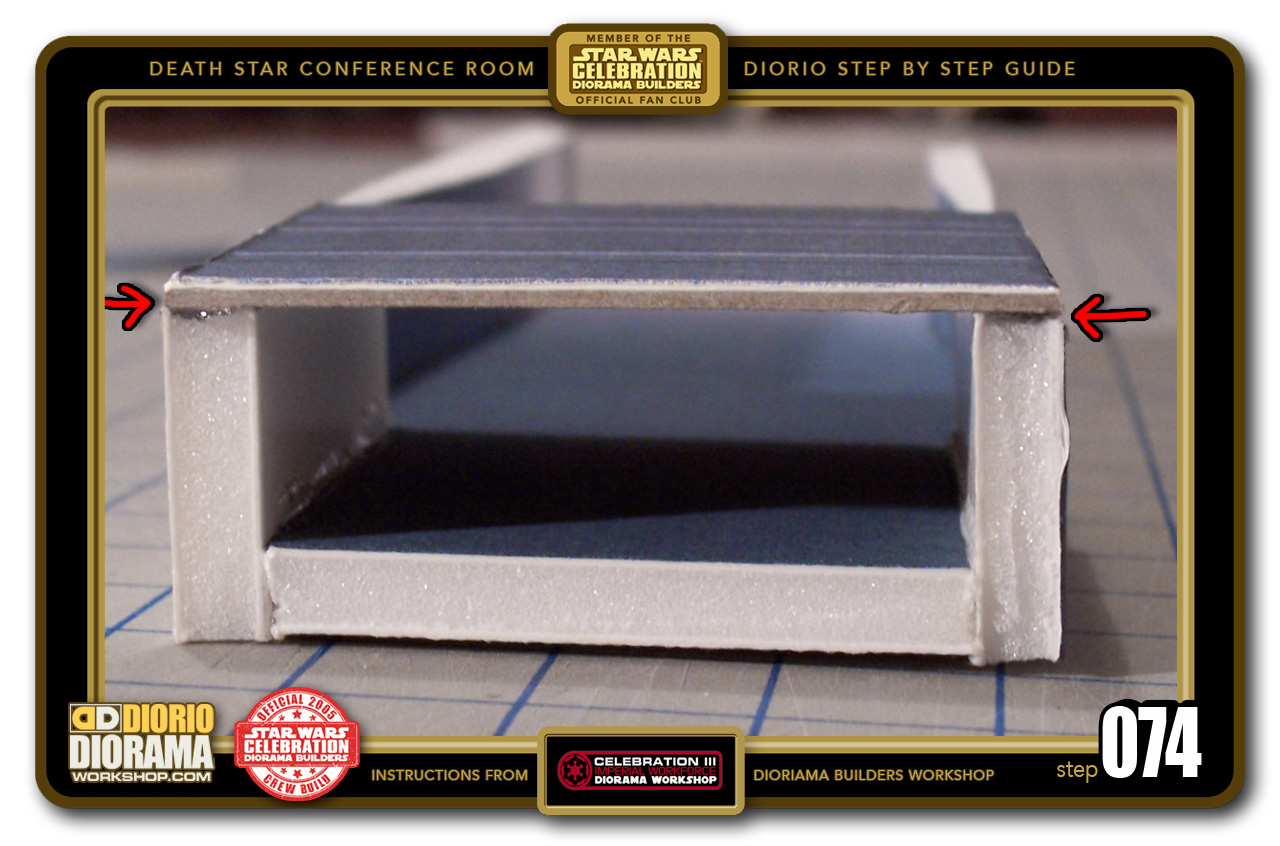
- STEP 074 > Now you will grab your Front Base and hot glue it aligned with the bottom.
-
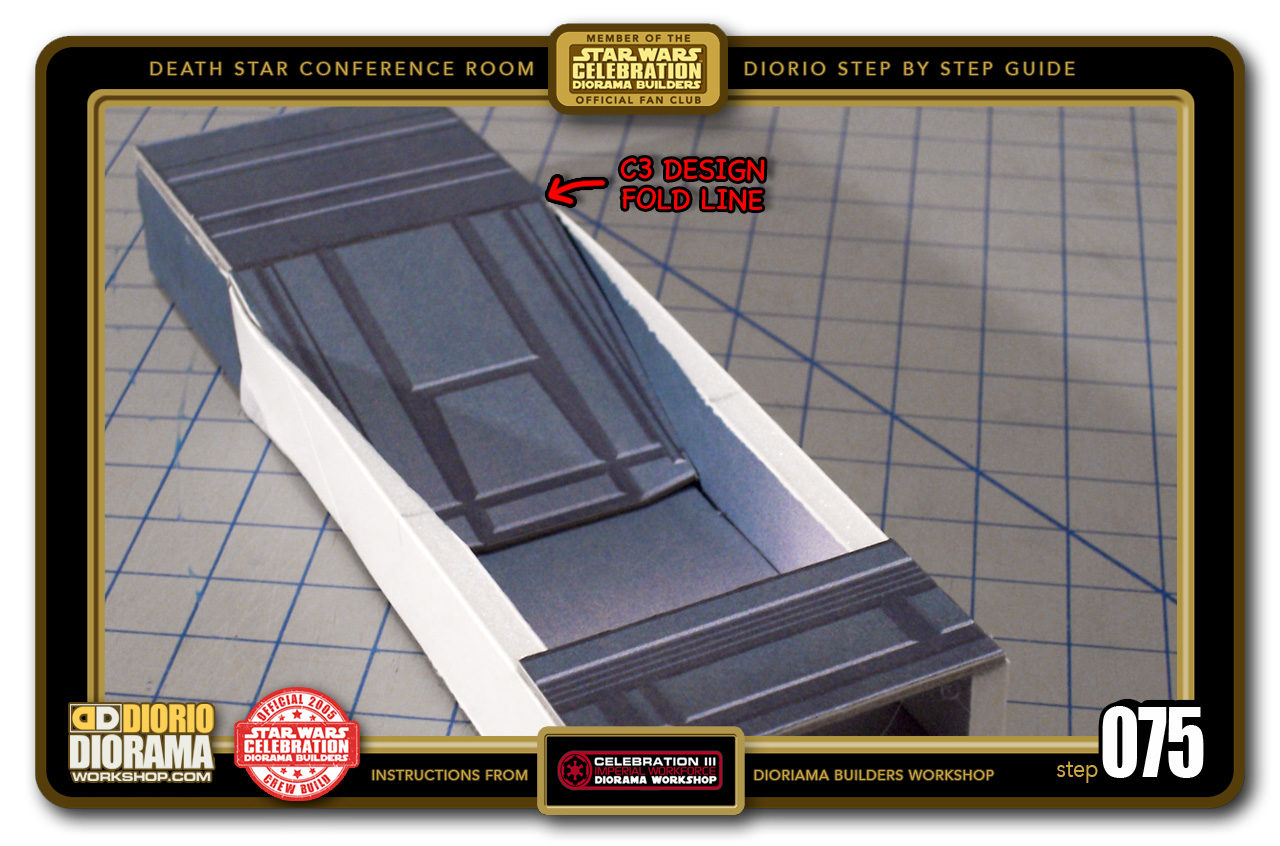
- STEP 075 > HOT GLUE ONLY the BOTTOM BASE. The rest of the Front Panel will fold down (more on how to do that later) and lean against the rear wall. You will just need to put a little dab of hot glue on the top back of the folded piece for it to stay in place. Again, more on that later...

-
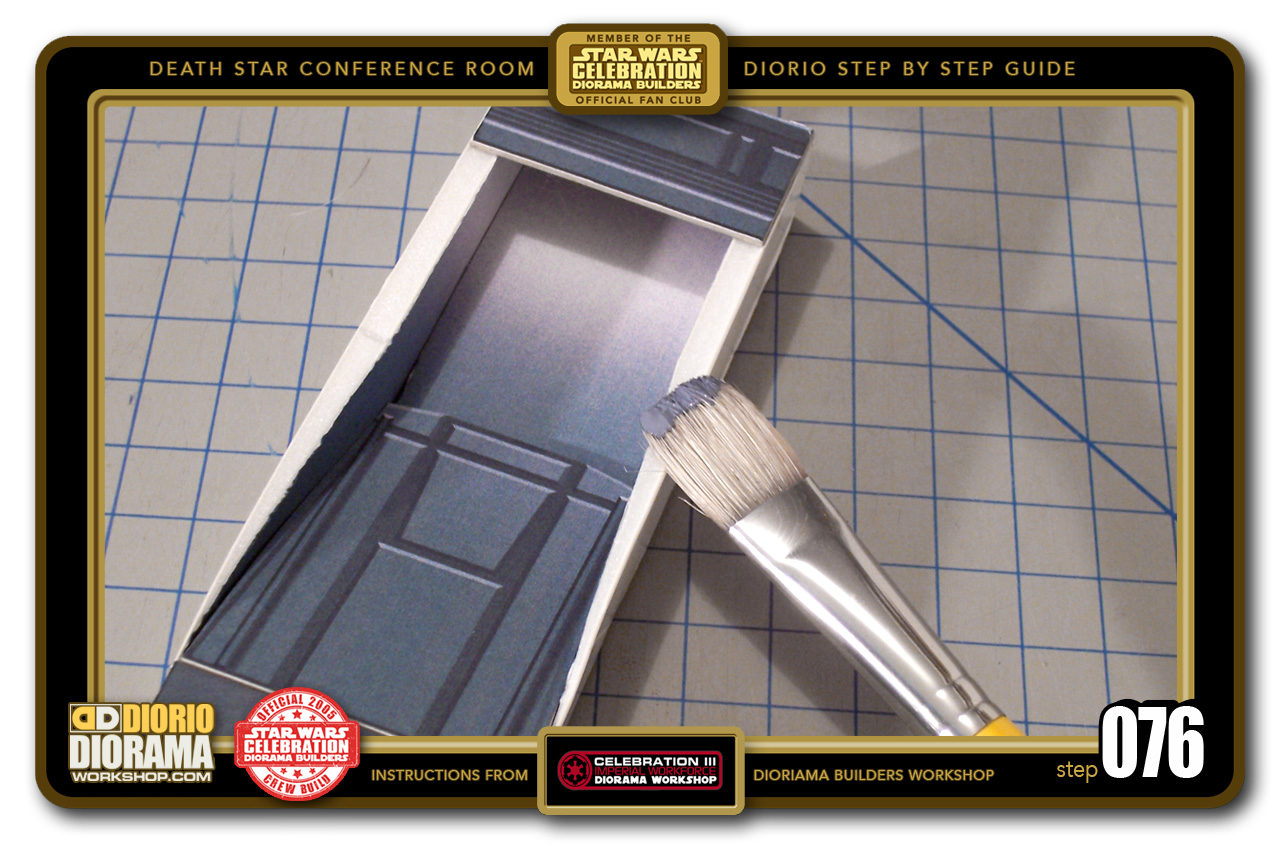
- STEP 076 > We don't want ugly white styrofoam peeking through the sides so the next step will be to get out your paintbrush and apply color to the Spines of the Foamcore. Go slowly, you DON'T want to paint over the decals.

-

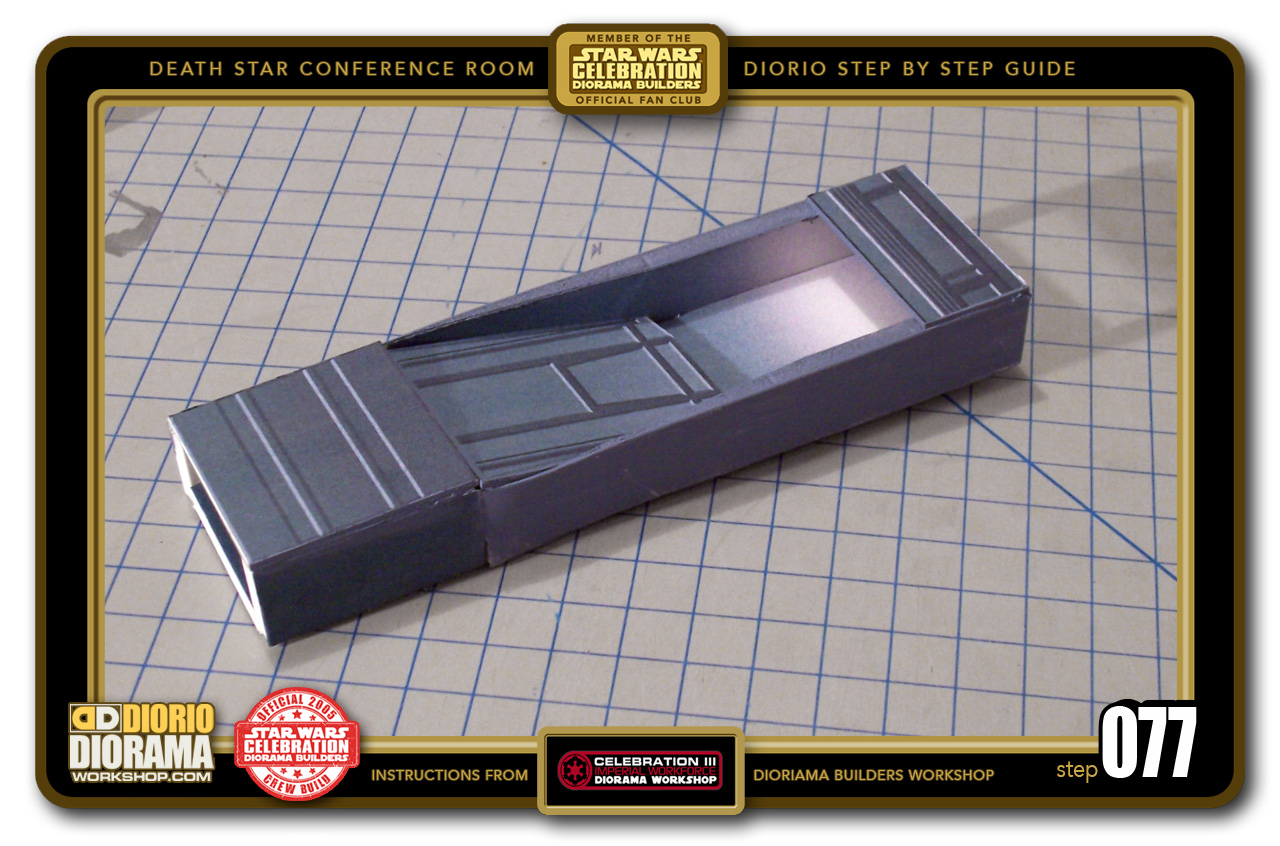
- STEP 077 > And here is a finished Wall Unit 🙂 Original C3 Style You could do a True Embossed version using foamies if you don't want the flat look of a decal. Just trace the embossed shapes and glue them on top a foamie base. for the truly patient and Advanced Diorama Builders out there 😛
-
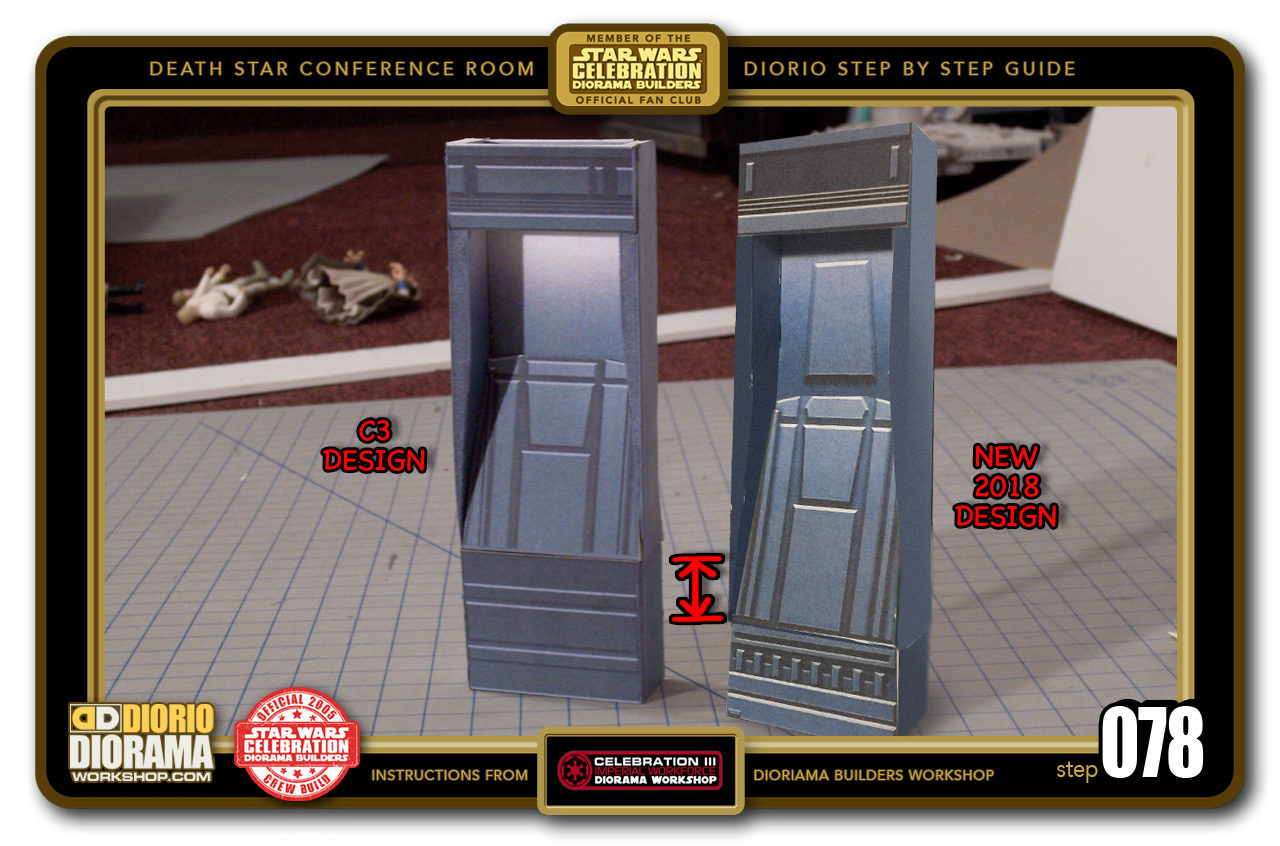
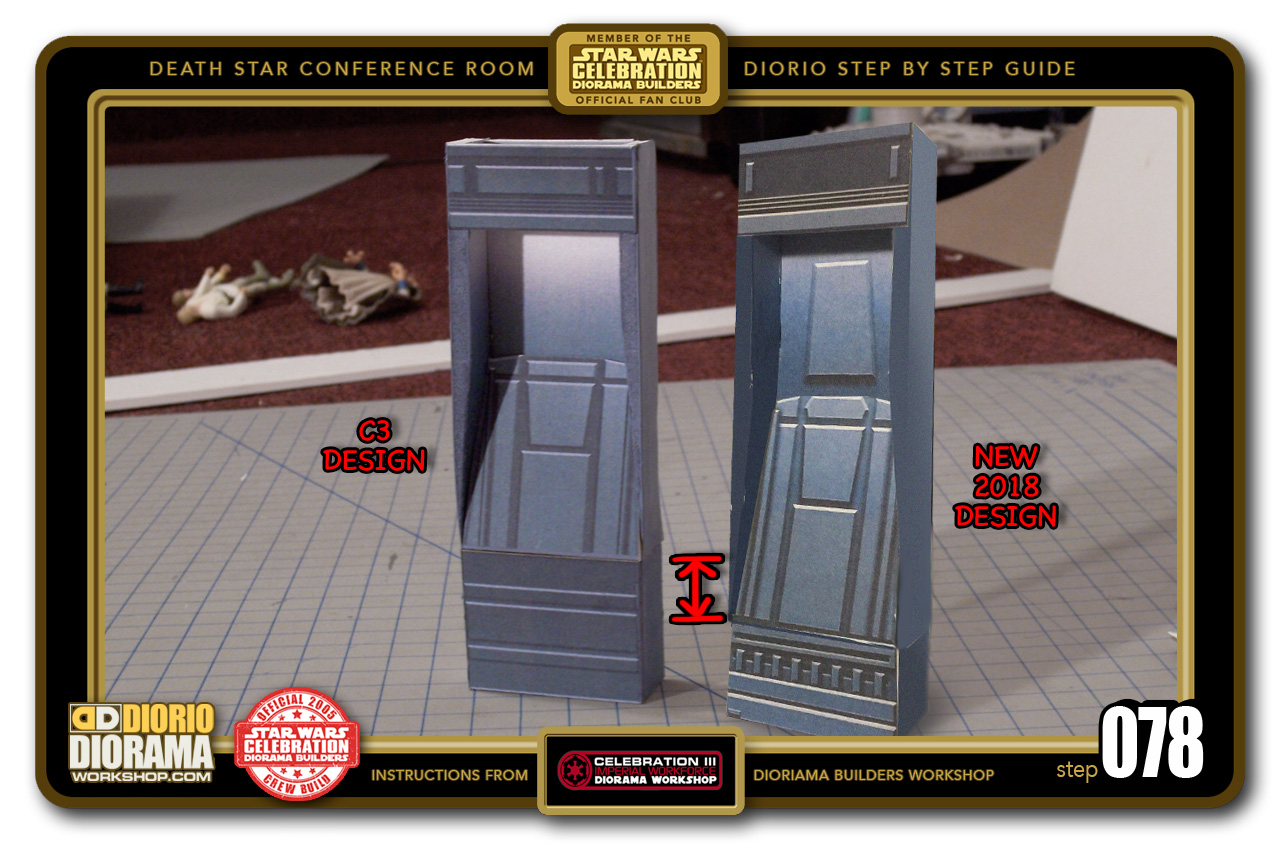
- STEP 078 > Pretty cool for simple Decals applied to Foamcore pieces. Once the grid at the top and some Christmas Lights get put in at the end, it should really look awesome. To avoid confusion, On the LEFT is the ORIGINAL 2005 C3 design that you see in most photos, what YOURS will look like when building is the NEW 2018 UPDATED Movie Accurate version on the right.
-

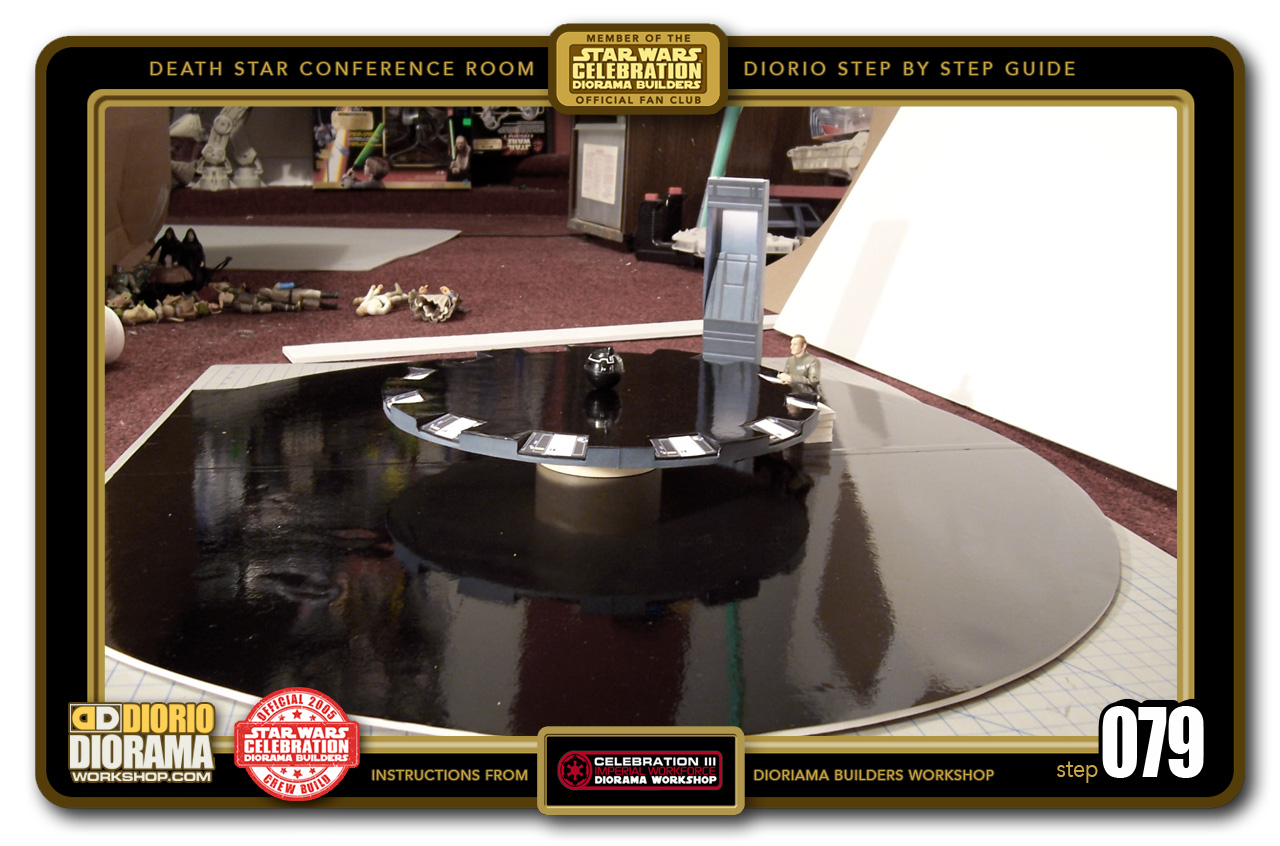
- STEP 079 > Use your imagination for what this will look like with just a couple more dozen wall units. Coming up next is the tedious boring copy paste part of the build....
-
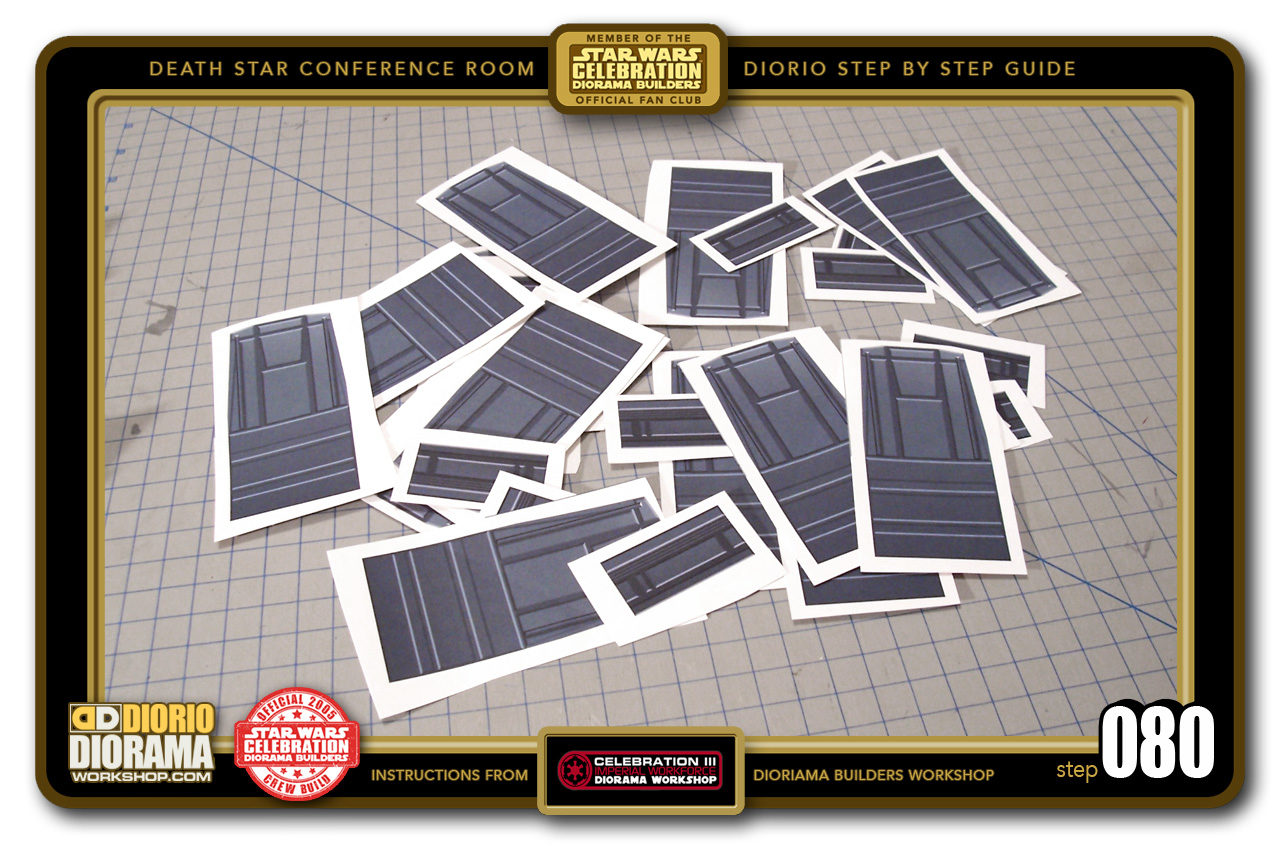
- STEP 080 > So let's start making some wall panels 😀 Simply print out the Death Star Conference Room Wall Decals from the Tutorial Menu and roughly cut out the sections into separate pieces.


.
Did you already build this Diorama ? At home or at our Star Wars Celebration Diorama Builders workshop ? Would you like to show it in the site’s GALLERY VISITORS DIORAMAS section, YES ? That is Awesome !!! You can find out all the details on how to email me your photos on the VISITORS SUBMISSIONS INFO page … When I get your photos, I will create your very own page just like this one. You may not realize it but work does inspire others to join in the fun of making Action Figure Dioramas.
.
NOT FOR RESALE ALL Decals, tutorials and artwork are ©FrankDiorio (dioramaworkshop.com) and offered FOR FREE to the fans – that would be you ? so you can build and display my diorama designs in your very own home. I realize I cannot control what one does with my graphics once I place them on the web, I can only ask you as one fan to another, please respect the artist and do not be that jerk who uses my designs and tutorials to build a copy of my work only to sell it on EBAY or trade/sale groups and forums. Thank You. Frank.
.
.
If you have a facebook account, why not join the Official Diorama Builders Fan Club today, simply click the logo link below.
 .
.
Catch up with fellow visitors and exchange stories, read cool interviews with the crew, exchange photos, fun surprises and grab some FAN ONLY merchandise next year at actual future conventions ?
.
©2018 Frank Diorio DioramaWorkshop.Com
.
IF YOU LIKE WHAT YOU SEE, PLEASE SHARE WITH YOUR FRIENDS
USING THE SOCIAL MEDIA BUTTONS BELOW