


-
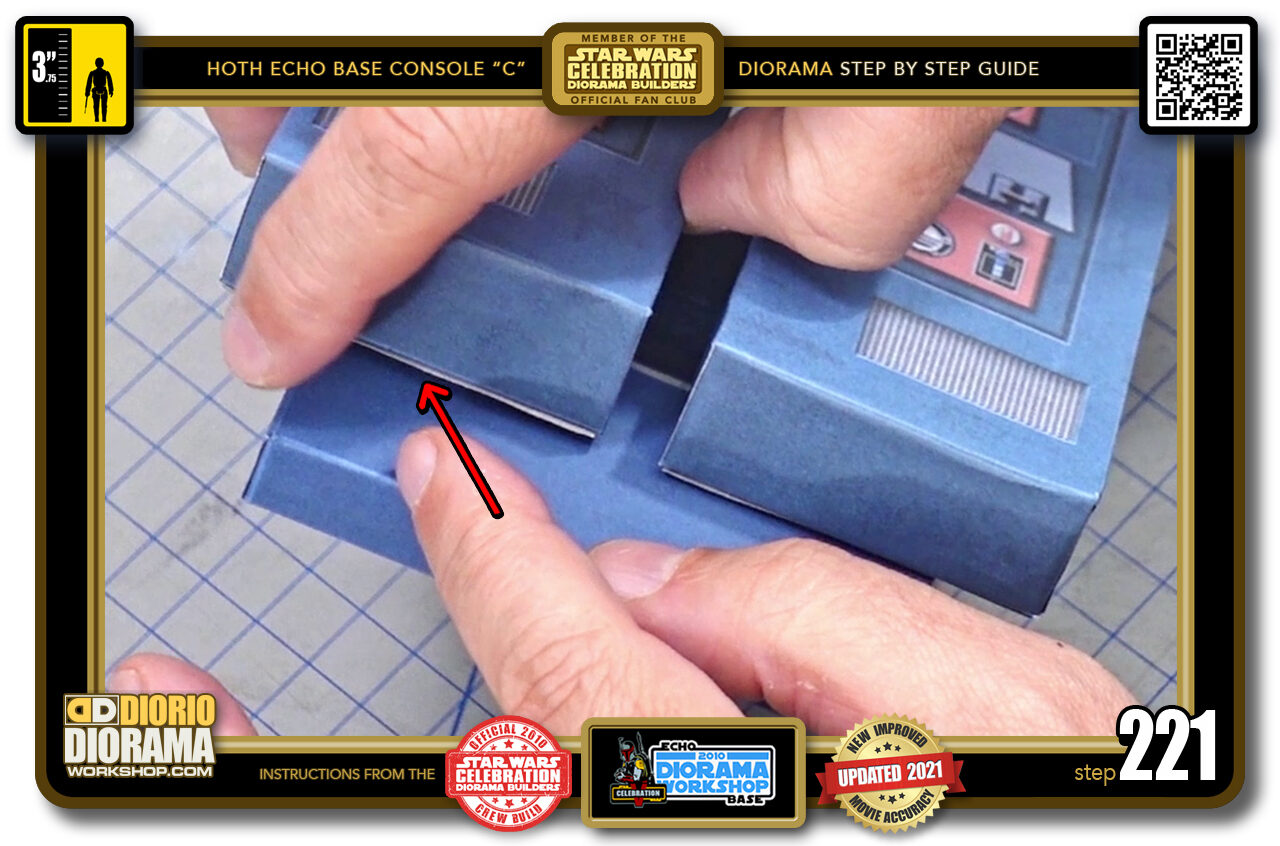
- STEP 221 > If you want you can raise your bottom rear box from the bodies and insert a drop of hot glue to keep it from moving, but it's not really needed. Gravity and the pressure from the straws will keep it nice in place as is. But you can put drop of hot glue if you want to.
-
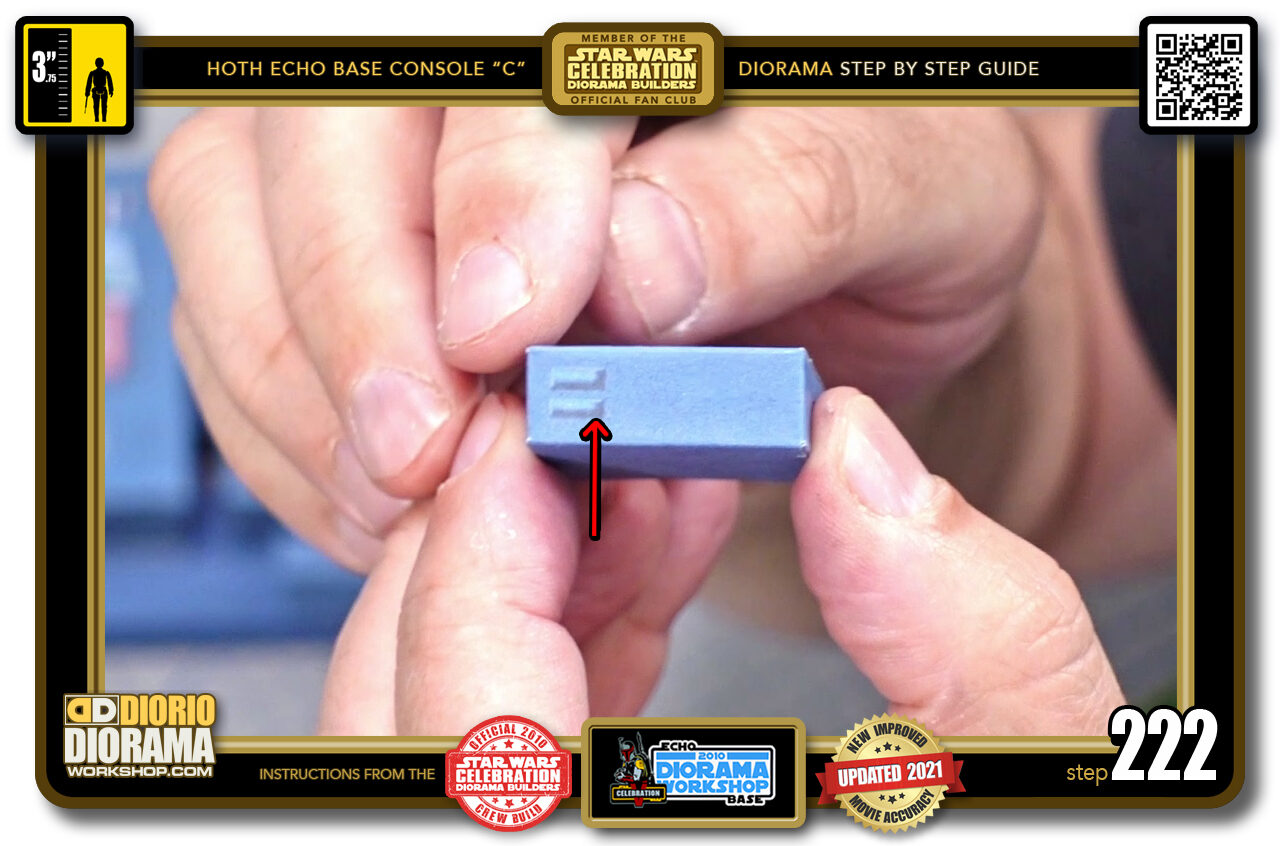
- STEP 222 > Time to attach the front feet to the lower rear box. Notice there are 2 small emboassed rectangles with a black shadow. you want this shadow to be in the bottom righ sides.
-
- STEP 223 > Meaning this foot would be placed on the left of the console.
-
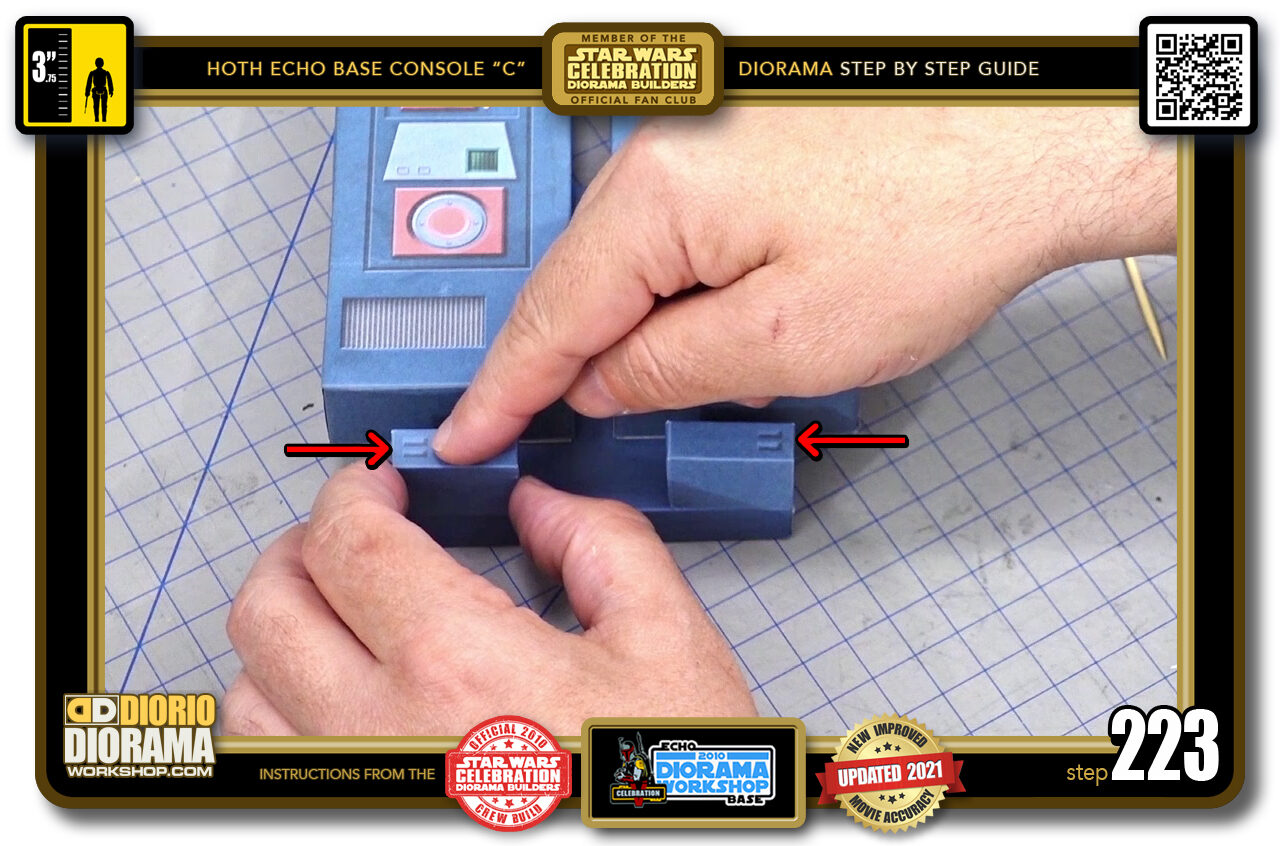
- STEP 224 > Start with a small line of hot glue on the foamcore exposed side (left image) Align your foot with the proper corner (centre image) Make sure it is aligned FLUSH with the bottom and outside (right image).
-
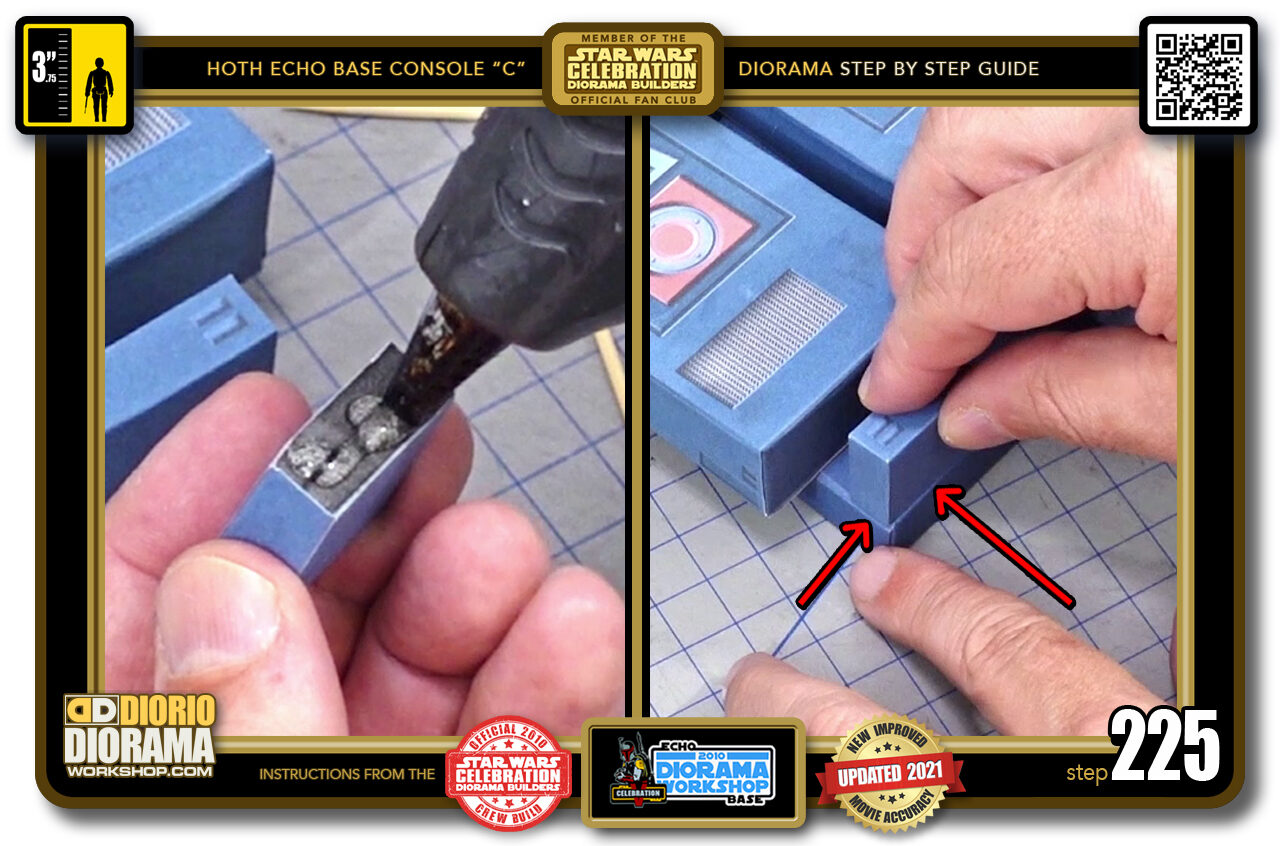
- STEP 225 > Repeat the same with the other starting with hot glue (left image) and placing it aligned the opposite edges (right image).
-
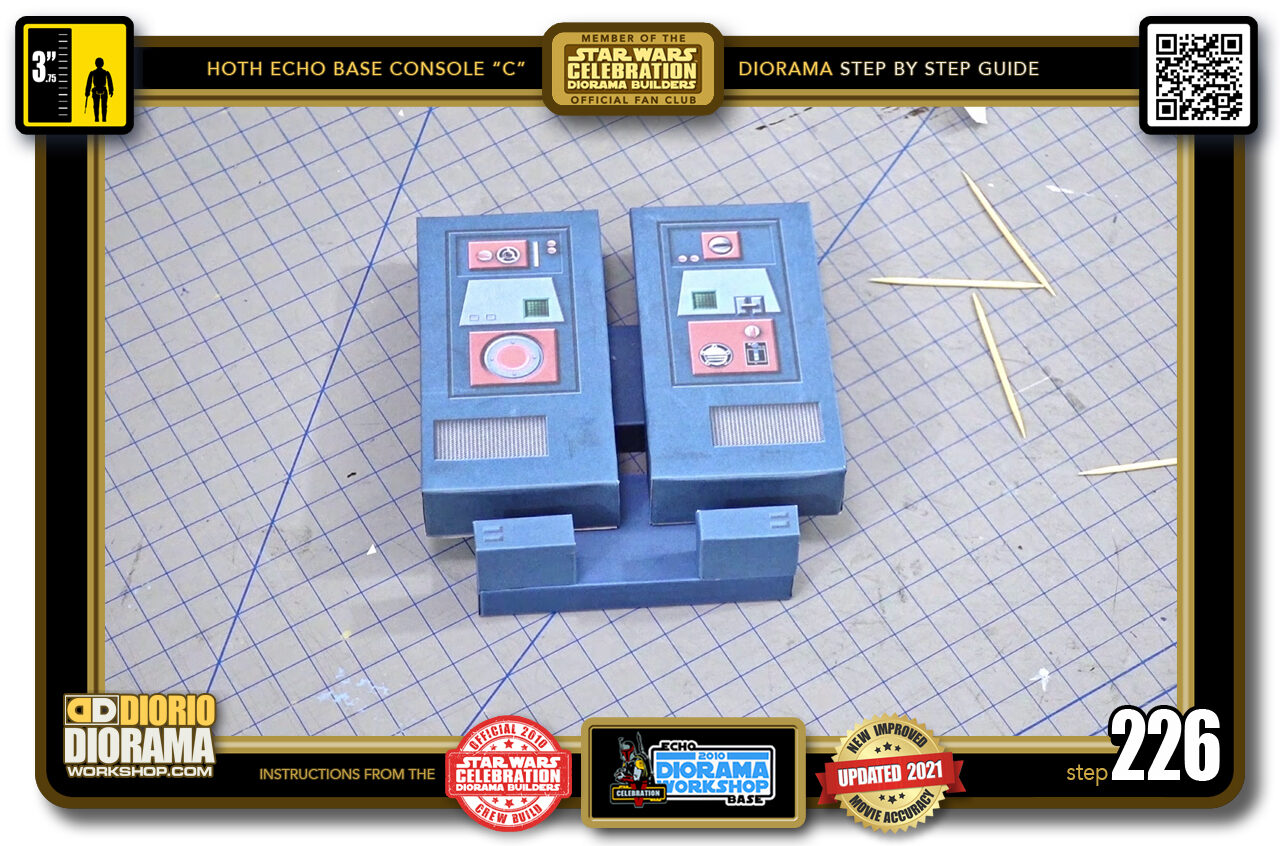
- STEP 226 > Your console "C" is almost done.
-
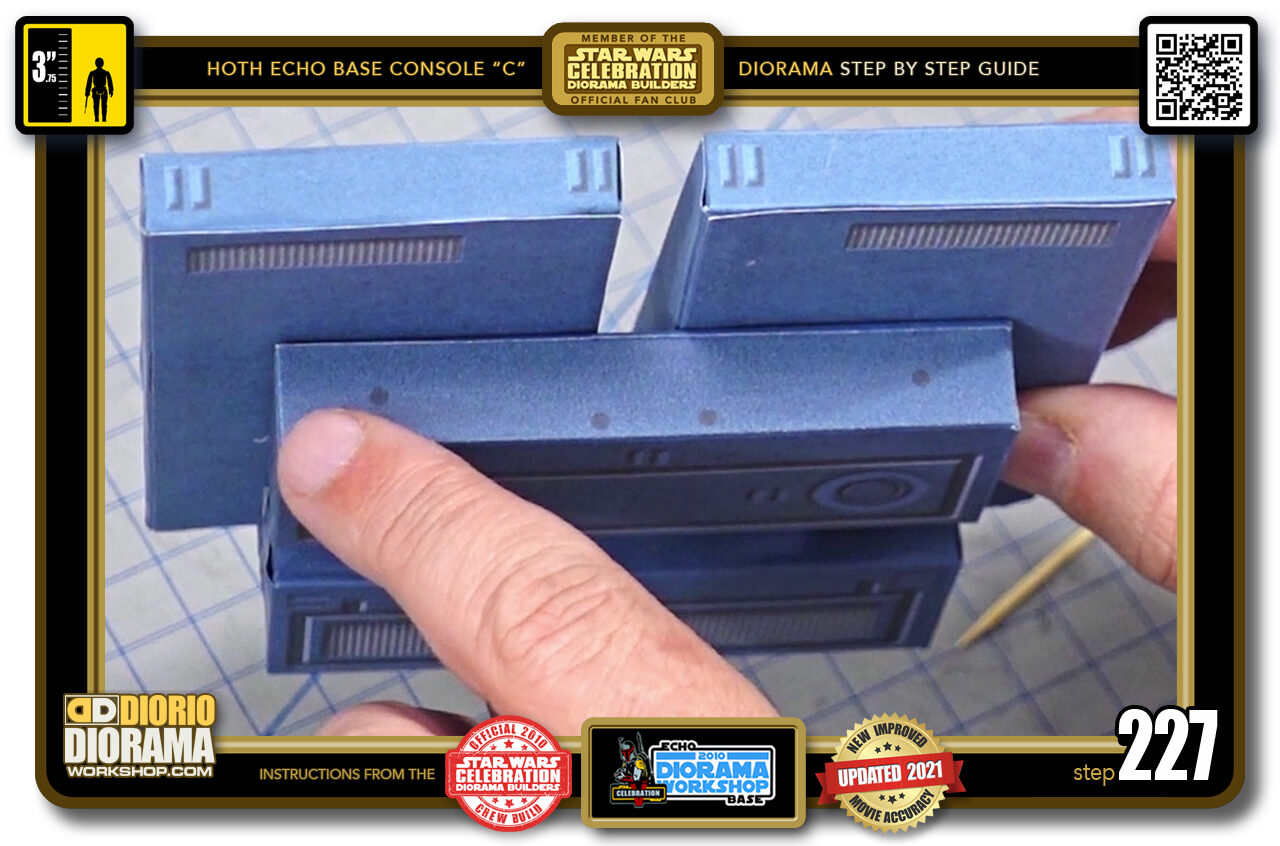
- STEP 227 > There are 2 more straws to attach to the edge of your rear top piece using the dot guides you see here.
-
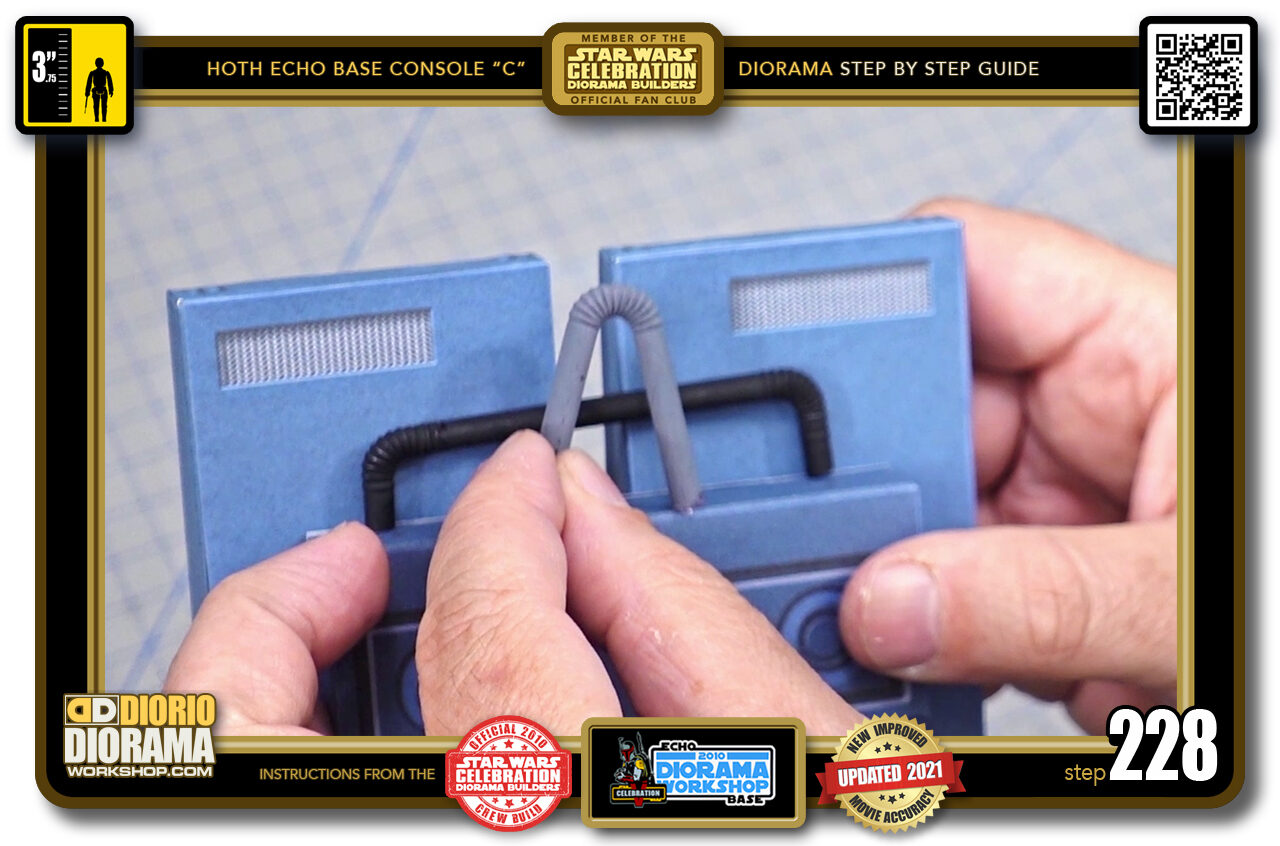
- STEP 228 > The "V" straw goes in front of the "U" tube so we want to place the black straw first.
-
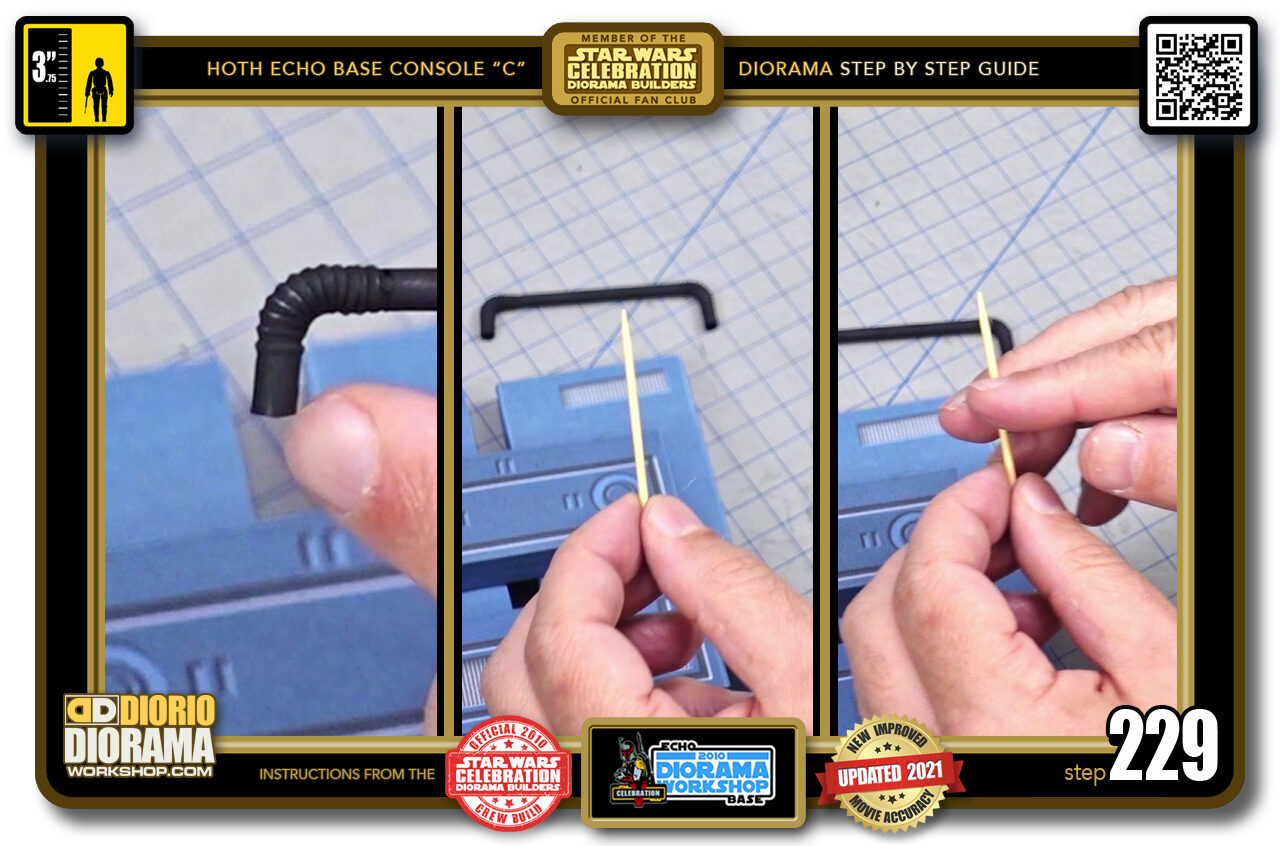
- STEP 229 > Since the bottoms of the straws are so short (left image) we need to take our toothpick (centre image and chop it in half with your scissors or X-Acto knife. Scissors are safer. Don't let the loose cut side fling into your eye. (right image)
-
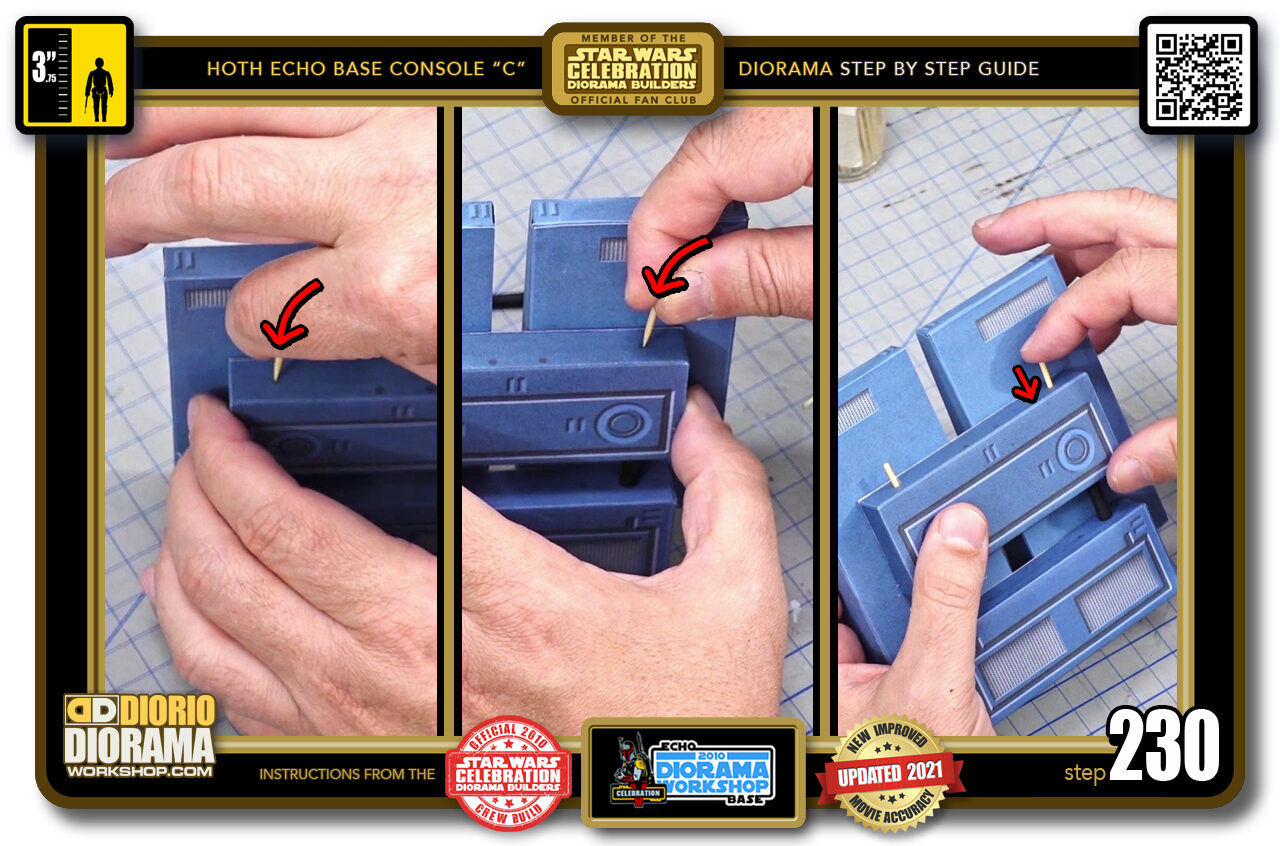
- STEP 230 > Align your toothpick with your left dot guide and poke the decal and foamcore and keep pressing untill about 1 cm remains sticking out (left image) Do the smae thing with the 2nd toothpick and the right dot guide (centre image) Once both toothpicks are inserted press down again to make sure both are even and one isn't sticking out more than the other (right image).
-
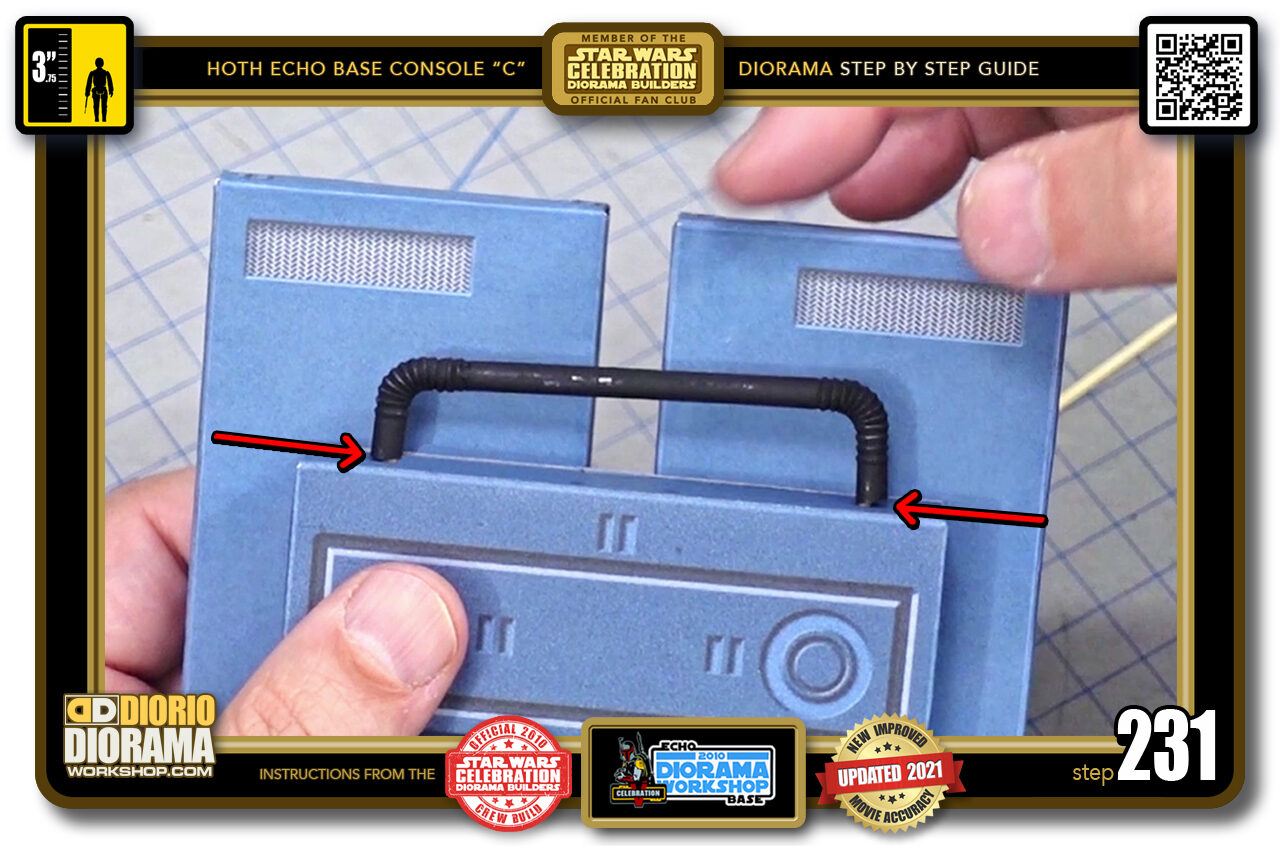
- STEP 231 > If you see your "U" straw is not parallel with the edge of your rear box (red arrows) You can lower the toothpick more or play with the accordion bends so that they curve evenly on both sides.
-
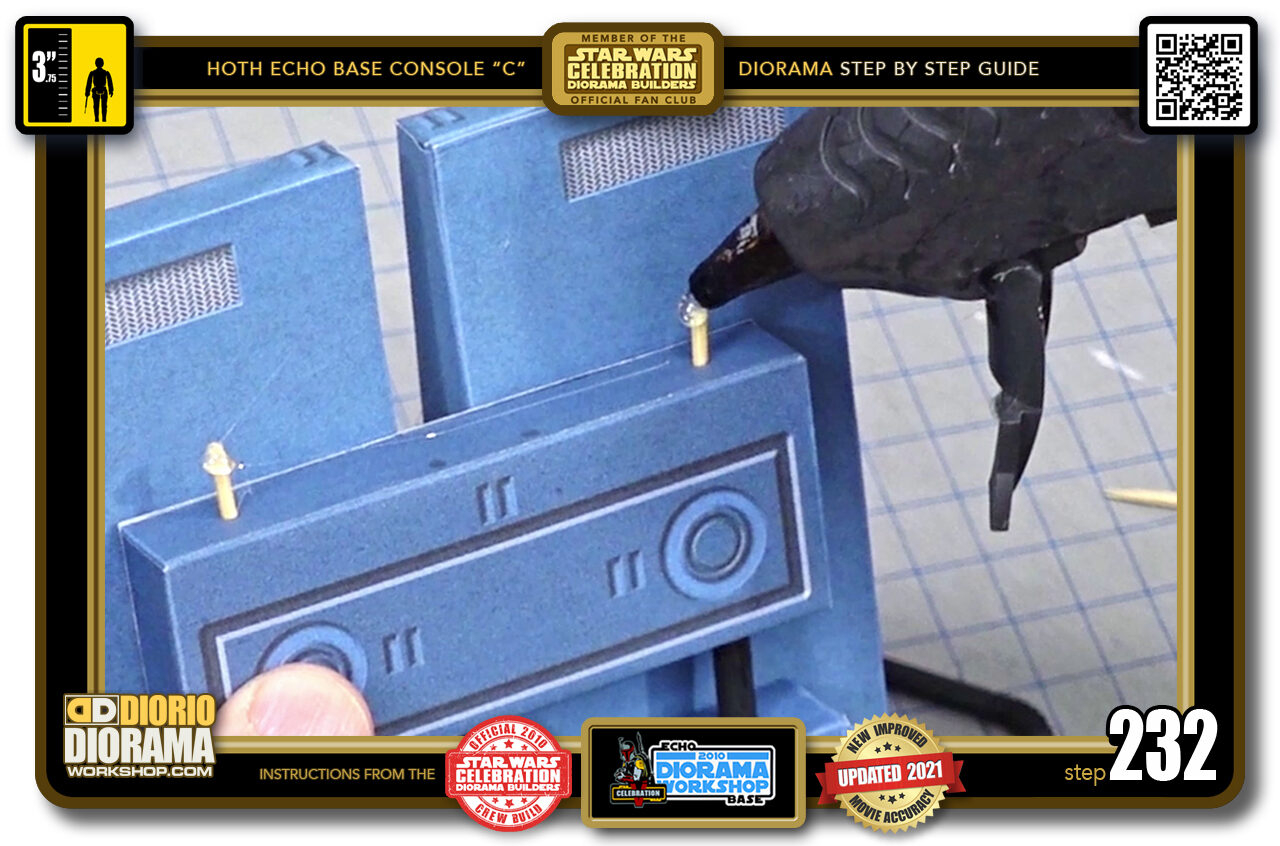
- STEP 232 > You can now place a small drop of hot glue on the tip of each toothpick.
-
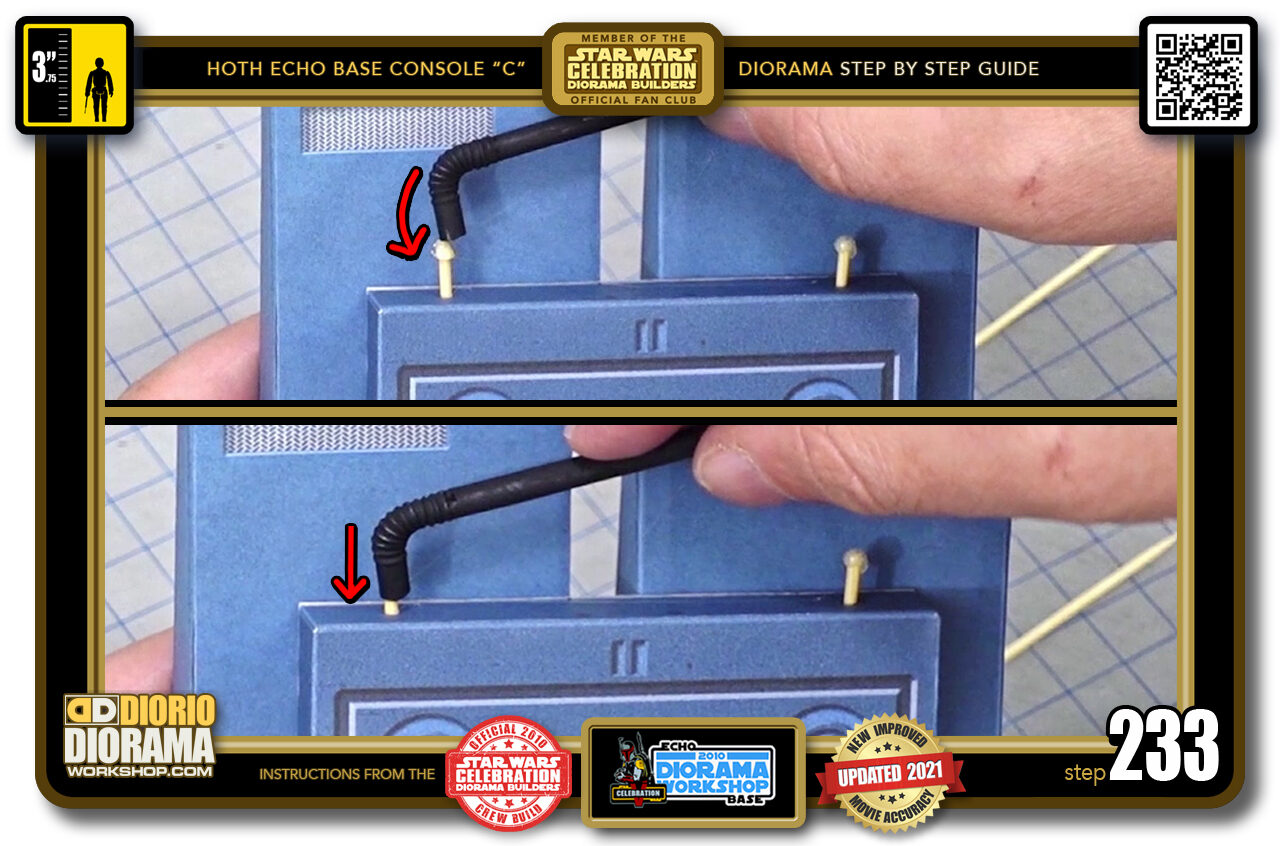
- STEP 233 > Carefully lower the left of your straw around the left toothpick, keeping as much glue inside the straw as possible (top image) then slightly lower to prevent it from popping out when placing the other side (bottom image)
-
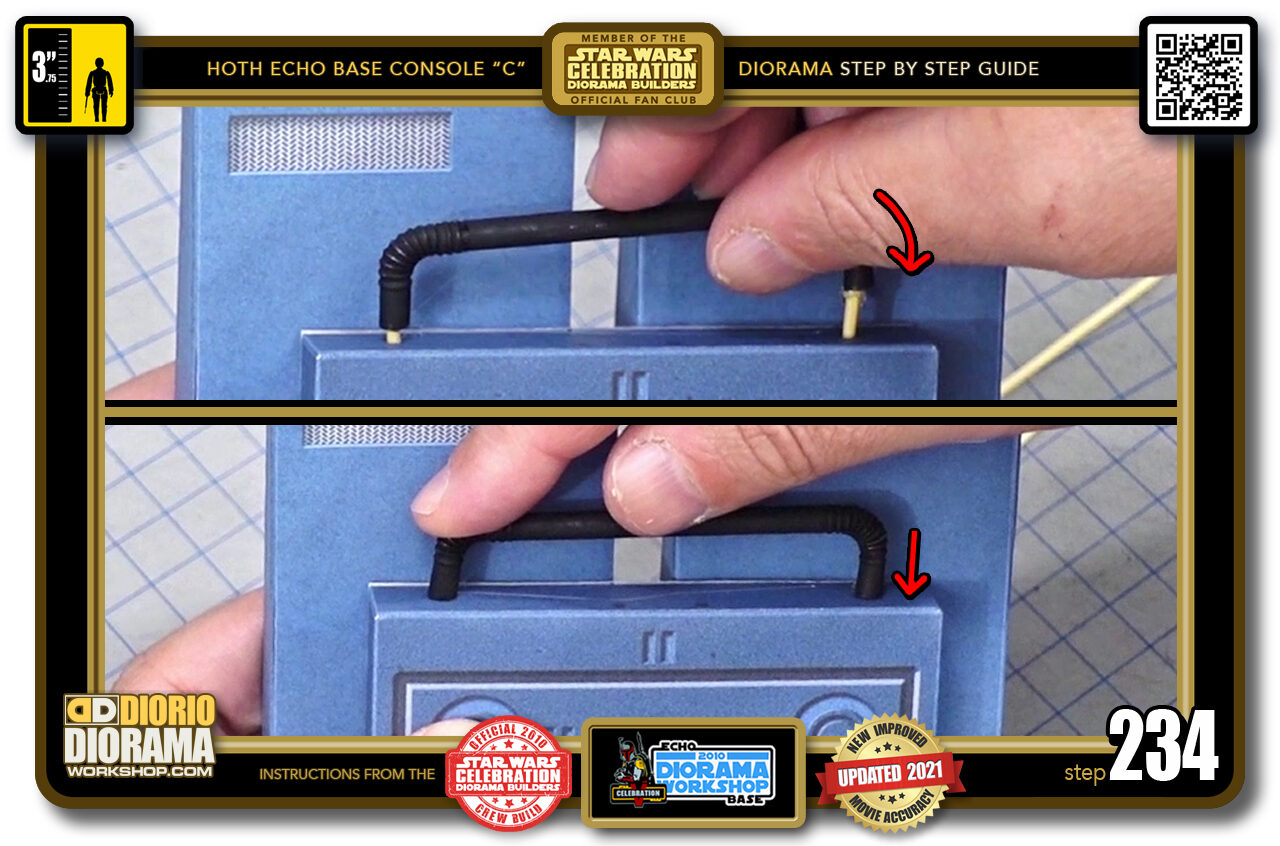
- STEP 234 > Now carefully lower the right side of the straw on the toothpick keeping an eye that the left side hasn't popped out (top image) Once inserted, you can press down on both sides until the straw touches the edge (bottom image).
-
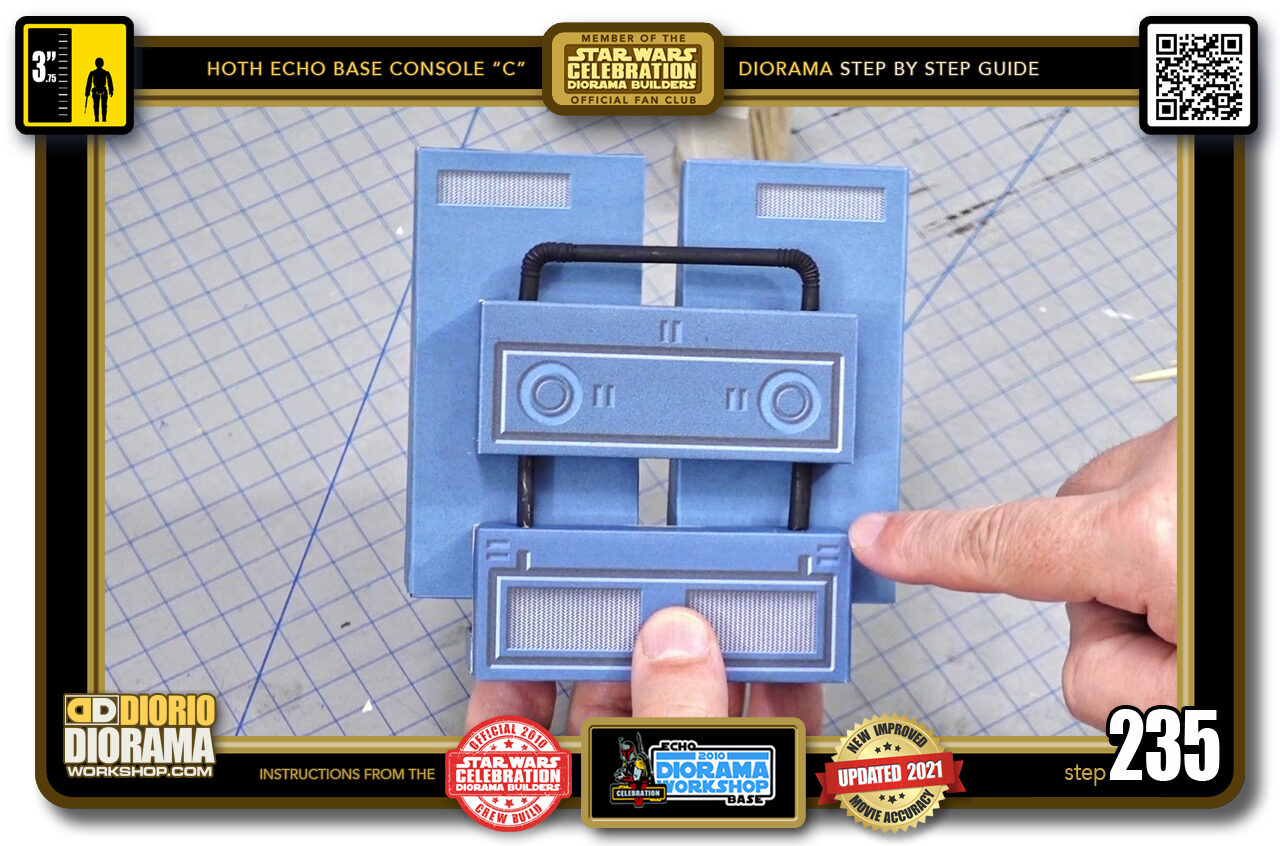
- STEP 235 > Your console now looks like this. See how the middle side straws look like they are going through the body and emerging out the other side giving the illusion of one big pipe bending to form a upside down "U"
-
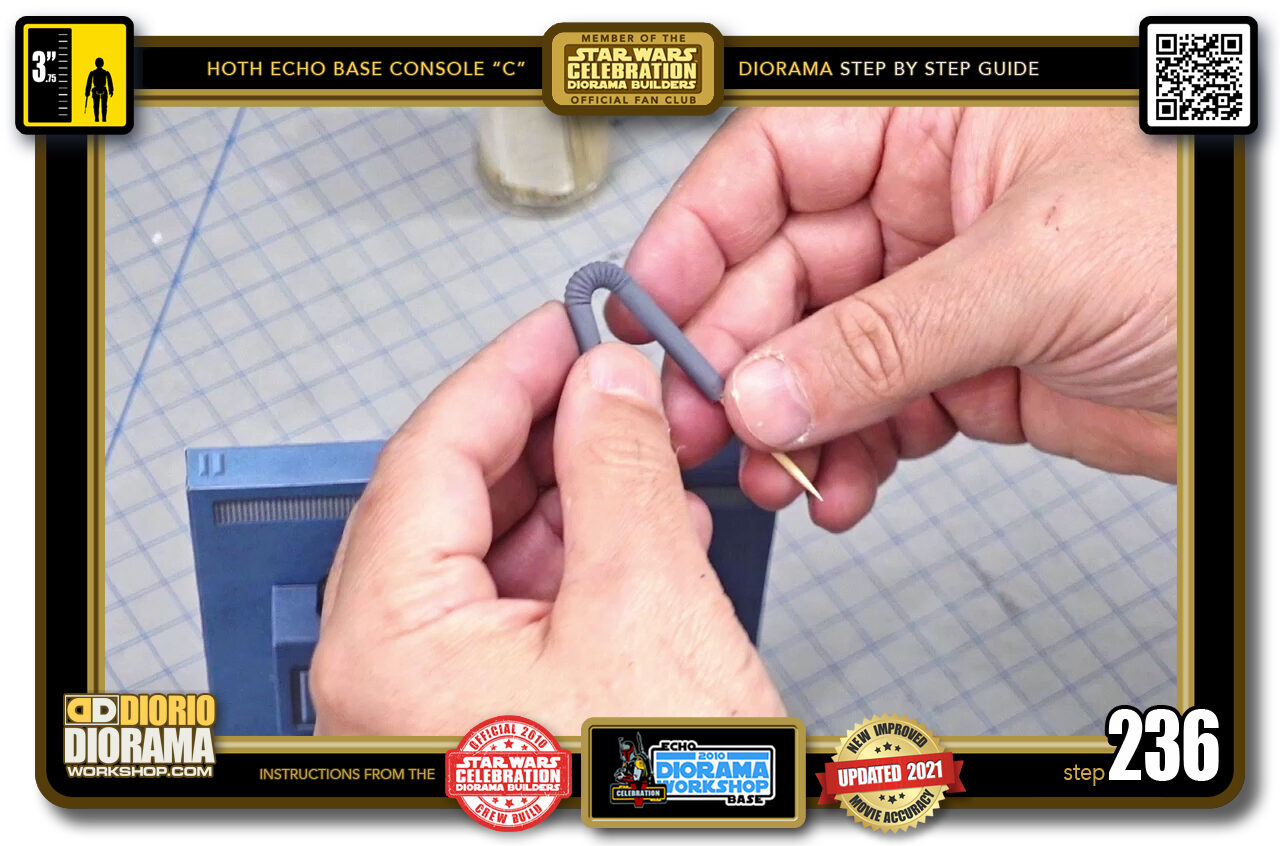
- STEP 236 > Now we need to attach our "V" straw.
-

- STEP 237 > Take a toothpick and place it at an agle on top of your left dot guide (left image) Put pressure and pierce the decal and foamcore then press it down half way (centre image) Repeat the same with a 2nd straw on the right dot guide (right image).
-
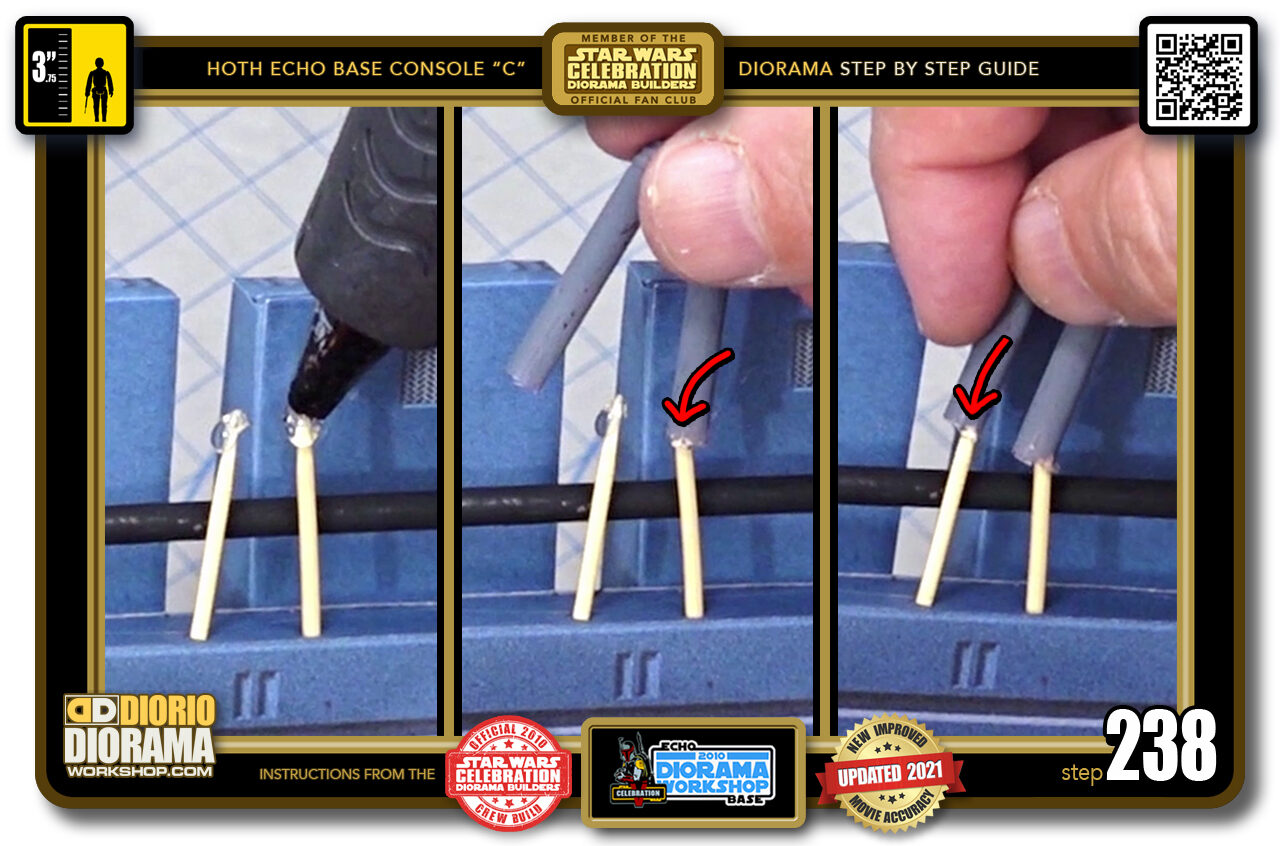
- STEP 238 > Just a little dot of hot glue (left image) is all you need before lowering the right side of your "V" straw over the toothpick (centre image). Try and keep as much glue inside the straw. Then squees the "V" closer together until the other side can fit over the first straw and release (right image).
-
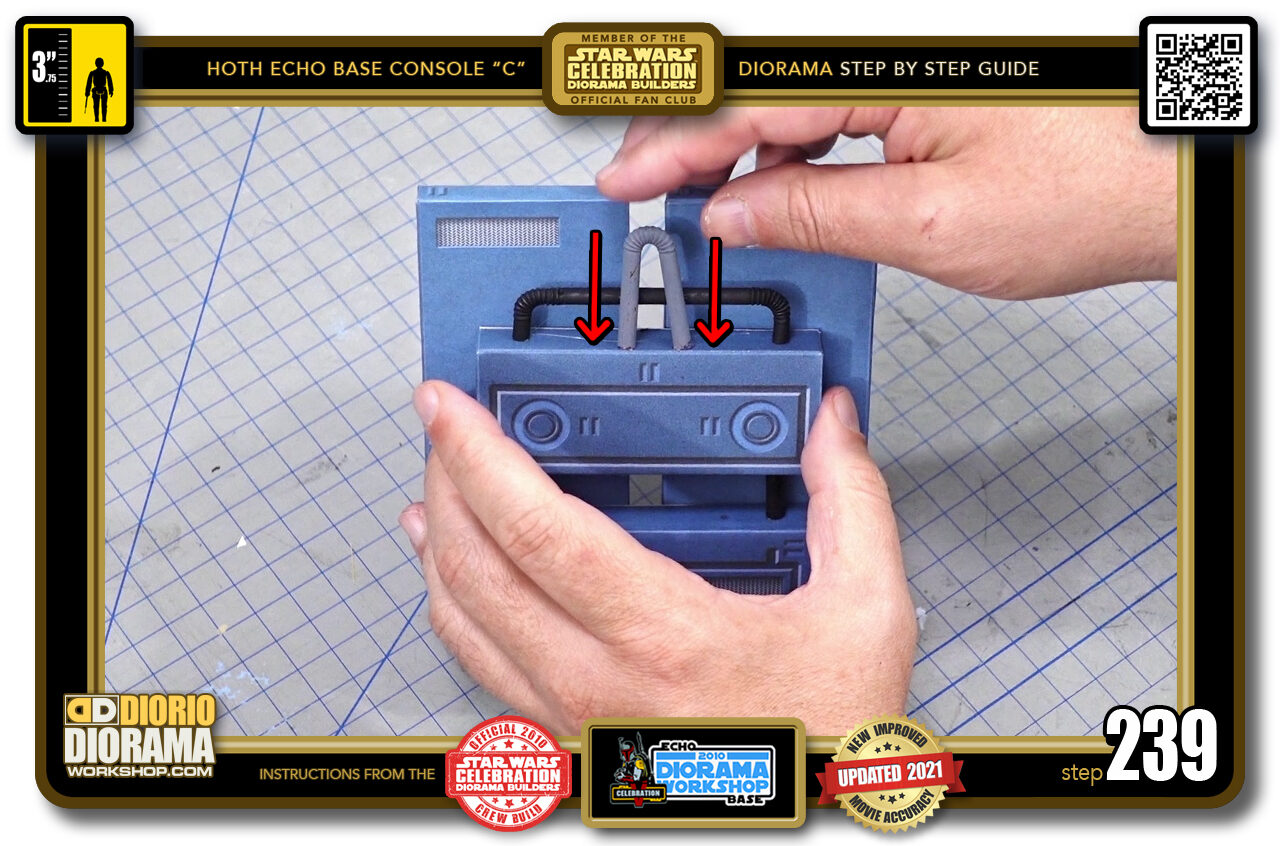
- STEP 239 > Press down until bot sides reach the edge of your top rear shape (red arrows)
-
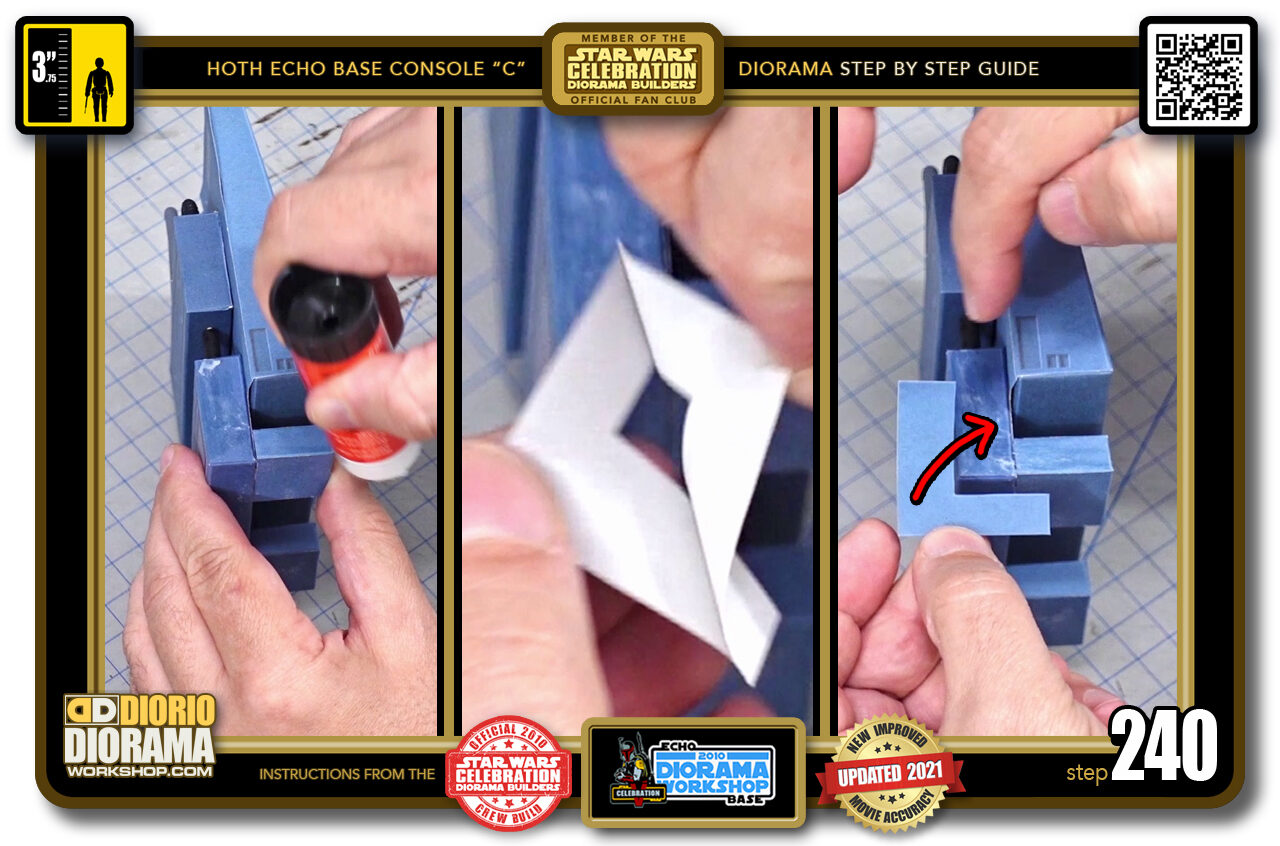
- STEP 240 > Last but not leaast the foot covers. This is optional but it looks so good I doubt you will get lazy at this point and skip this step, but you can if you want 🙂 Start with gluestick on the outside of your console foot (left image) Peel back your last decal. (centre image) If doing the left foot as in the photo you want the decal that has the wider edge on the left of it's "L" shape. Align your "L" decal to the side of your foot (right image). As you can better see here, the left of the "L" is wider than the bottom which is the foot base.
-
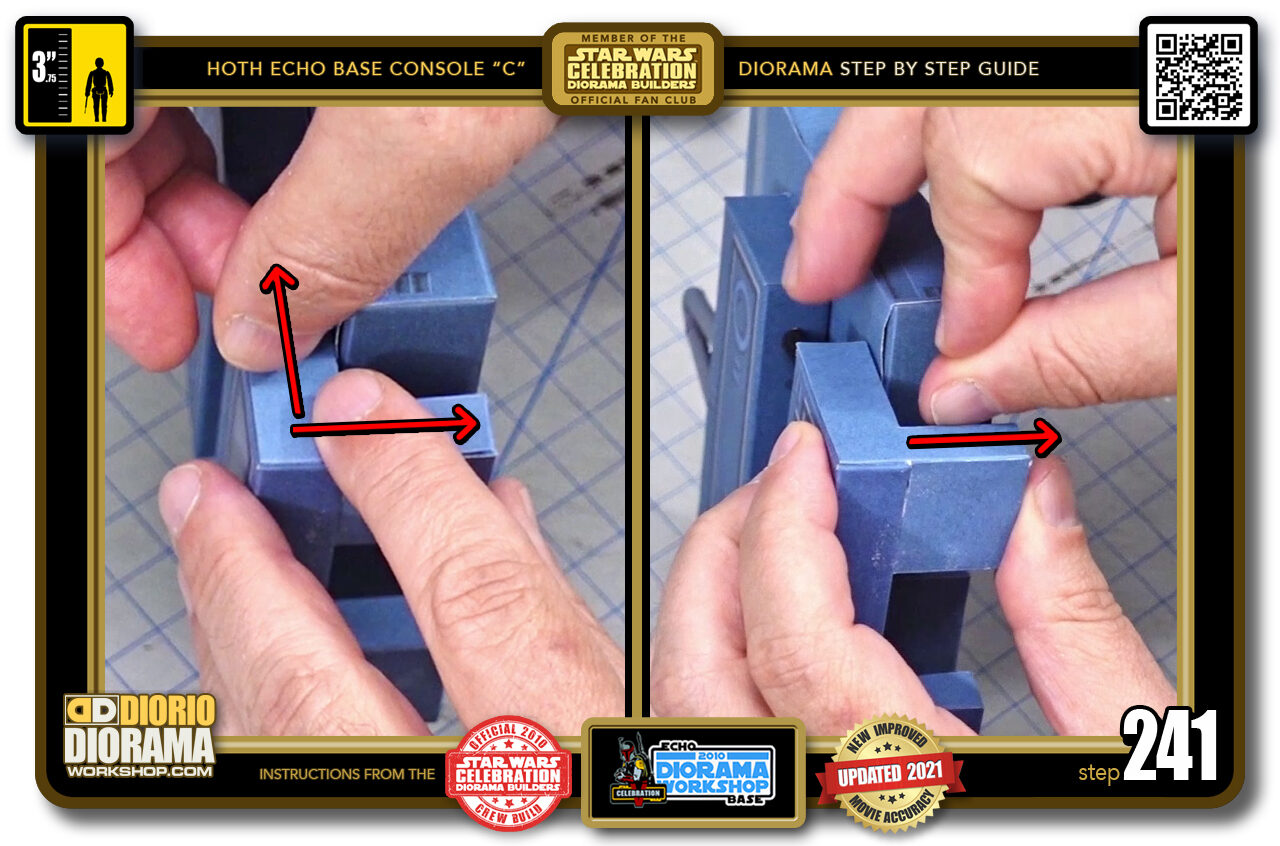
- STEP 241 > Once aligned press centre to the top and centre to the right (left image) You can then use your fingernail technique to better fuse the decal edges together (right image)
-
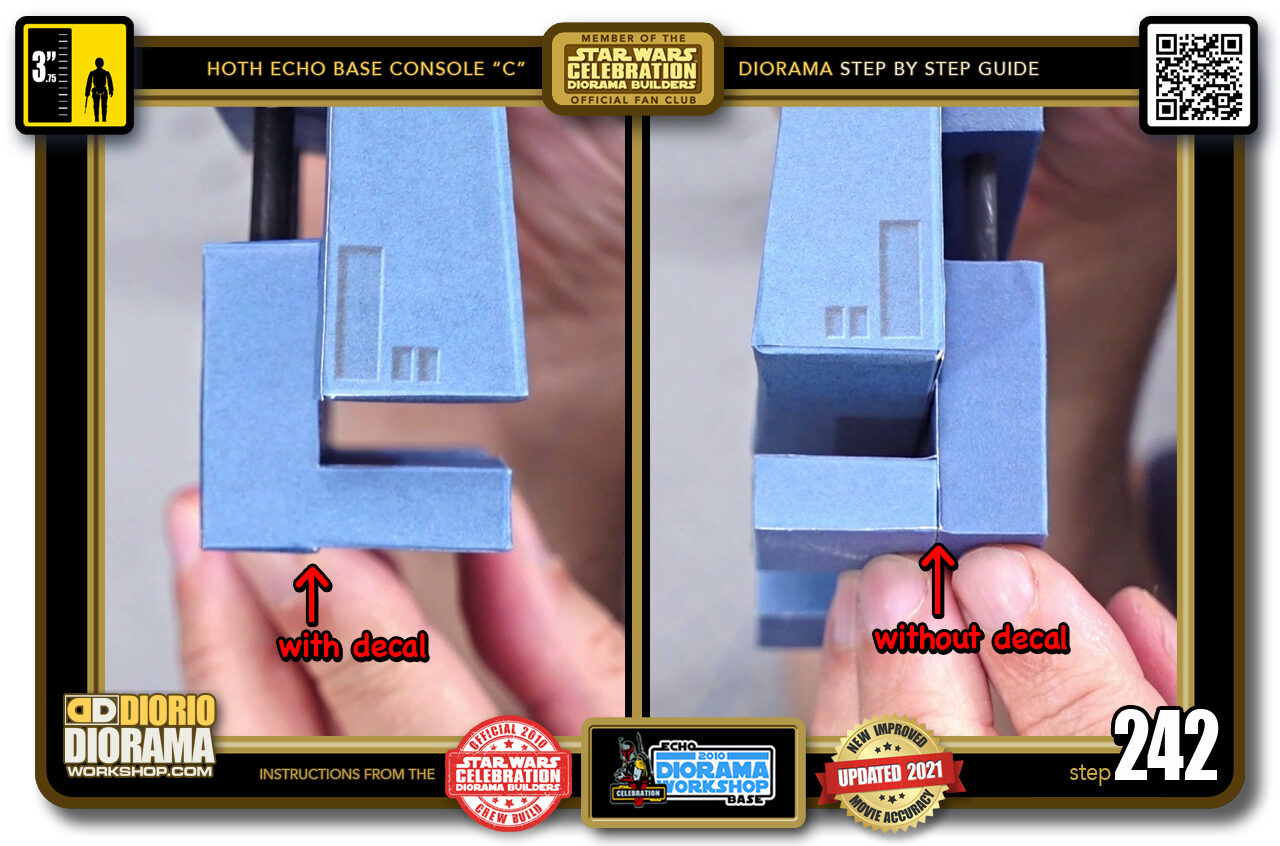
- STEP 242 > Here you can see the difference on the sides with the decal applied (left image) and without it (right image) As you can see there is a difference and I think taking 2 minutes more is well worth it don't you ?
-
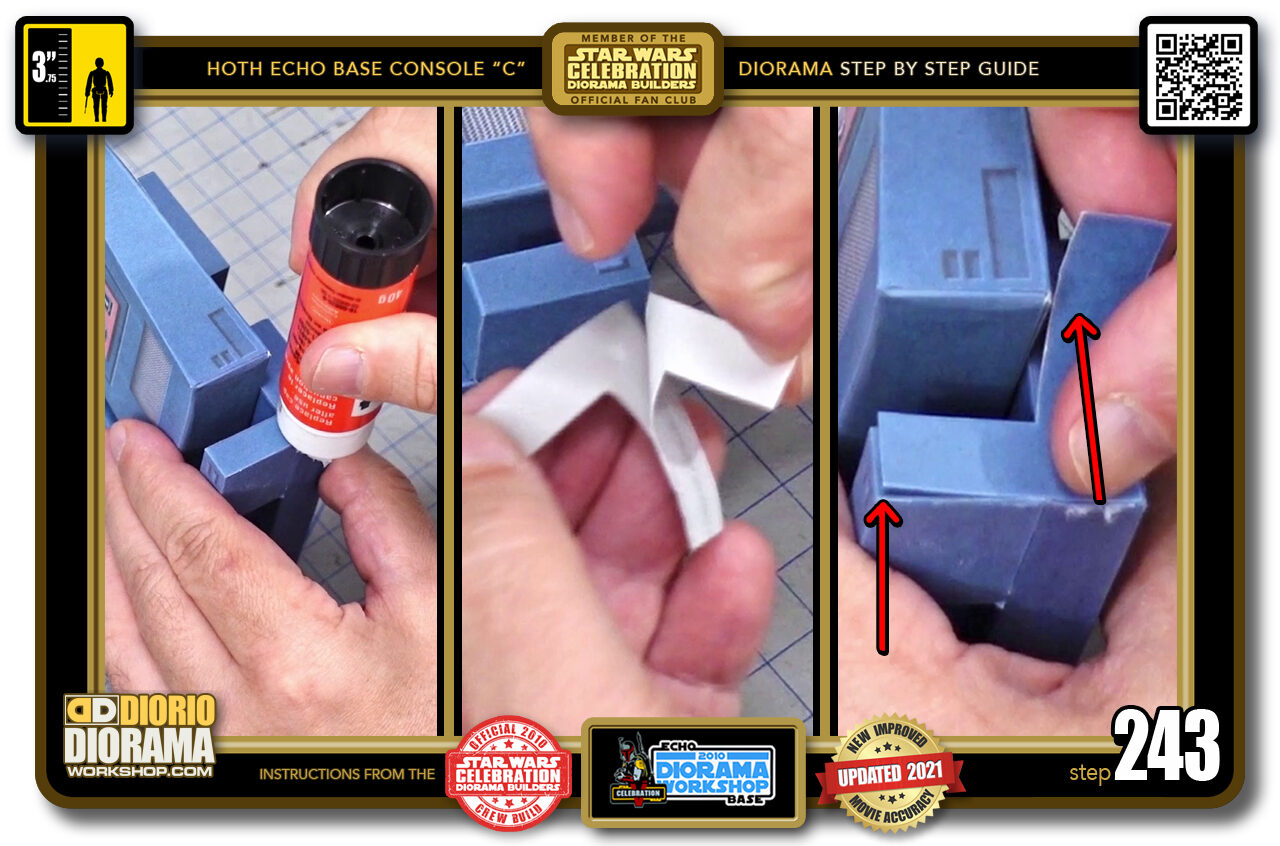
- STEP 243 > Flip the console to the other side and repeat. Gluestick the bottom and right (left image) Peel your decal (centre image) Align and place your decal along the foot's side (right image).
-
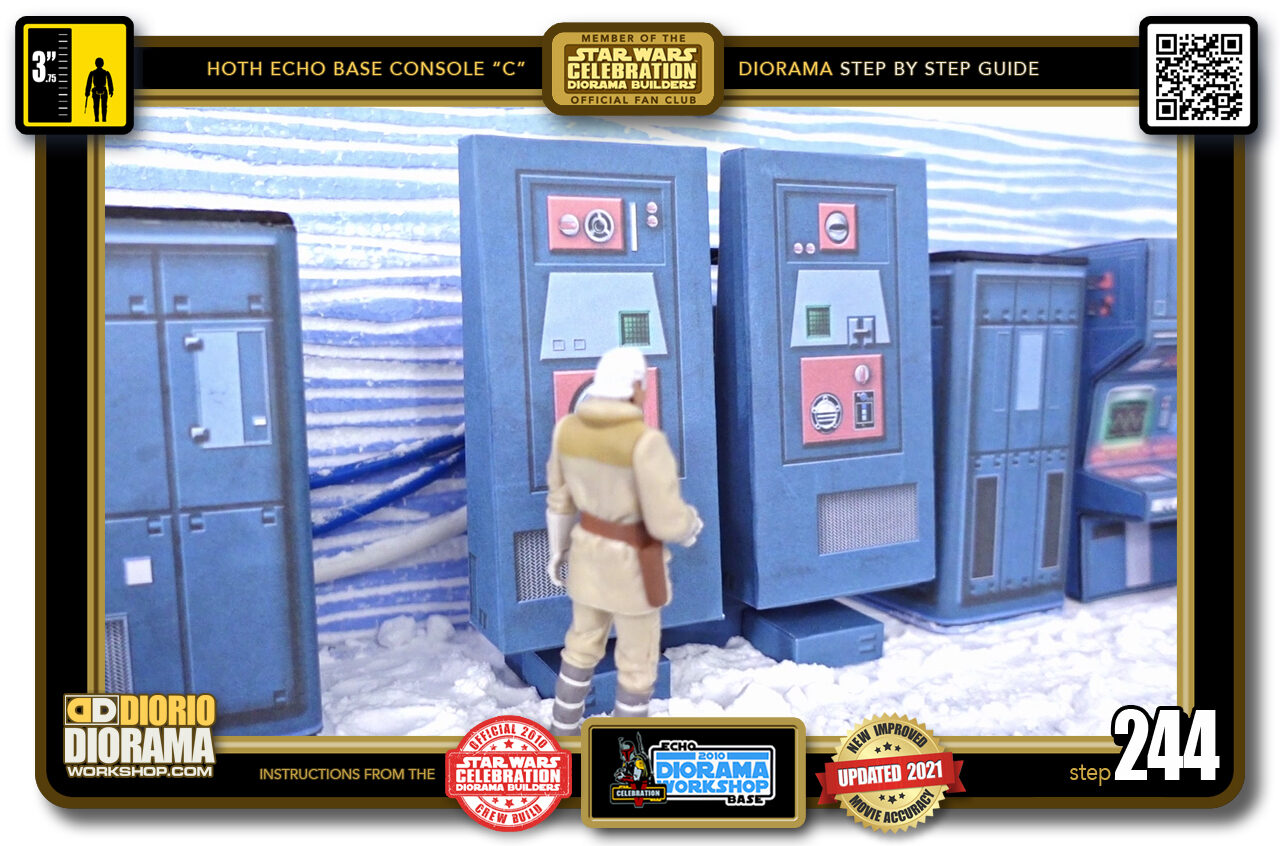
- STEP 244 > And there your Rebel "C" console is complete.
-
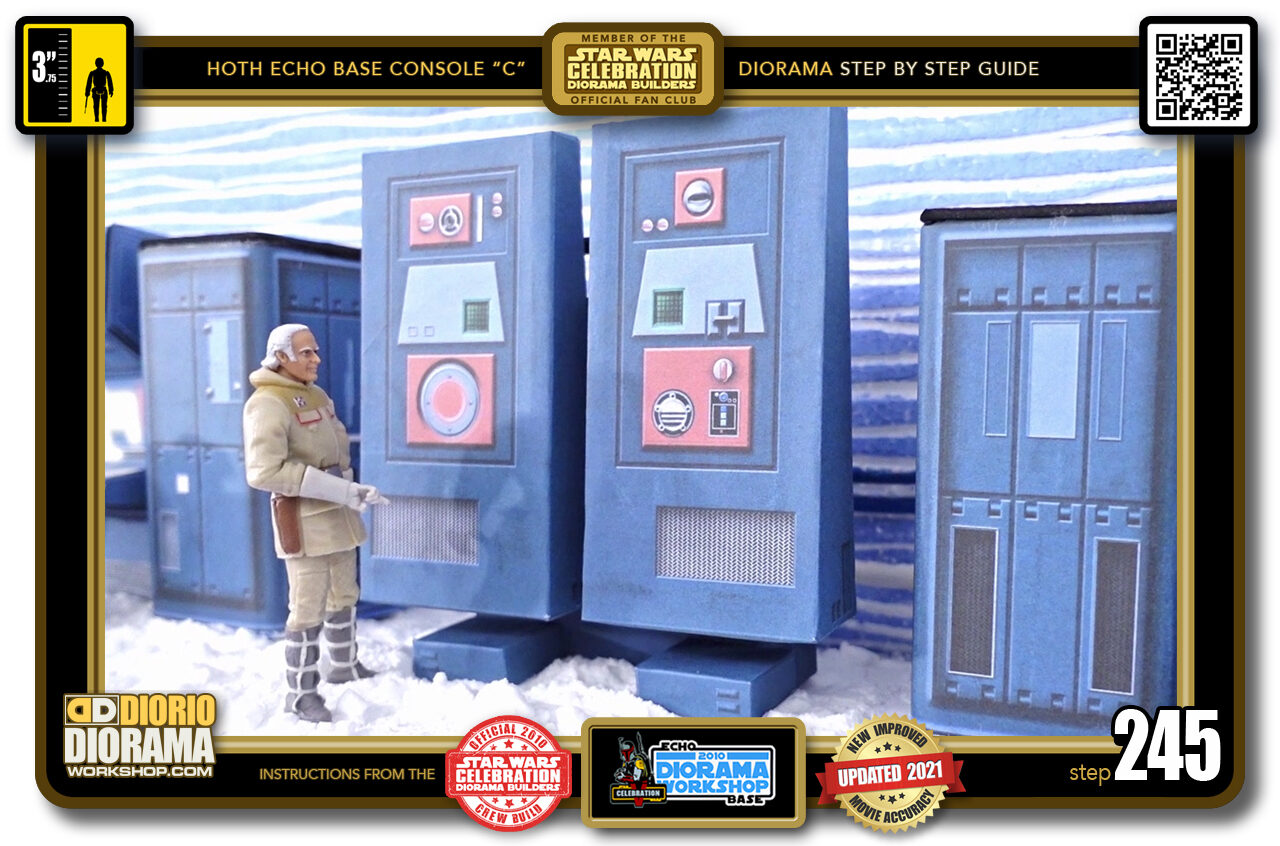
- STEP 245 > You can place it in any of your Hoth Echo base dioramas. In the movie it can be seen under the arches of the main hangar near the snow speeders.

.
Did you already build this Diorama ? At home or at our Star Wars Celebration Diorama Builders workshop ? Would you like to show it in the site’s GALLERY VISITORS DIORAMAS section, YES ? That is Awesome !!! You can find out all the details on how to email me your photos on the VISITORS SUBMISSIONS INFO page … When I get your photos, I will create your very own page just like this one. You may not realize it but work does inspire others to join in the fun of making Action Figure Dioramas.
.
NOT FOR RESALE ALL Decals, tutorials and artwork are ©FrankDiorio (dioramaworkshop.com) and offered FOR FREE to the fans – that would be you ? so you can build and display my diorama designs in your very own home. I realize I cannot control what one does with my graphics once I place them on the web, I can only ask you as one fan to another, please respect the artist and do not be that jerk who uses my designs and tutorials to build a copy of my work only to sell it on EBAY or trade/sale groups and forums. Thank You. Frank.
.

.
.
If you have a facebook account, why not join the Official Diorama Builders Fan Club today, simply click the logo link below.
 .
.
Catch up with fellow visitors and exchange stories, read cool interviews with the crew, exchange photos, fun surprises and grab some FAN ONLY merchandise next year at actual future conventions ?
.
©2021 Frank Diorio DioramaWorkshop.Com
.
IF YOU LIKE WHAT YOU SEE, PLEASE SHARE WITH YOUR FRIENDS
USING THE SOCIAL MEDIA BUTTONS BELOW