


-
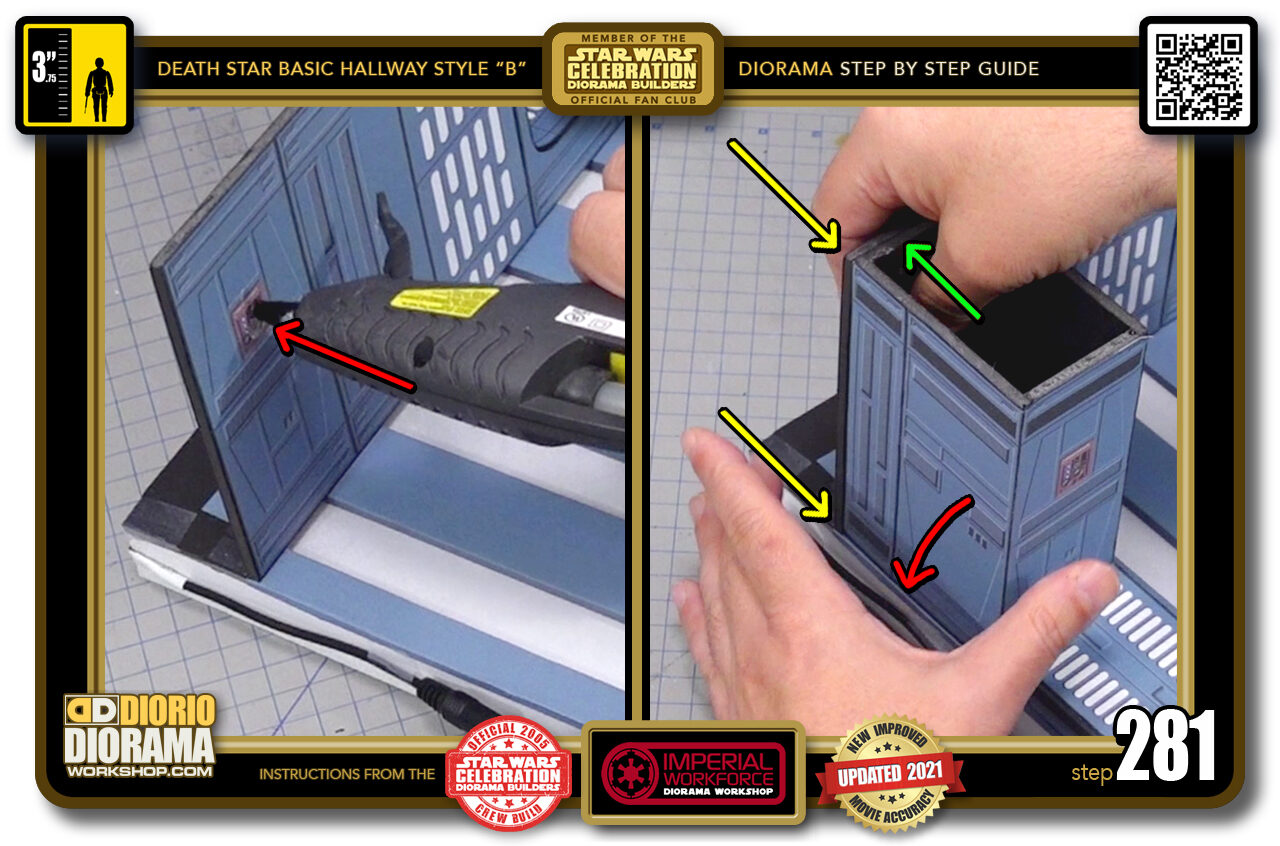
- STEP 281 > Also put a quick glob of hot glue on the end panel decal (left image red arrow) Carefully press the arch against the wall (right image green arrow) then lower it until it touches the ceiling and flush against the corner (right image red arrow) Last push the wall up against the archway at the top (right image yellow arrows).
-
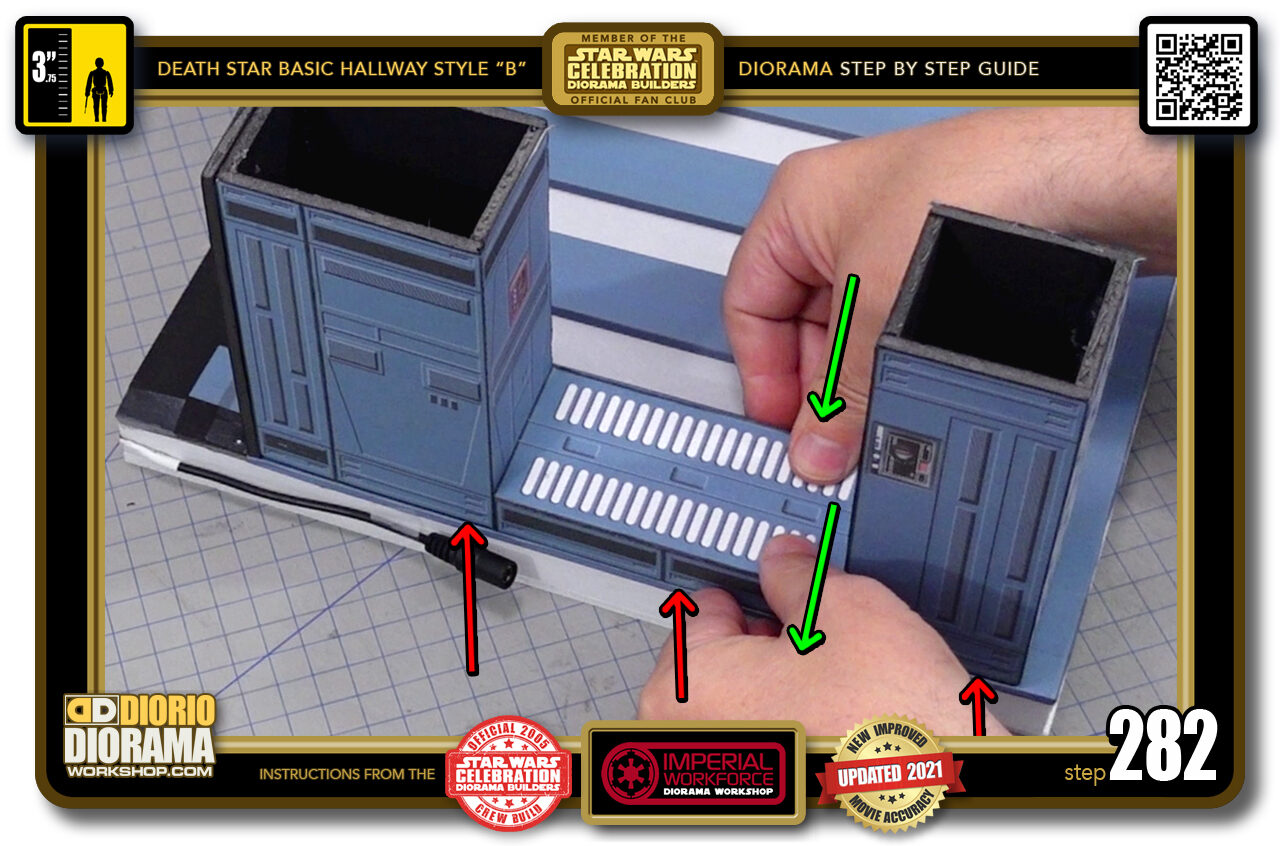
- STEP 282 > You now want to make sure your archway is flush against the ceiling's side edge (red arrows) at which point you can start applying downward pressure (green arrows).
-

- STEP 283 > Now for the opposing corner I will be attaching my column.
-
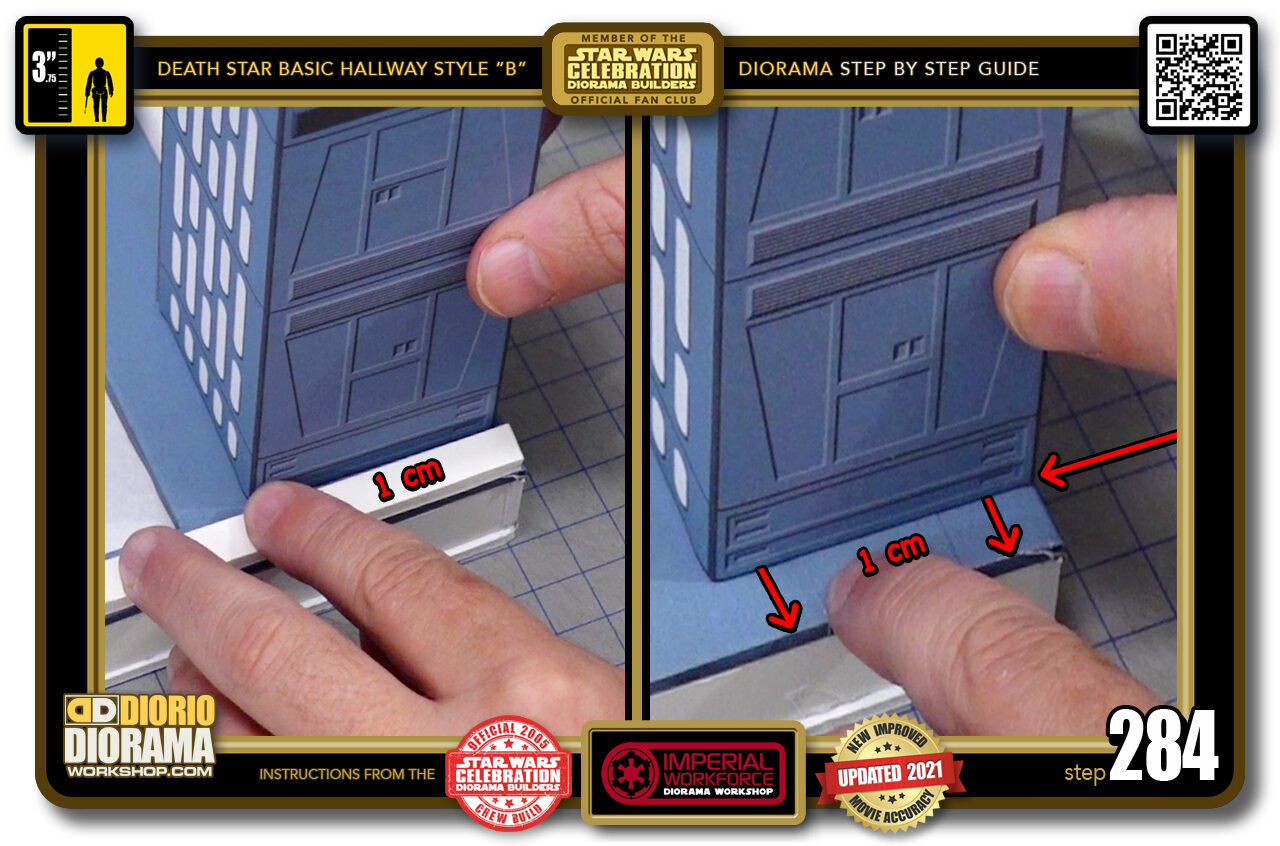
- STEP 284 > You can use a 1cm scrap foamcore to give you the correct distance from the edge (left image) You can then remove the scrap leaving you with your 1cm gap in the front of the diorama. Then make sure you are flush on the right side of the column (right image red arrows)
-
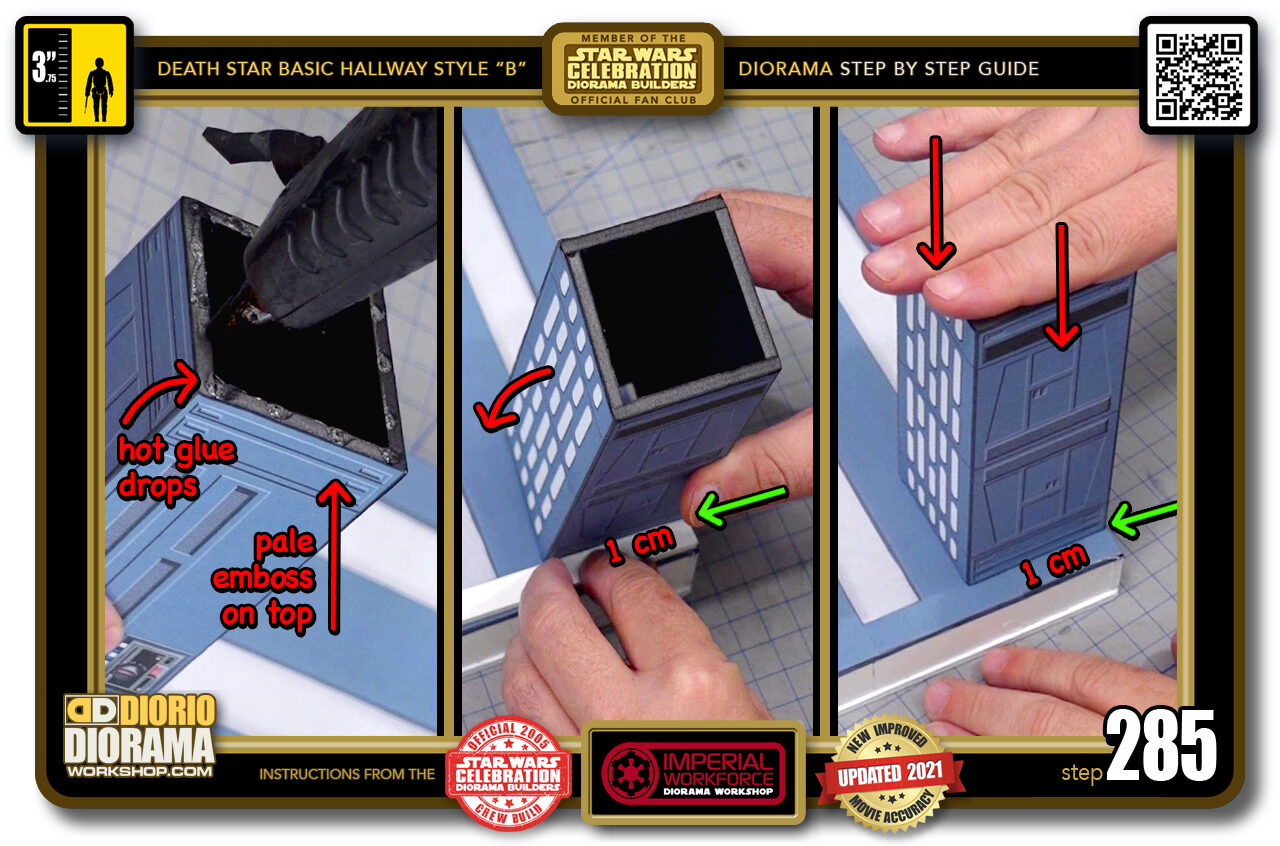
- STEP 285 > Make sure your white emboss lines are at the TOP of your column and apply some hot glue drops along the spines (left image red arrows) Place your 1cm scrap guide flush with the front edge and press your column front against it's edge (centre image green arrow) Then carefully lower your column onto the ceiling until it makes contact (centre image red arrow) Put pressure with your hand for 30-40 seconds until the hot glue has cooled down (right image red arrow).
-
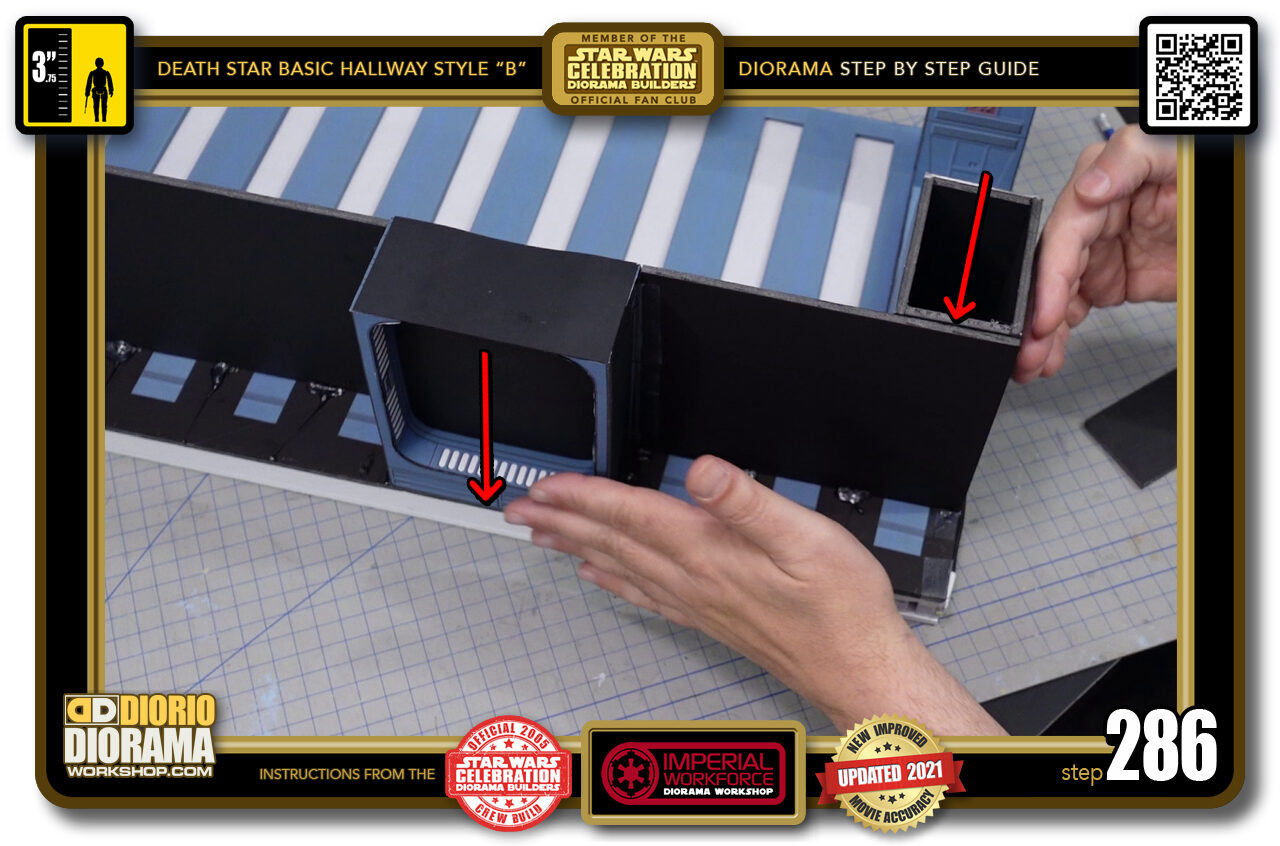
- STEP 286 > Now because the 6cm width of the door and Archway we don't really have an issue for lack of support on this side (red arrows)
-
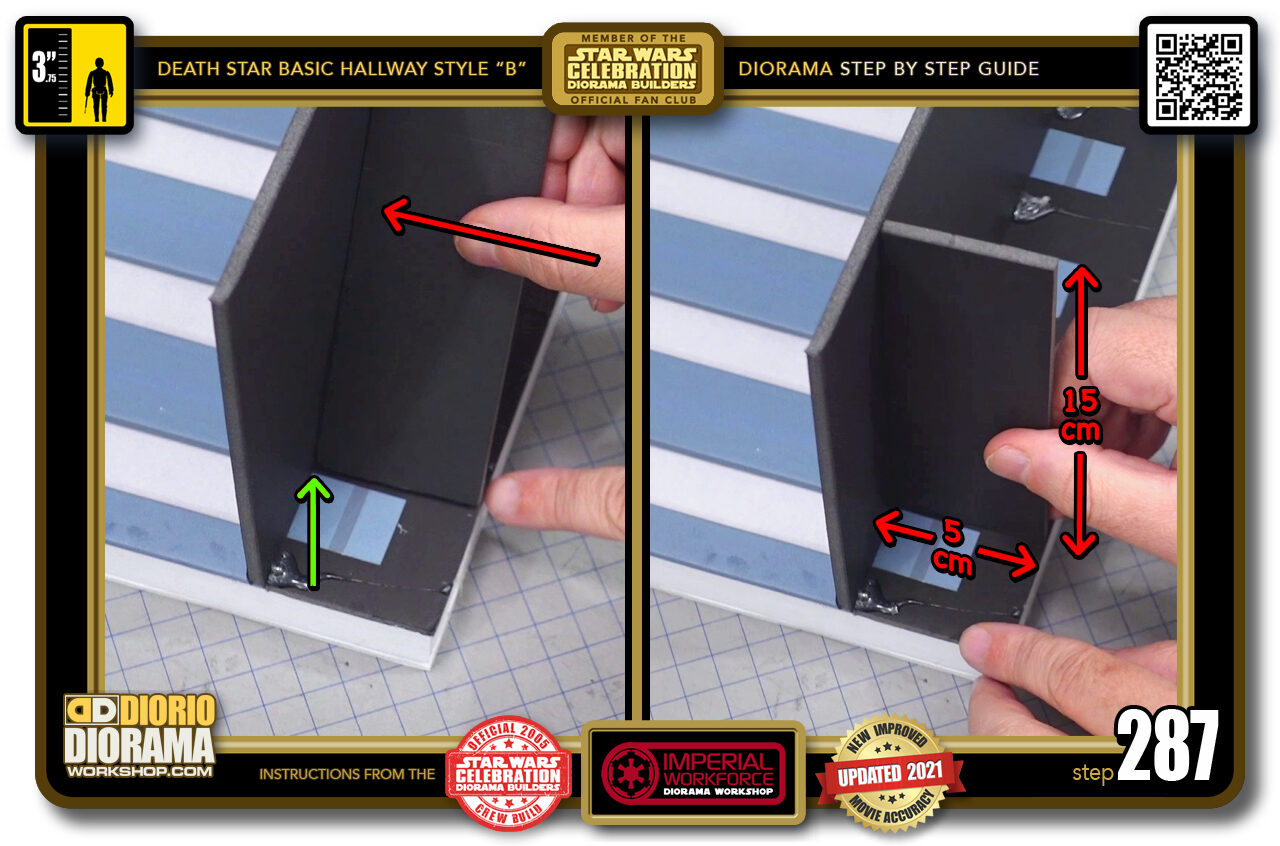
- STEP 287 > On the other end however we will have to add a piece of foamcore (left image red arrow) and have it pressed against the bottom of the wall (left image green arrow) so the the wall stays straight before putting the floor on. So measure a 15cm x 5cm piece of foamcore and we will insert it here against the wall (right image red arrow).
-

-
STEP 288 > NOTE: MUST APPLY ON A BLACK AREA ONLY - DO NOT ATTACH ON TOP OF A BLUE DECAL SKIN ZONE !!!
So apply a line of hot glue along the top spine (left image red arrow) and on the right side spine (centre image red arrow) Place the rear bottom against the wall and ceiling connection (right image green arrow) and then press it at the top against the rest of the wall (right image red arrows) creating a 90 degree support.
-
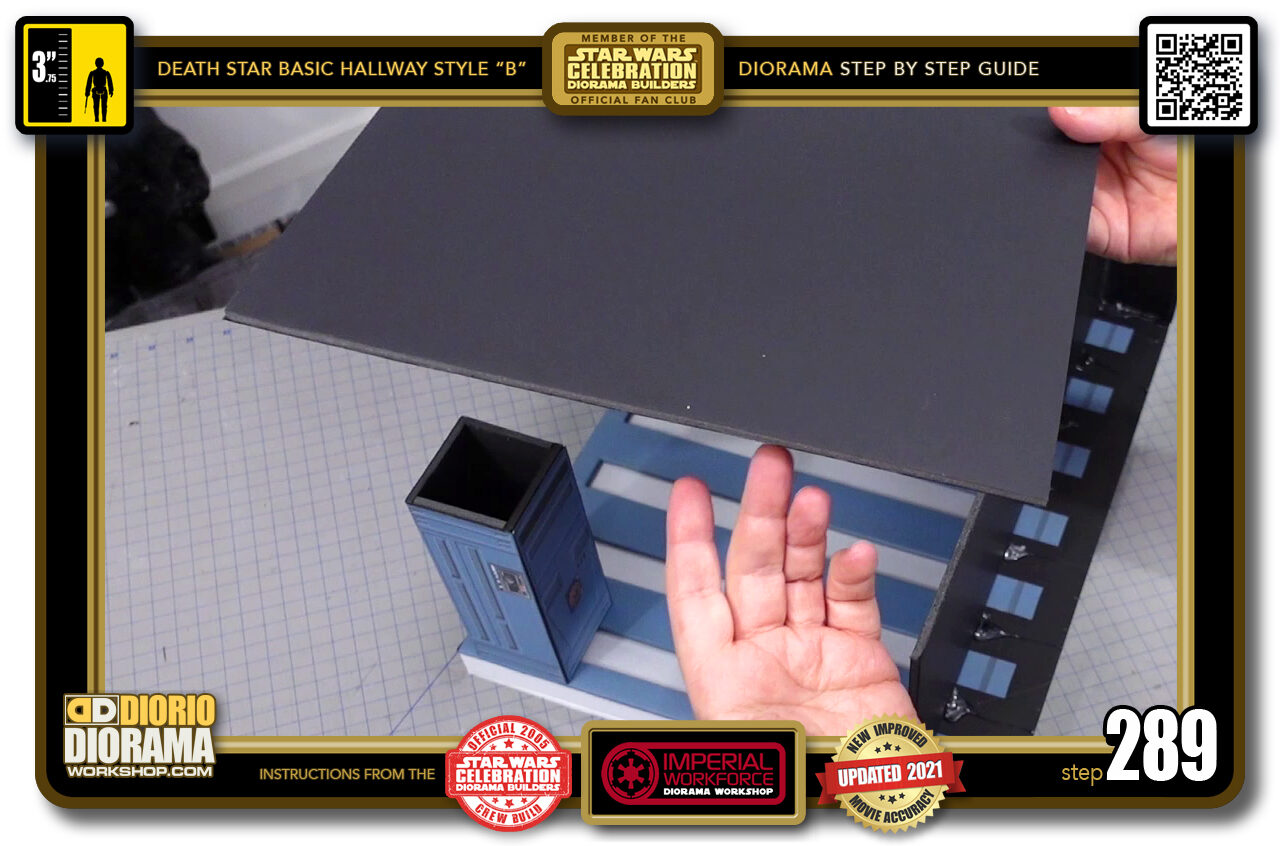
- STEP 289 > We are now ready to connect our floor. You want it with the high gloss on the bottom underside.
-
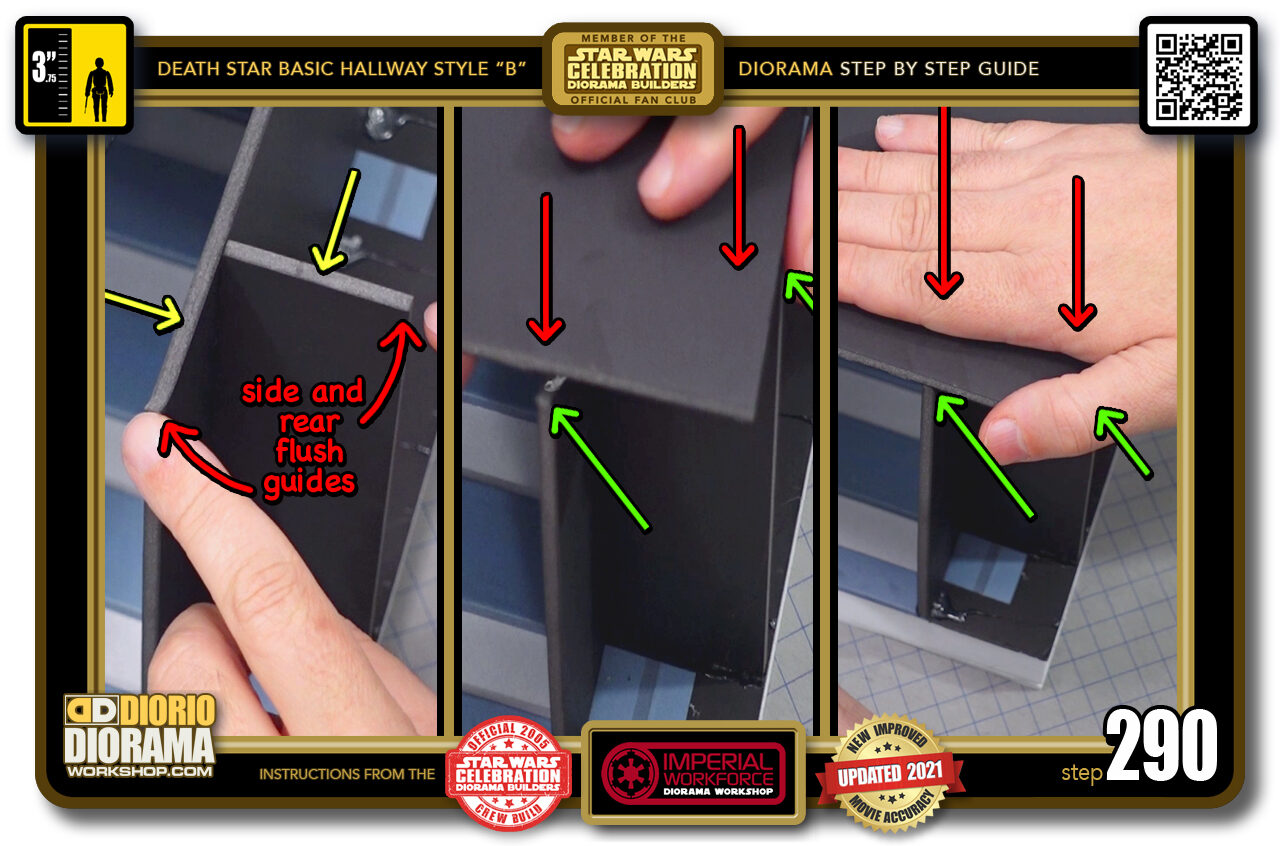
- STEP 290 > We are going to put 2 drops of hot glue on the corner spines (left image yellow arrows) then LIFT the ceiling until you are flush with the corner edges (centre image green arrow. At this point you can lower the floor to make contact with the glue (centre image red arrows) Make sure you are flush on both the side and the rear (right image green arrows) then press down with your hand for 30-40 seconds until the glue cools off (right image red arrows).
-
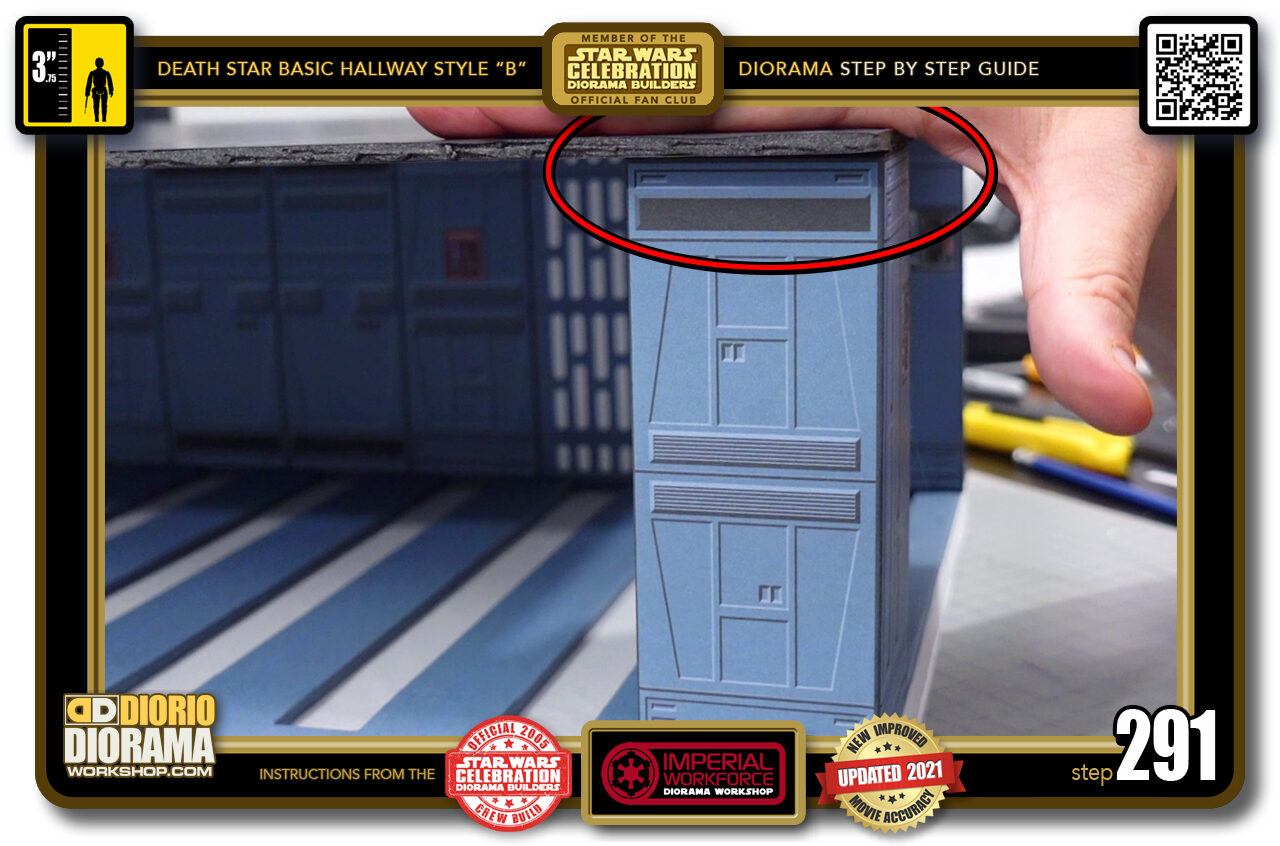
- STEP 291 > Now we are going to want to place the floor flush with the column like you see inside the red circle.
-
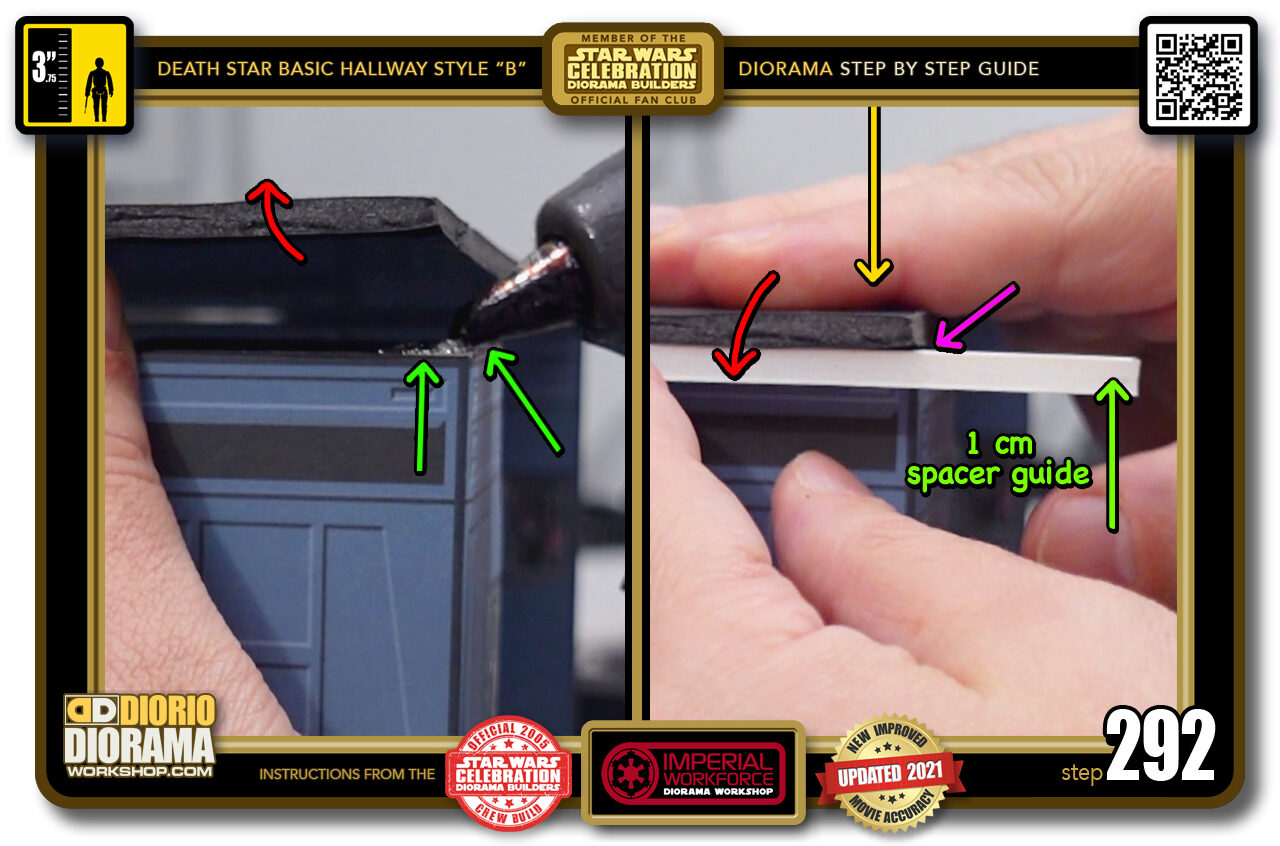
- STEP 292 > Lift the front corner of the floor (left image red arrows) and place 2 drops of hot glue onto the top spines (left image green arrows) Place your 1cm scrap spacer to the front (right image green arrow) This will give you a 1cm gap at the column front then check to make sure the side of the floor is flush with the side of the column (right image purple arrow). When all is aligned, lower the floor to make contact with the hot glue (right image red arrow) Last put your hand on the top and put some pressure for 30-40 seconds or so (right image yellow arrow).
-
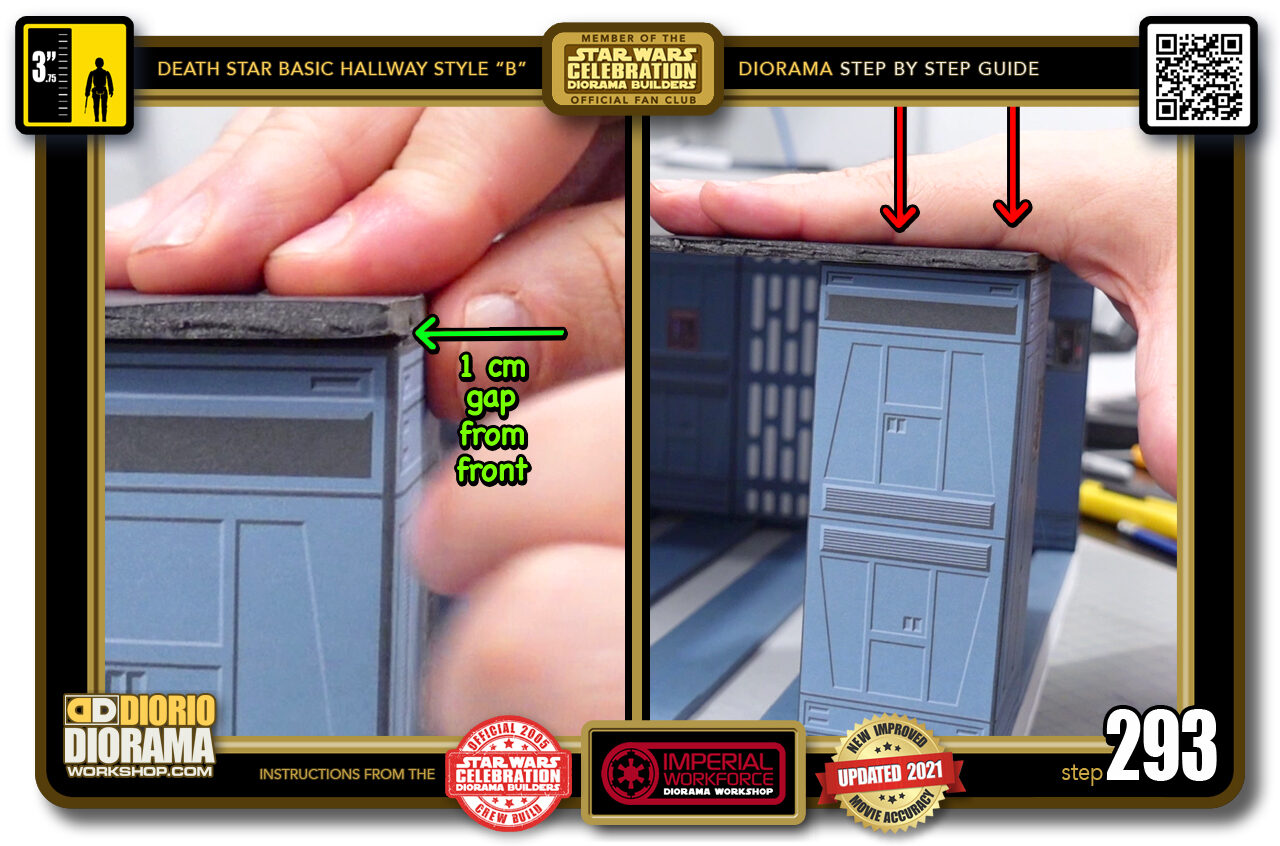
- STEP 293 > After you remove your scrap 1cm guide double check your gap matches the one at the bottom (left image green arrow) and make sure you are still clean and flush at the side. Keep putting pressure on the top until glue has cooled down (right image red arrows).
-
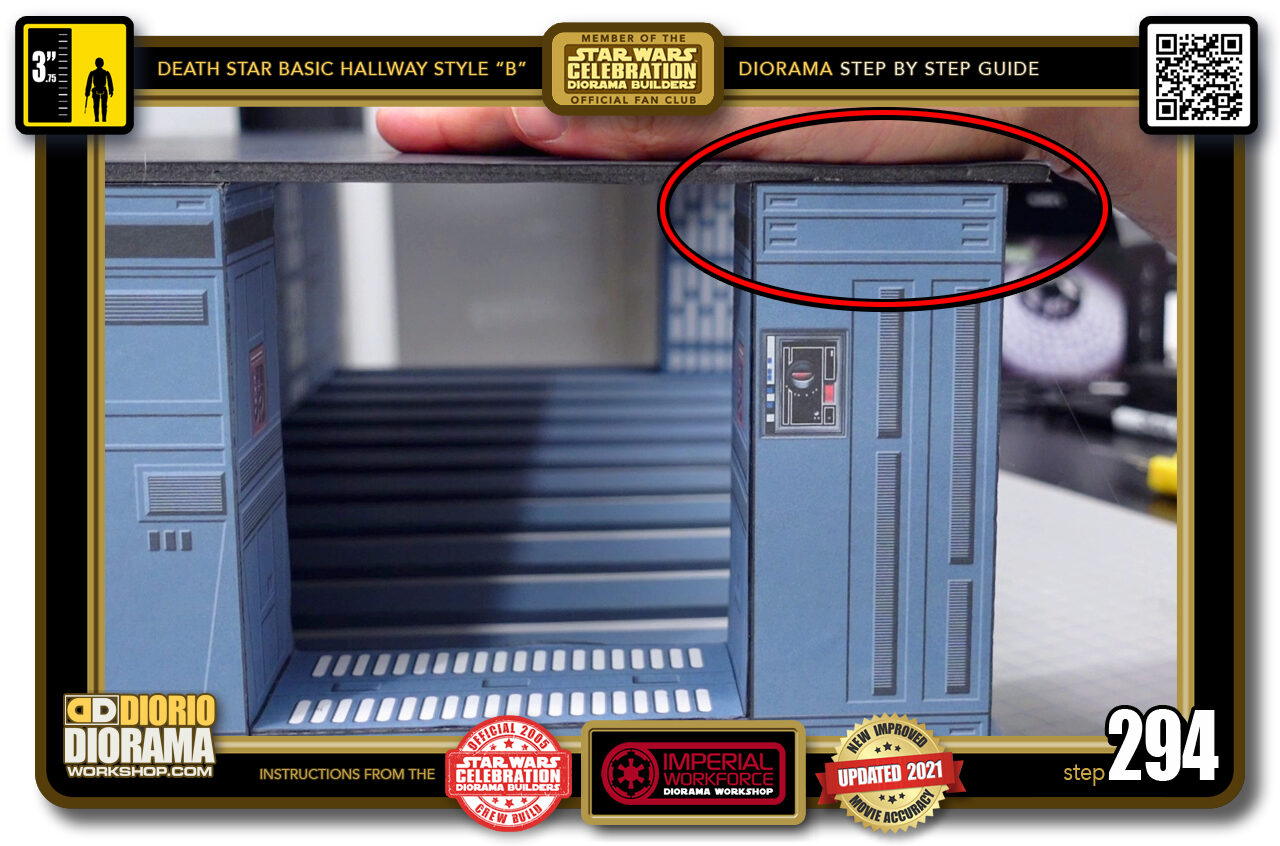
- STEP 294 > Now we have to attach the other side of the hall archway with the floor (inside the red circle).
-
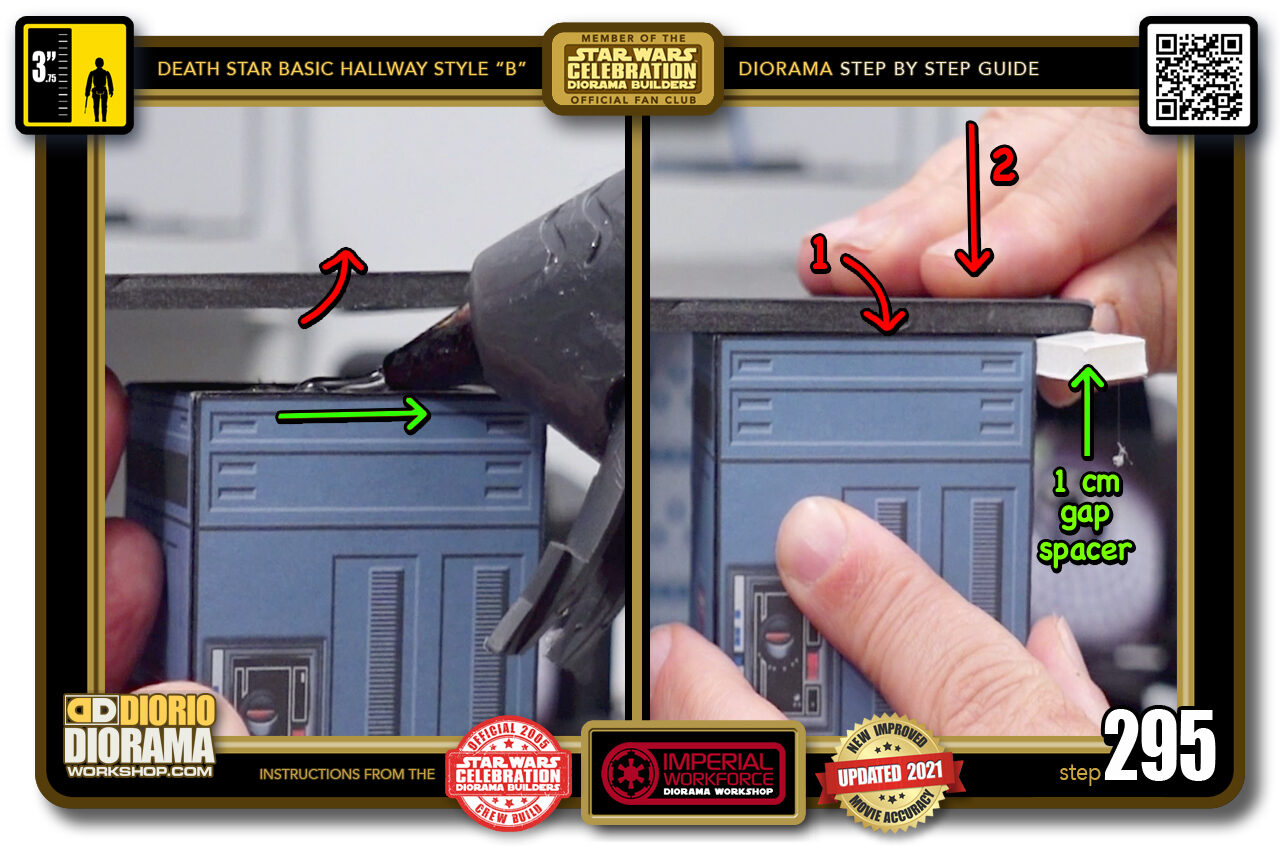
- STEP 295 > Lift up your floor at the front (left image red arrow) and put a small line of hot glue along the top spine (left image green arrow). Now place your 1cm scrap spacer (right image green arrow) and re-align if need be then lower your floor to make contact with the glue (right image red arrow 1) put some pressure with your hand for 30-40 seconds until the glue cools down (right image red arrow 2).
-
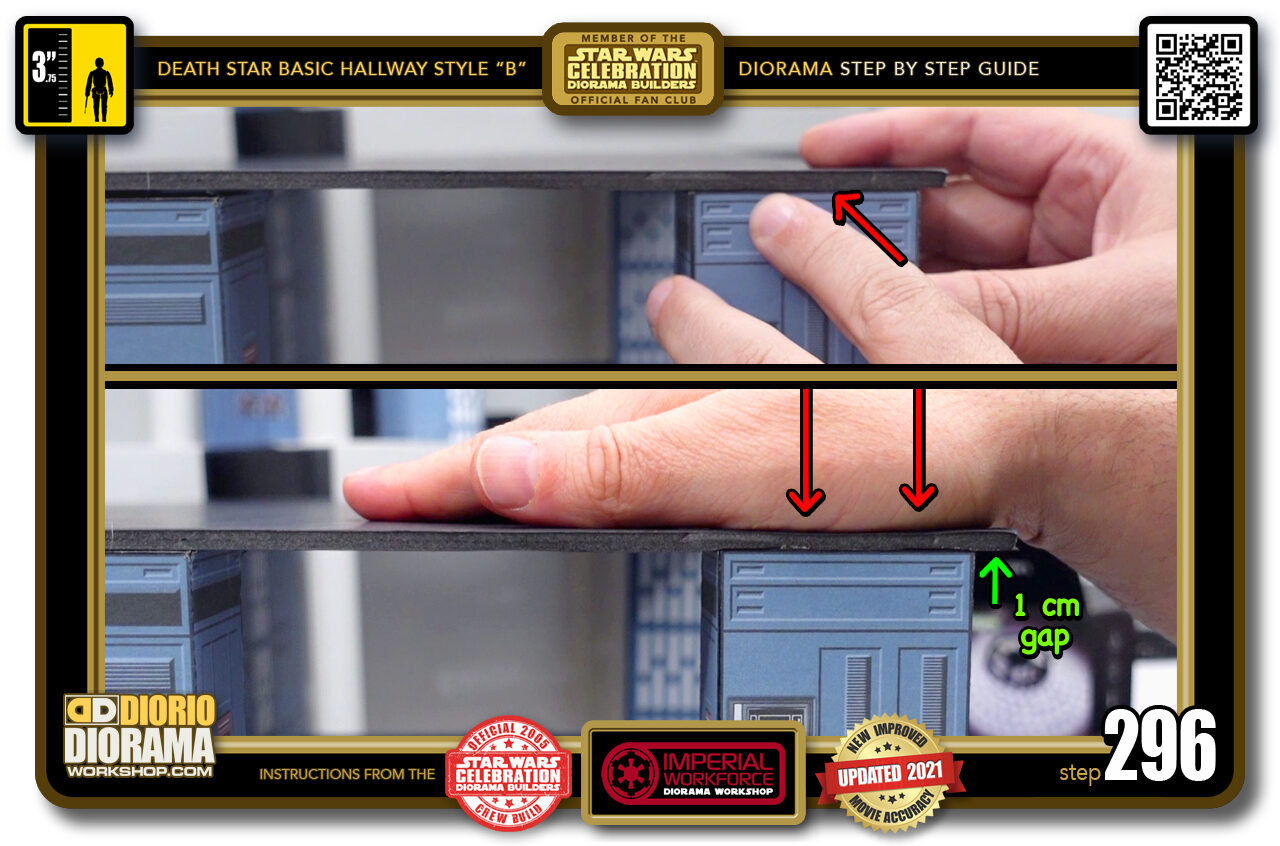
- STEP 296 > Make sure your side is flush against the archway side (top image red arrow) and that your 1cm gap (bottom image green arrow) matches the bottom one. Keep pressure going until glue is cool (right image red arrows).
-
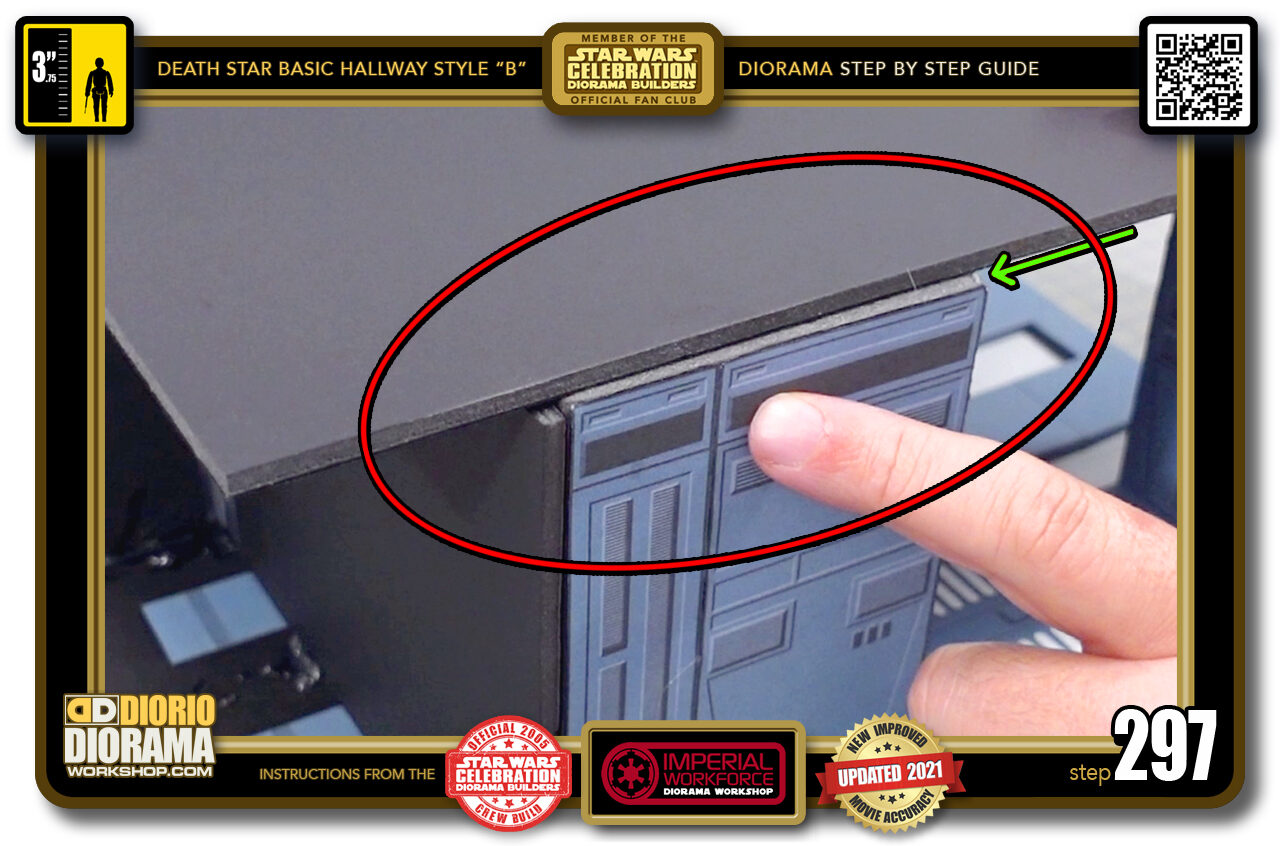
- STEP 297 > Now for the rear section of the archway that is against your wall, this needs to be flush with the floor (inside red circle). At the moment it sticks out a little at the top (green arrow).
-
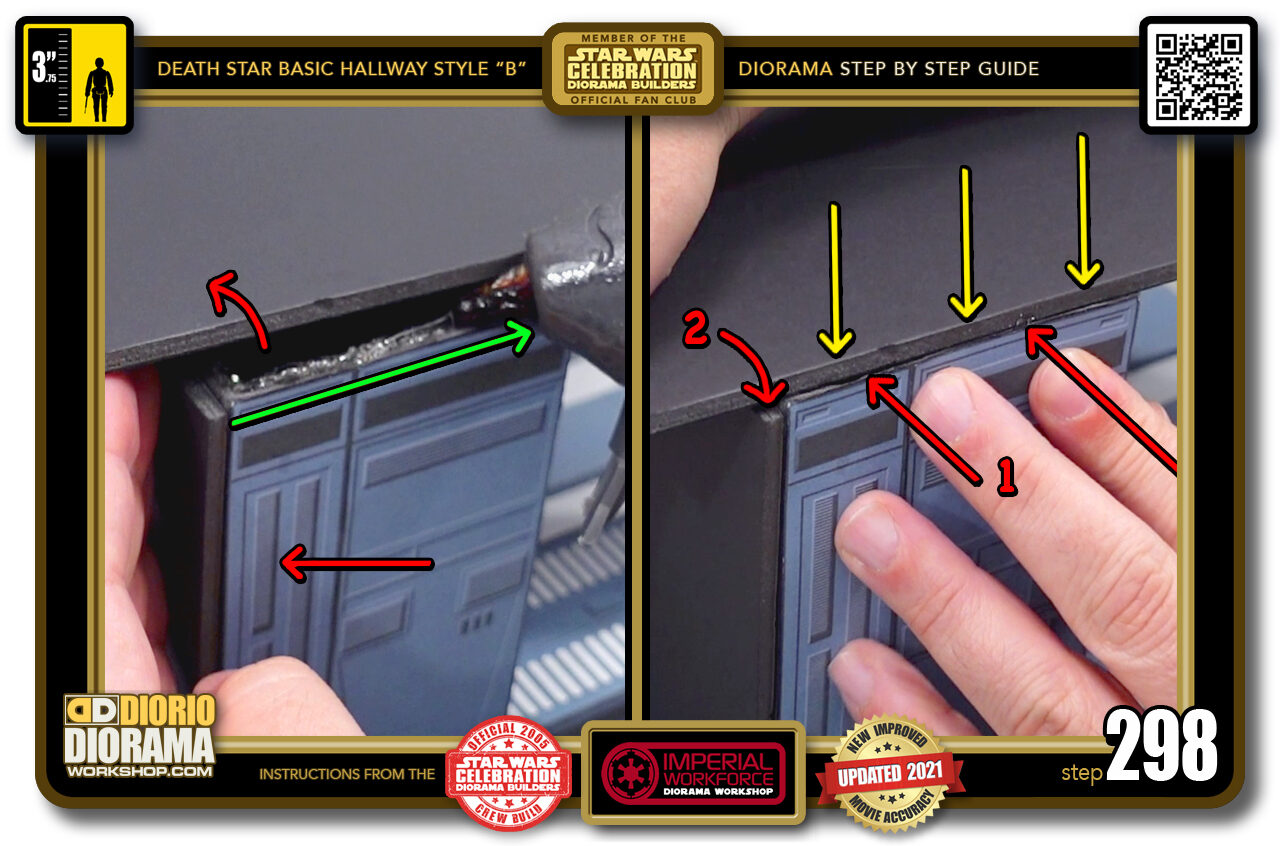
- STEP 298 > Lift the floor (left image red arrow) and apply a small line of hot glue along the spine (left image green arrow) In my case I need to push the archway towards the inside (right image red arrows 1) When flush with the floor edge, I can lower the floor to make contact with the glue (left image red arrow 2) At this point I need to put a LOT of pressure (right image yellow arrows) to make sure this massive archway chunk doesn't pop back out. Press for 1-2 minutes until glue cools off.
-
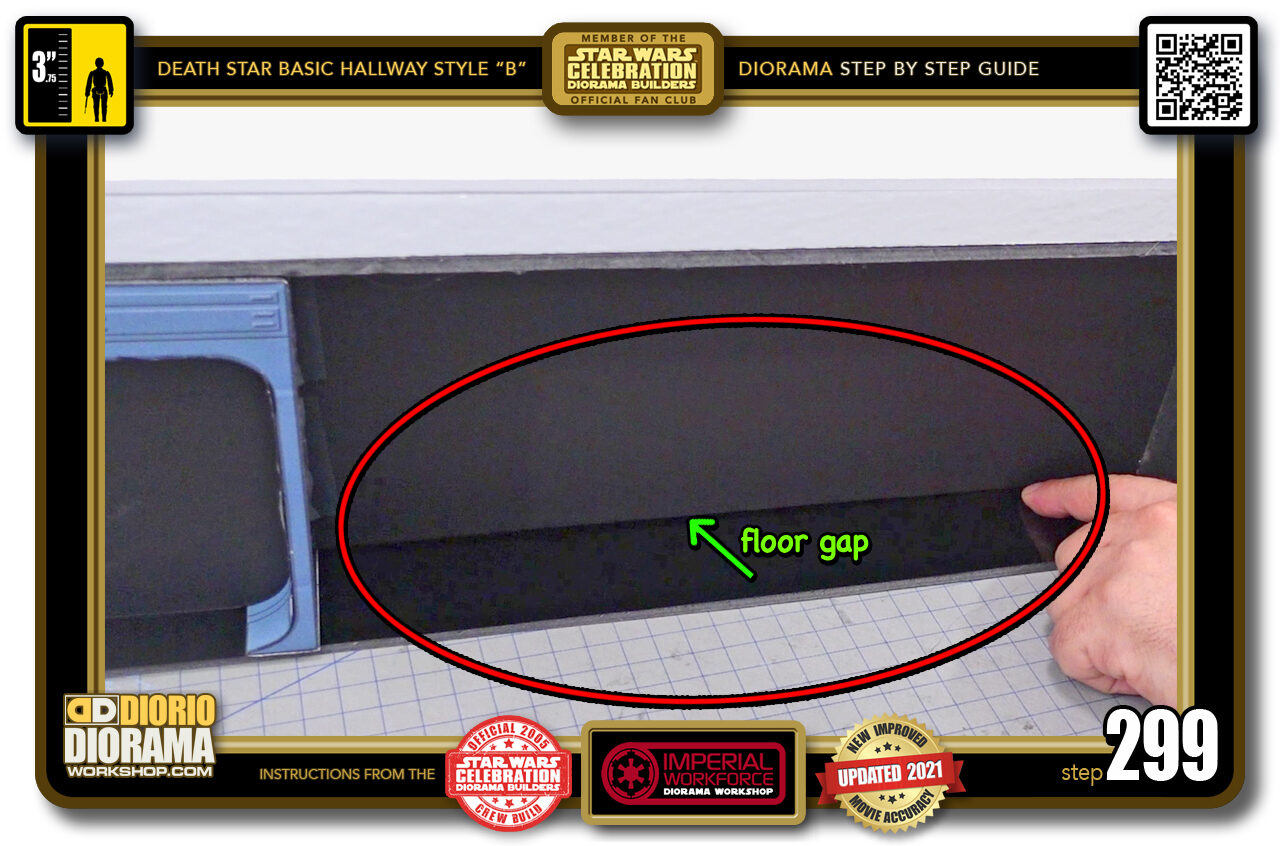
- STEP 299 > Now when I flipped the hallway onto it's proper side, I noticed a small gap (inside red circle) in between the base of the wall and the floor (green arrow)
-
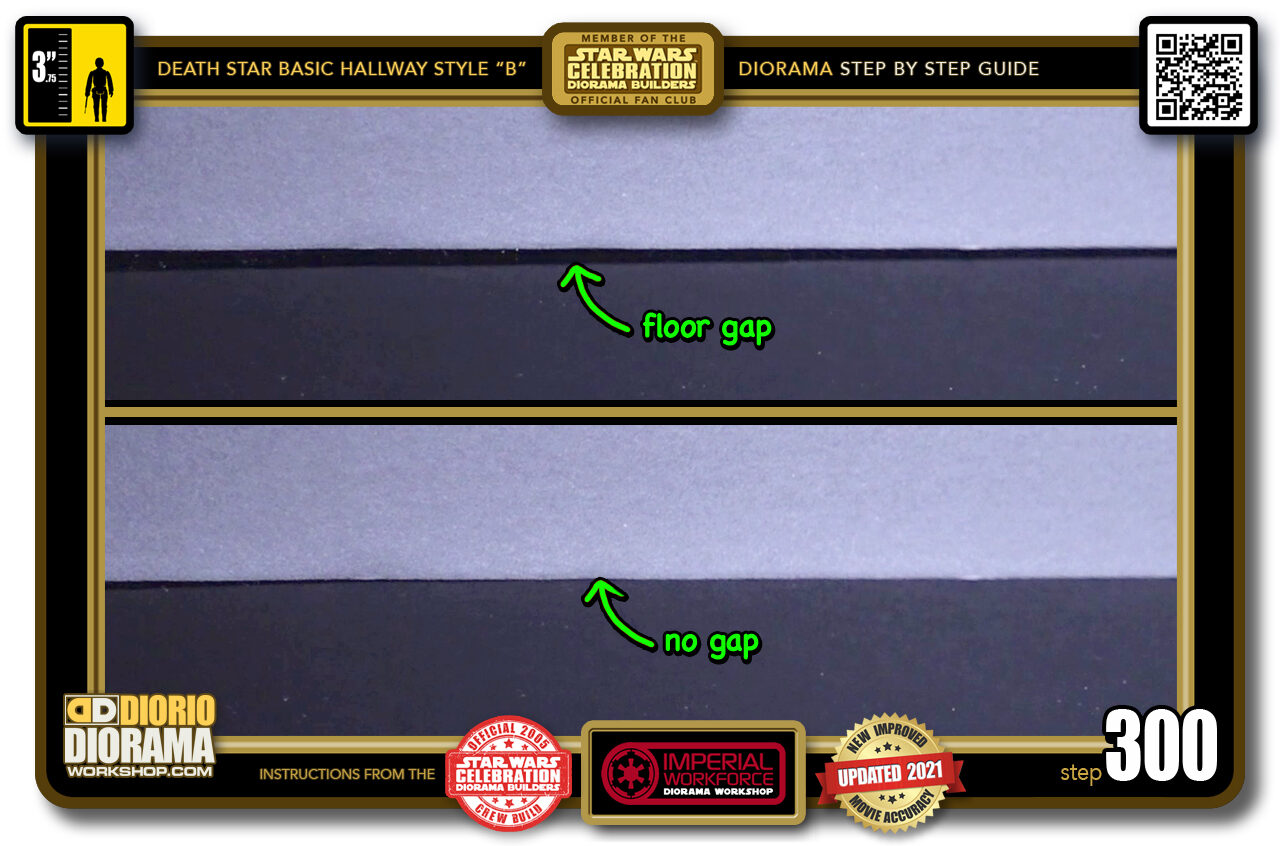
- STEP 300 > When you place your hand under the floor and press down on the ceiling it connects 100% and removes that gap you see in the top image.
.
Did you already build this Diorama ? At home or at our Star Wars Celebration Diorama Builders workshop ? Would you like to show it in the site’s GALLERY VISITORS DIORAMAS section, YES ? That is Awesome !!! You can find out all the details on how to email me your photos on the VISITORS SUBMISSIONS INFO page … When I get your photos, I will create your very own page just like this one. You may not realize it but work does inspire others to join in the fun of making Action Figure Dioramas.
.
NOT FOR RESALE ALL Decals, tutorials and artwork are ©FrankDiorio (dioramaworkshop.com) and offered FOR FREE to the fans – that would be you ? so you can build and display my diorama designs in your very own home. I realize I cannot control what one does with my graphics once I place them on the web, I can only ask you as one fan to another, please respect the artist and do not be that jerk who uses my designs and tutorials to build a copy of my work only to sell it on EBAY or trade/sale groups and forums. Thank You. Frank.
.

.
.
If you have a facebook account, why not join the Official Diorama Builders Fan Club today, simply click the logo link below.
 .
.
Catch up with fellow visitors and exchange stories, read cool interviews with the crew, exchange photos, fun surprises and grab some FAN ONLY merchandise next year at actual future conventions ?
.
©2021 Frank Diorio DioramaWorkshop.Com
.
IF YOU LIKE WHAT YOU SEE, PLEASE SHARE WITH YOUR FRIENDS
USING THE SOCIAL MEDIA BUTTONS BELOW