


-
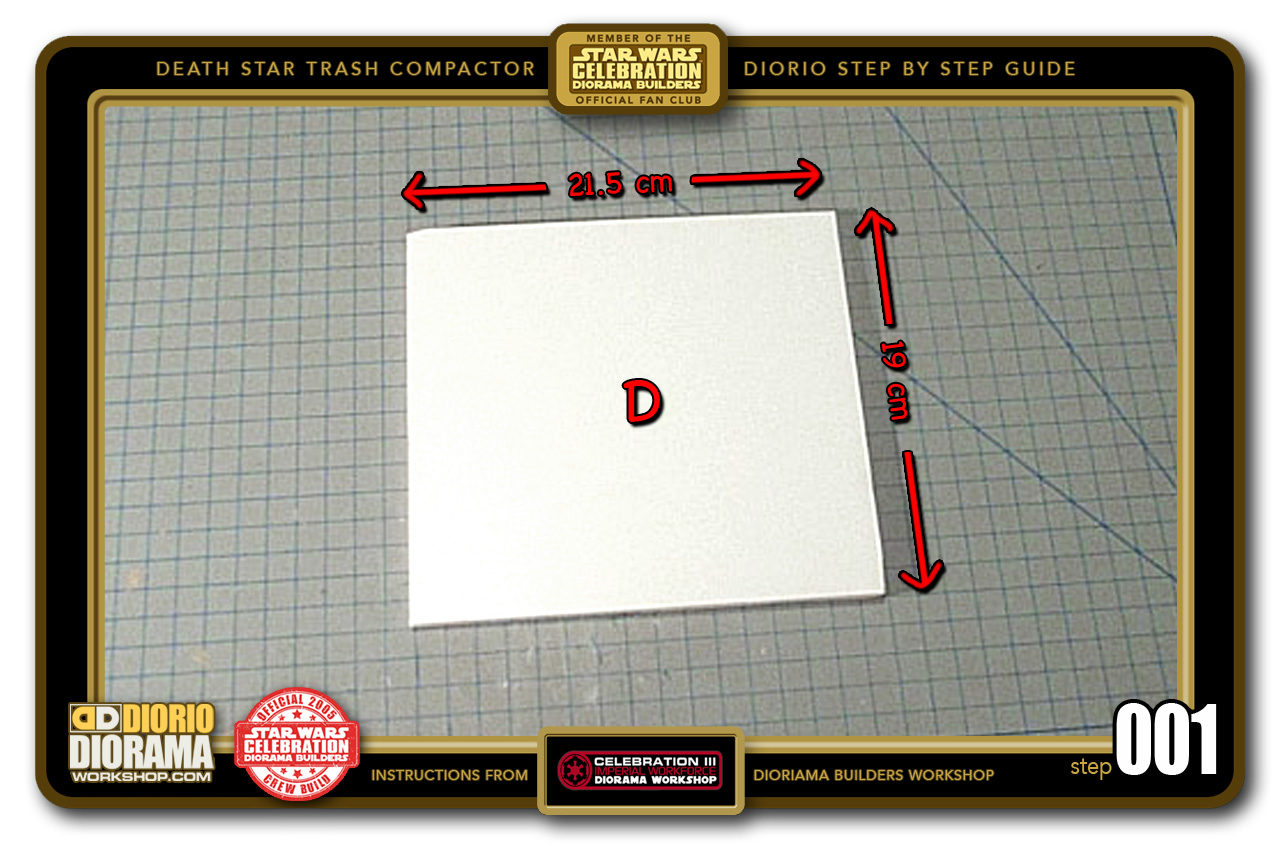
- STEP 001 > The main design is to have it fit around the New (at the time of Celebration III) Hasbro 2002 Trash Compactor Diorama 2 packs. If you have these sets and want a bit more impact then just the cardboard backgrounds, then follow these easy steps. You can of course place any of the 4 hero figures released in the last 25 years. Start by measuring and cutting a 21.5cm x 19cm piece of foamcore for your "D" Floor.
-
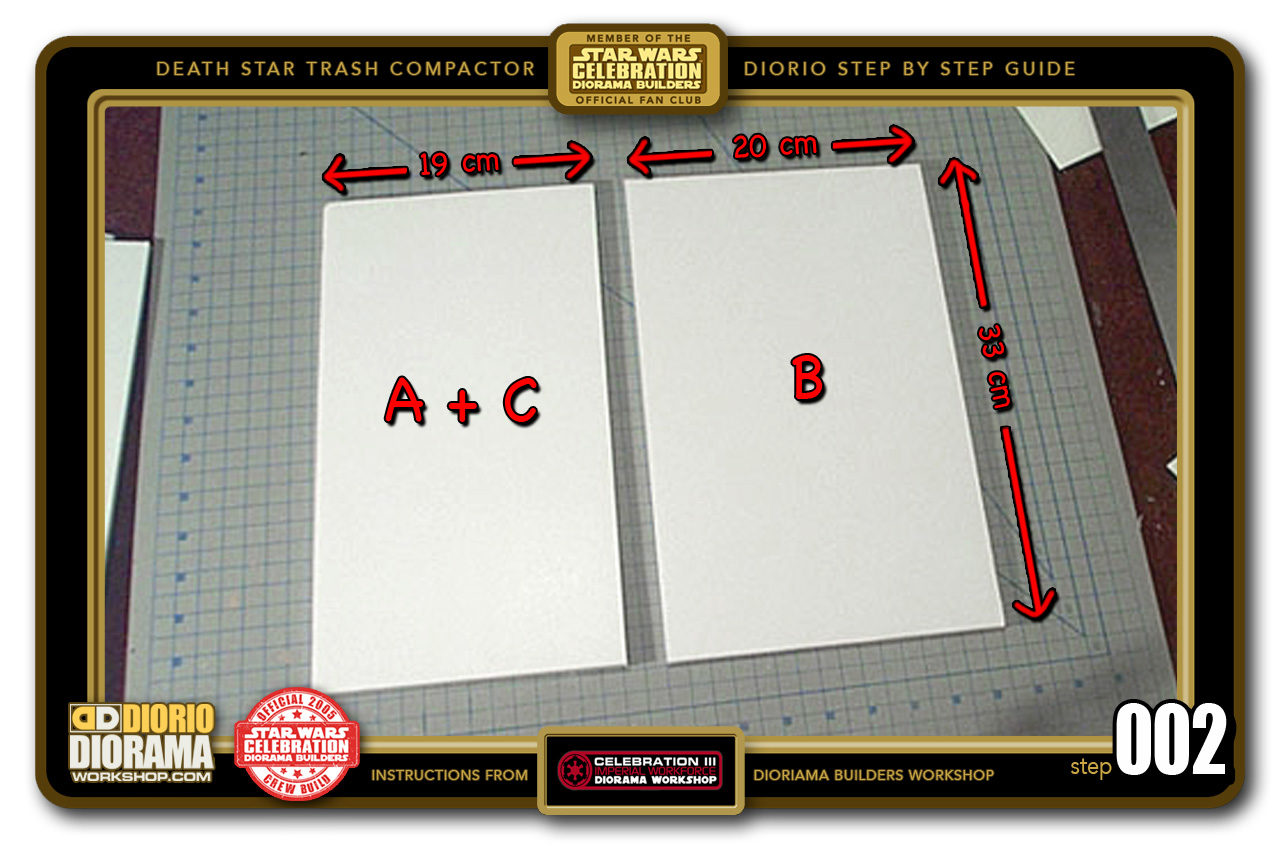
- STEP 002 > For the walls I wanted the height of 2 Death Star diorama levels (16.5cm) so that it would connect perfectly like Lego, with the rest of your Death Star diorama rooms. you need 2 foamcore side walls ("A" and "C") 19cm x 33cm and one back wall "B" 20cm where your door decal will be put on later.
-
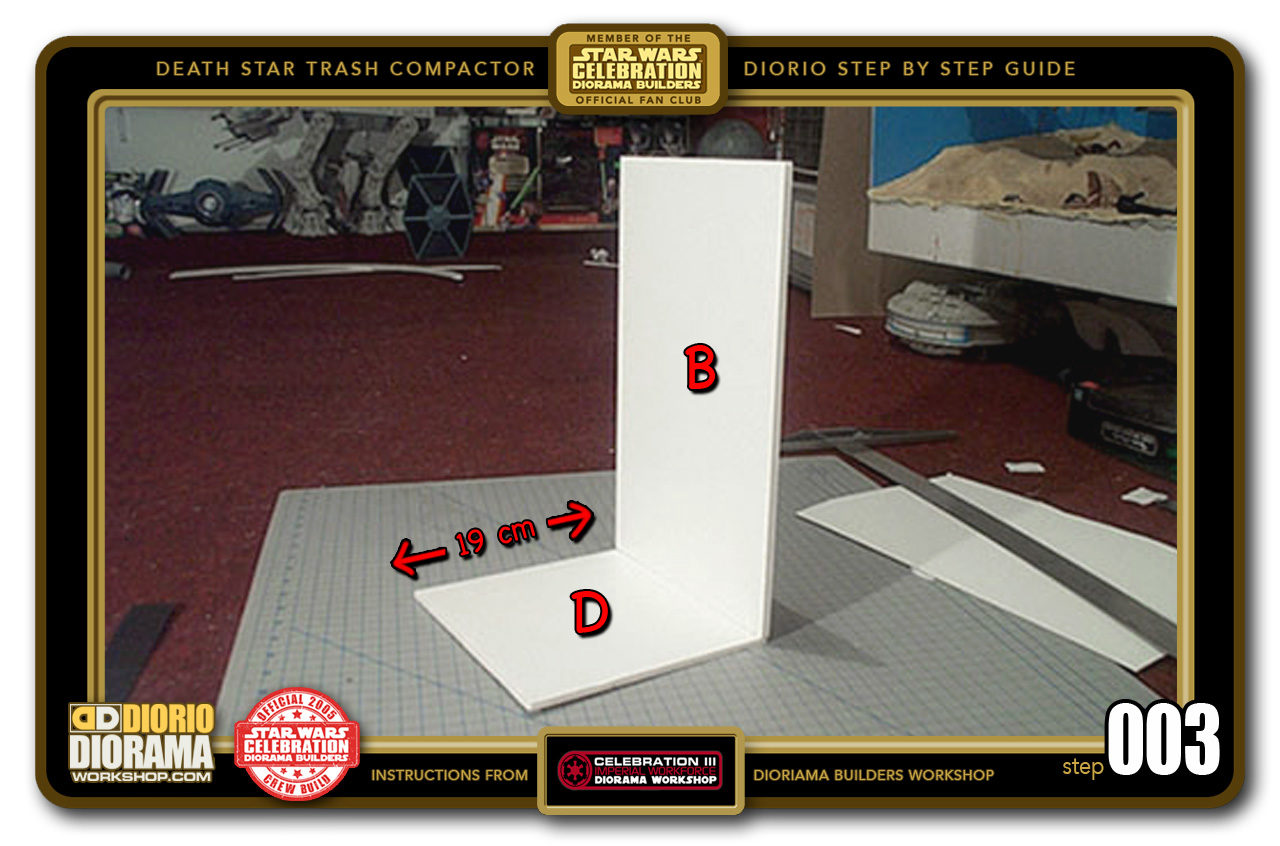
- STEP 003 > Start by putting some hot glue along the bottom of your "B" wall and align and press it onto the rear of your floor base "D" IMPORTANT: make sure it is glued along the 21.5cm wide side. NOT along the 19cm sides.
-
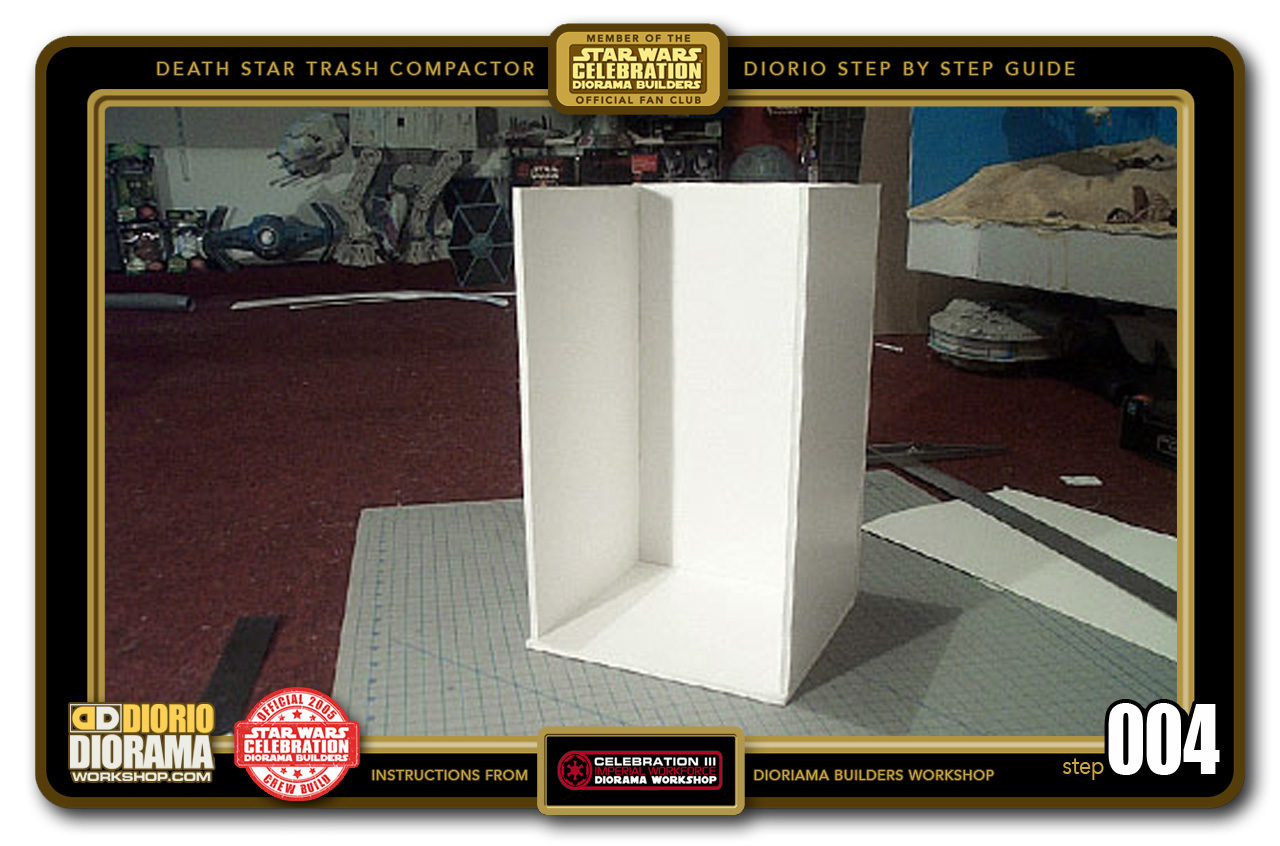
- STEP 004 > Next step is to glue the "A" and "C" side panels. Put the hot glue along the bottom of your side walls and up the side that will connect with the "B" wall. Start with the "A" wall, hold it in place until the hot glue cools off then repeat for your "C" wall.
-
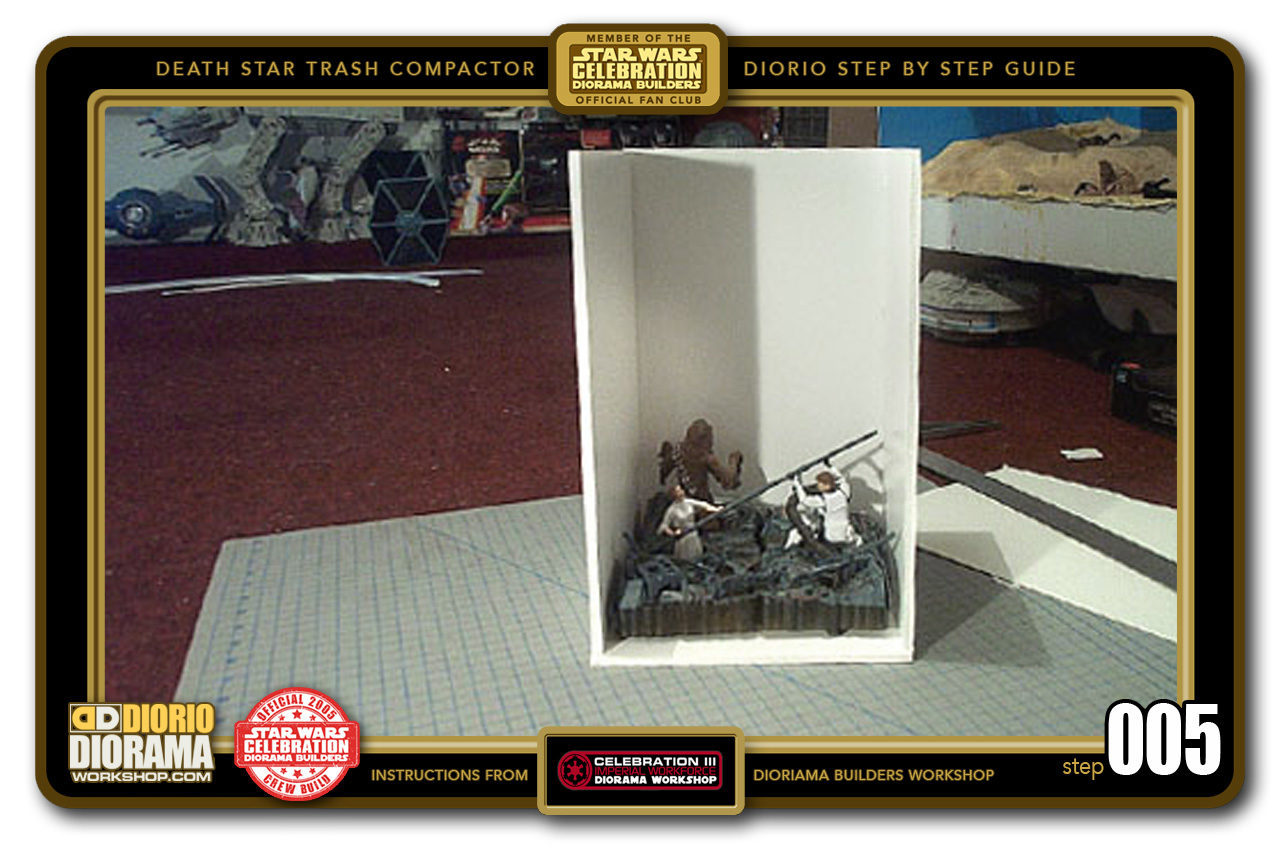
- STEP 005 > Here is our main box frame. Can't get any more simple then this 😀 See how the Deluxe figure plastic base just fit perfectly within the walls.
-
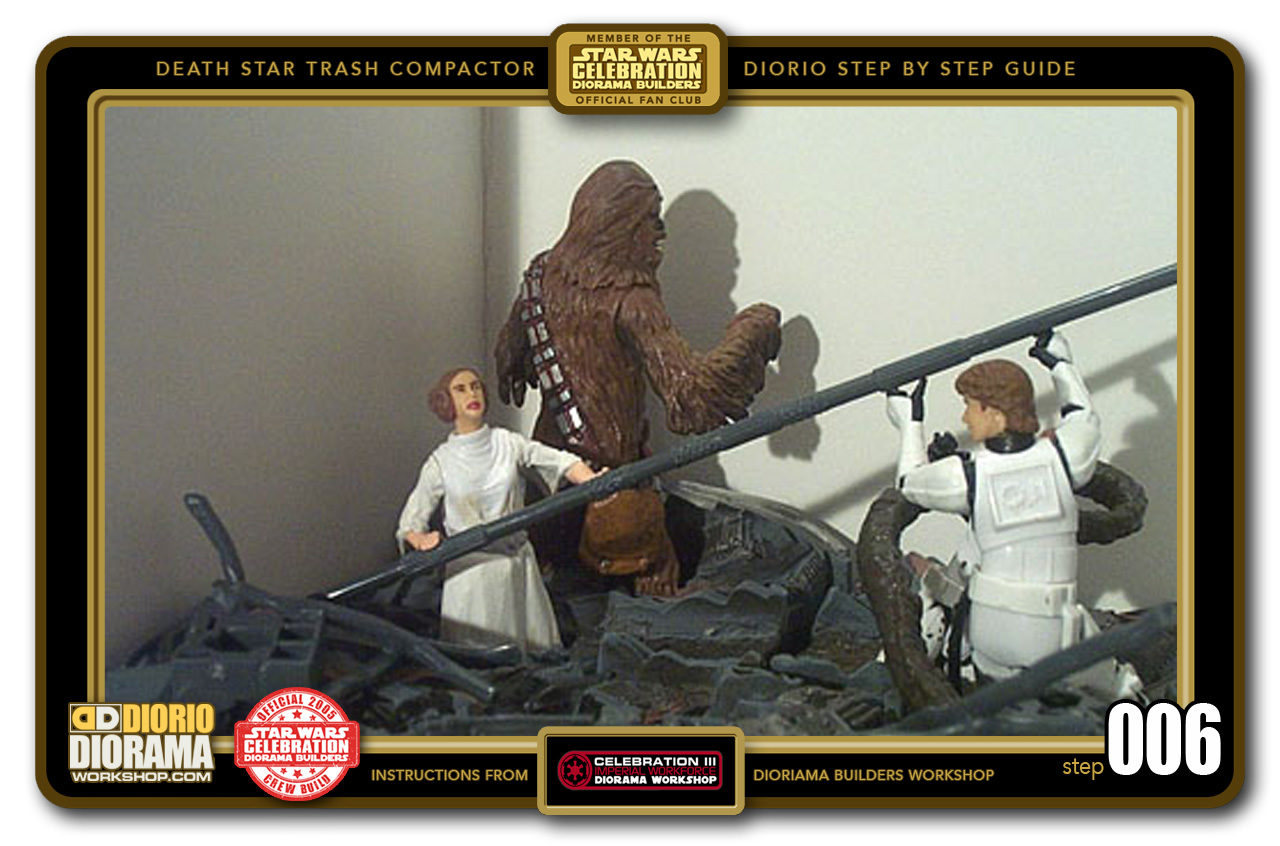
- STEP 006 > Our figures now wait for the detailed wall strips on the wall that will really bring the Diorama to life.
-
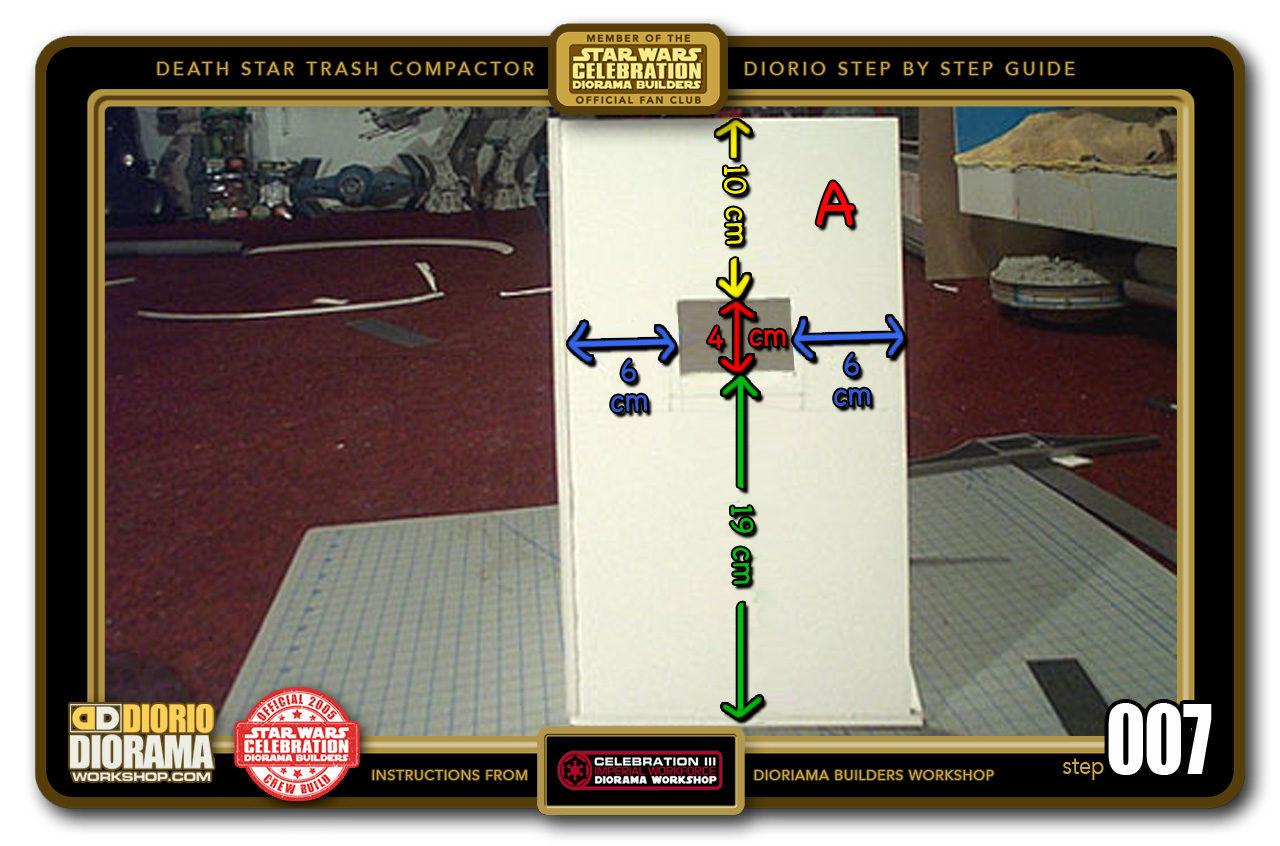
- STEP 007 > Since my design is to fit the Trash Compactor with the other interactive Death Star sections, it's time to make a hole for the Detention room garbage chute. Follow the colored arrows in the photo to draw your rectangle. Carefully cut along the lines to make your chute hole. If you don't plan making connecting rooms you can skip this part.
-
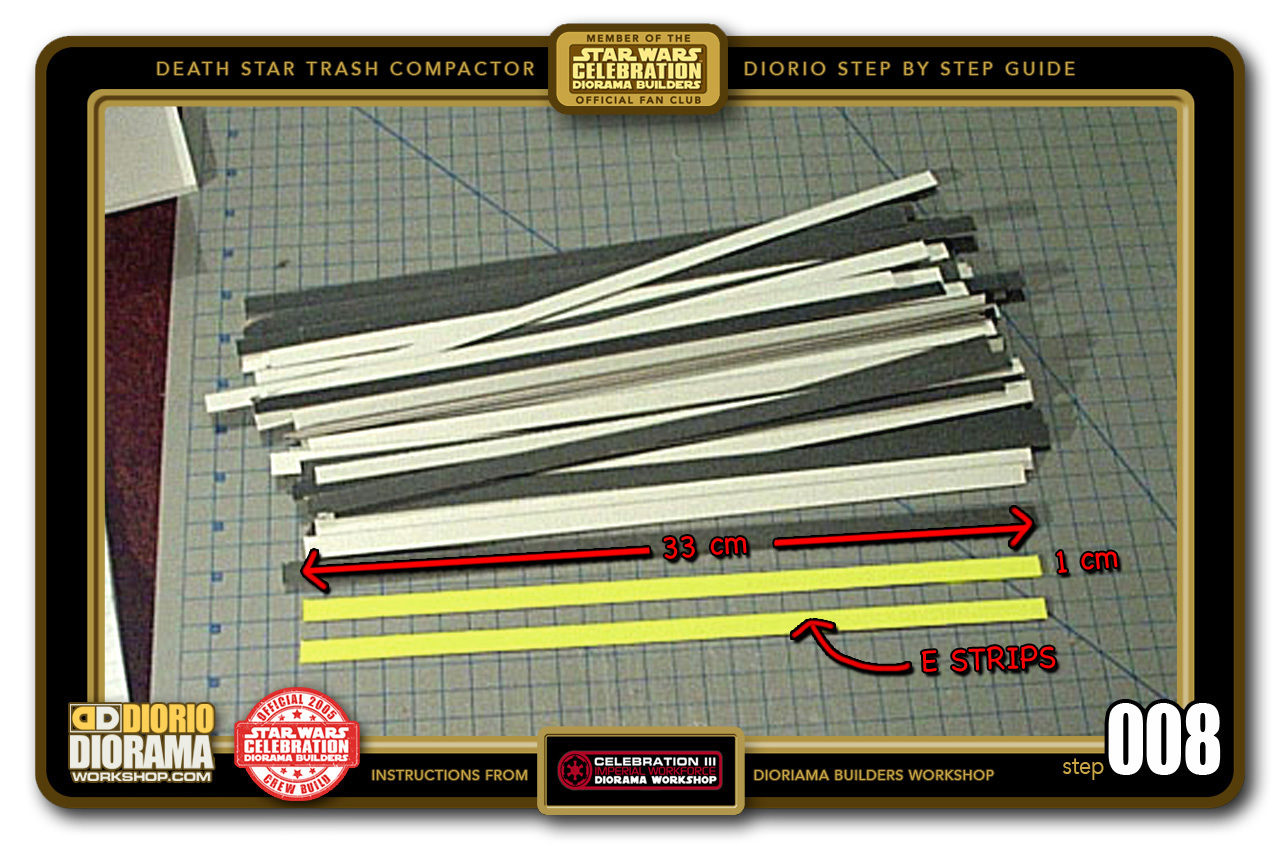
- STEP 008 > Time to start the detailing and make it movie Accurate 🙂 We need to make the rear vertical strips first using Posterboard or Foamie sheets. They are both close in same thickness. Measure and cut 33cm x 1cm Strips. We need 54 in total (I colored two in yellow - these are the "E" strips - so you can easier see where they are placed in step 010.)
-

- STEP 009 > Grab 6 of your 33cm x 1cm Strips. We need to trim these down to to 18cm wide to create the "F" strips (I colored two in purple so you can easier see where they are placed in step 010.)
-
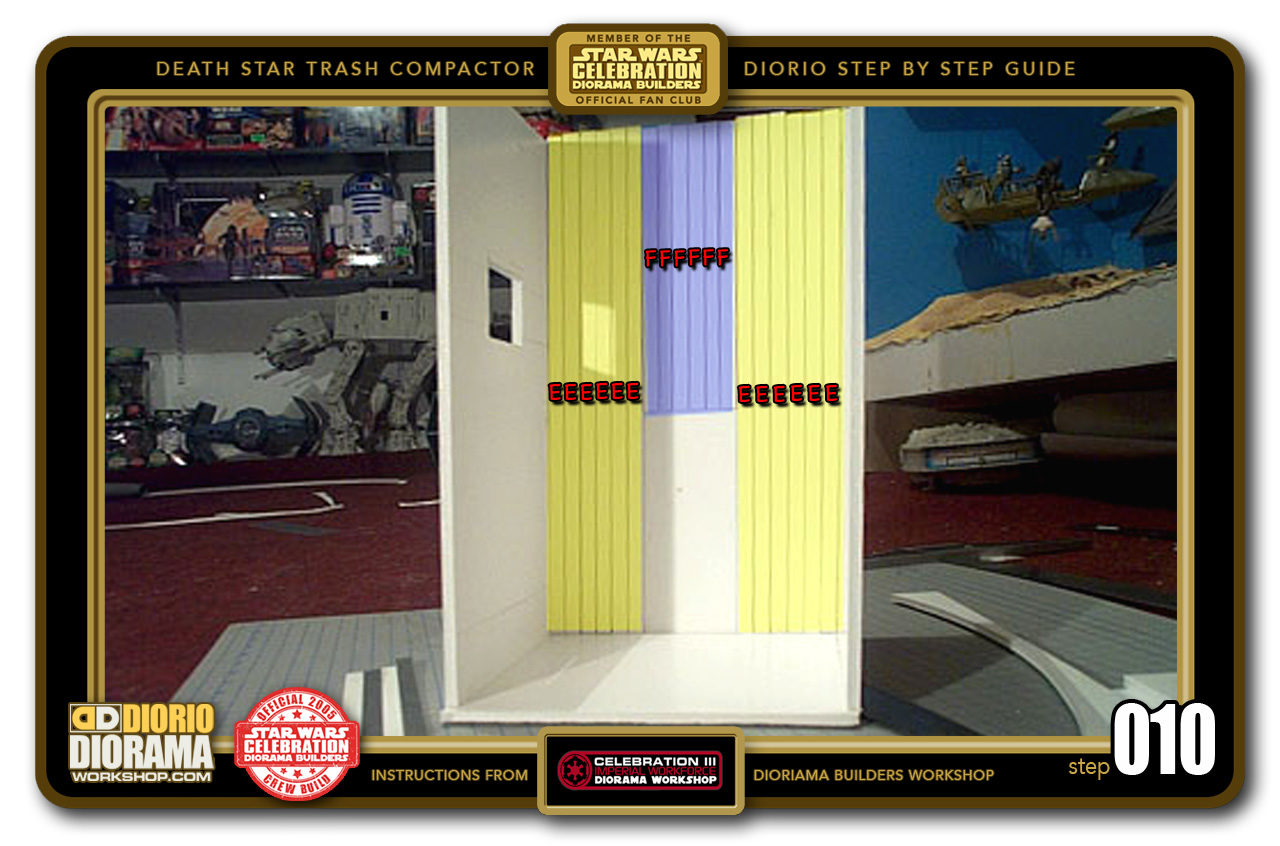
- STEP 010 > IMPORTANT: You must leave a small gap between each strip, do not hug them one against each other - see my example at Step 014 to better understand. Attach 6 "E" strips to each side of your "B" WALL with your shorter "F" strips in the center. This will allow you to put your Door Decal below later on. IMPORTANT: Instead of got glue Gun, use UHU gluesticks to attach the strips to the Foamcore. This will harden slower than the 4-5 seconds with hot glue. More importantly, allow you to wiggle, slip and slide the strips in perfect alignment with each other. Plus hot glue causes bumps under the cardboard and can melt the foamie. In other words, a big mess 🙂
-
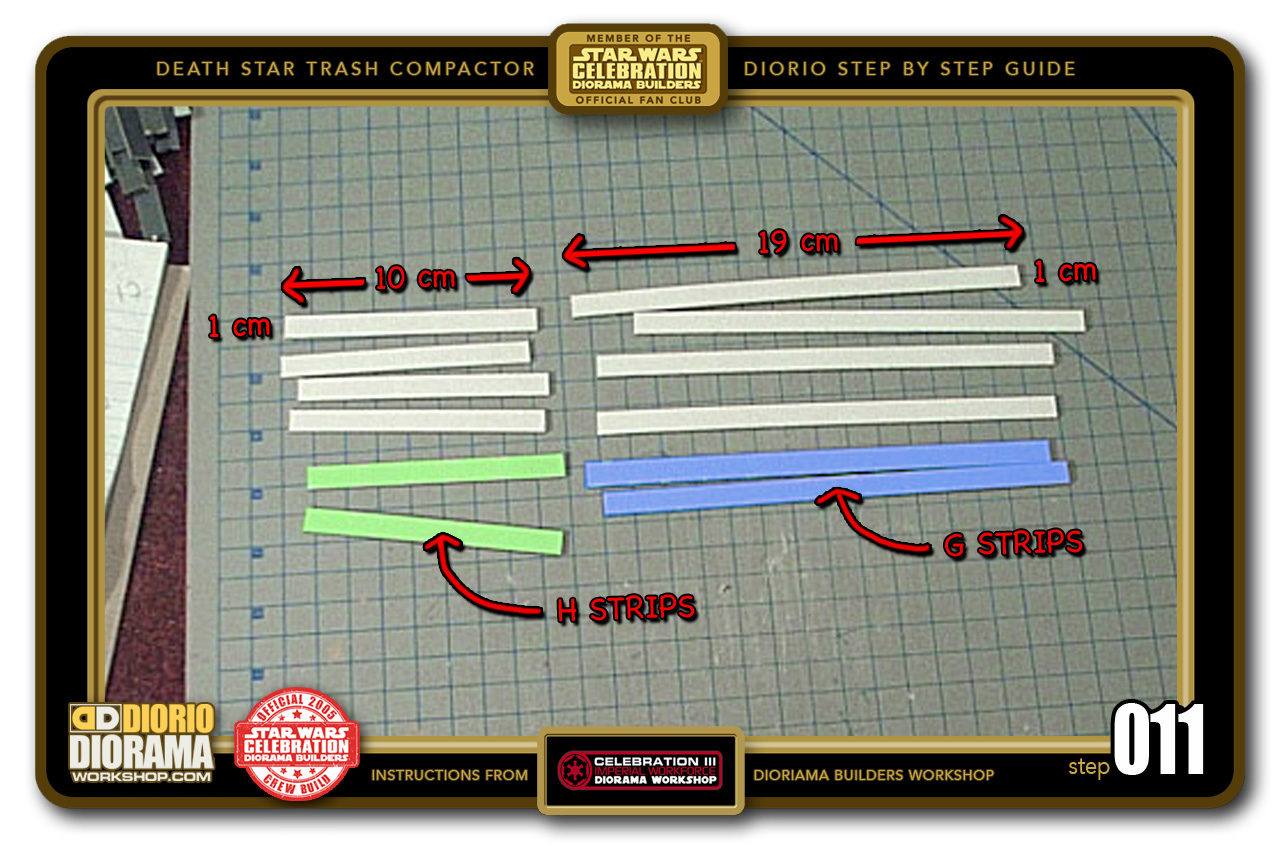
- STEP 011 > Next up WALL "A" strips need to be trimmed down as well if you created your garbage chute hole. Grab 6 of your "E" strips, measure 10cm wide and cut them to create your "H" strips. (I colored two in green so you can easier see where they are placed in step 012.) Put these aside for now and now measure 19cm wide and cut them to create your "G" strips. (I colored two in blue so you can easier see where they are placed in step 012.) What is left from your initial "E" strip is no longer needed, you can toss those away.
-
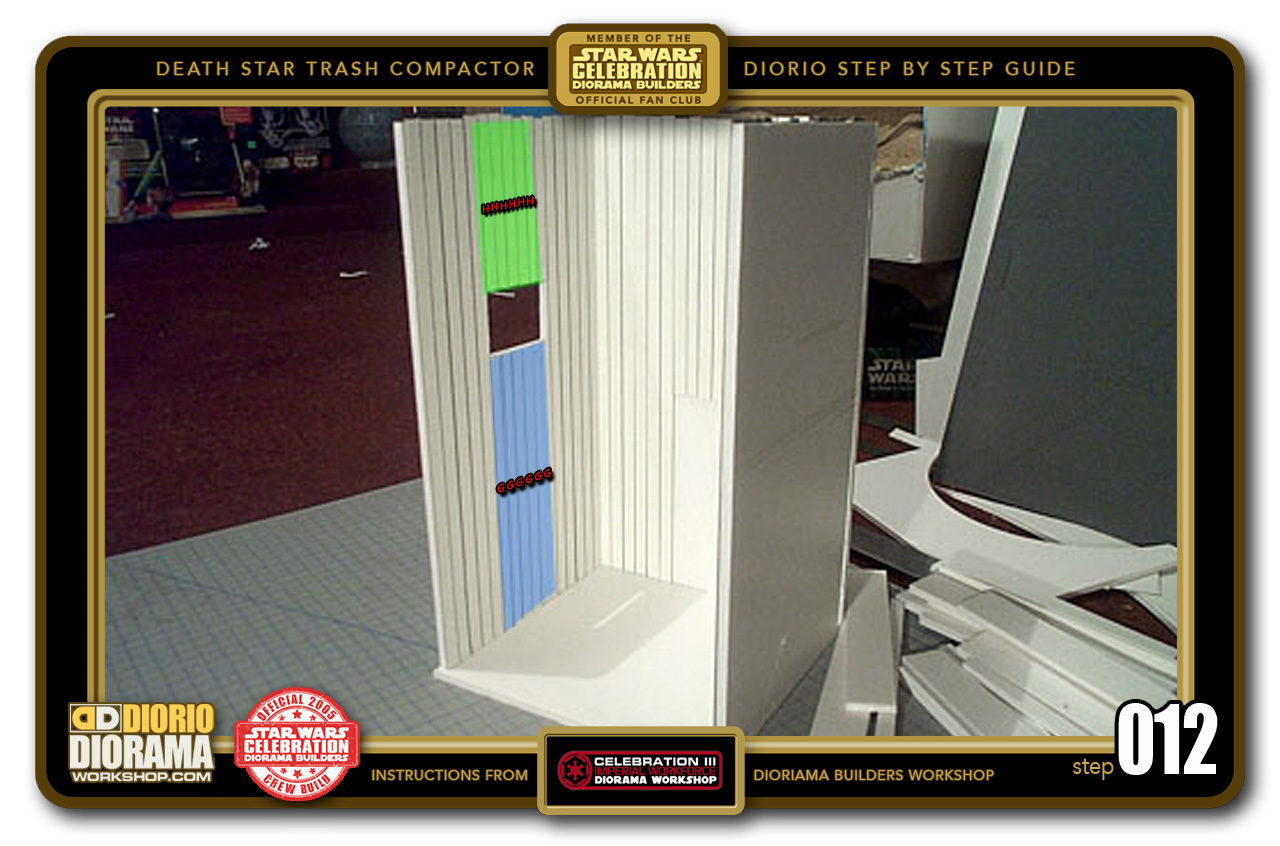
- STEP 012 > IMPORTANT: You must leave a small gap between each strip, do not hug them one against each other - see my example at Step 014 to better understand. Attach 6 "E" strips to each side of your "A" WALL with your 6 shorter "H" strips in the center top above your garbage chute hole and your 6 "G" strips in the center bottom below the hole. IMPORTANT: Instead of got glue Gun, use UHU gluesticks to attach the strips to the Foamcore. This will harden slower than the 4-5 seconds with hot glue. More importantly, allow you to wiggle, slip and slide the strips in perfect alignment with each other. Plus hot glue causes bumps under the cardboard and can melt the foamie. In other words, a big mess 🙂
-
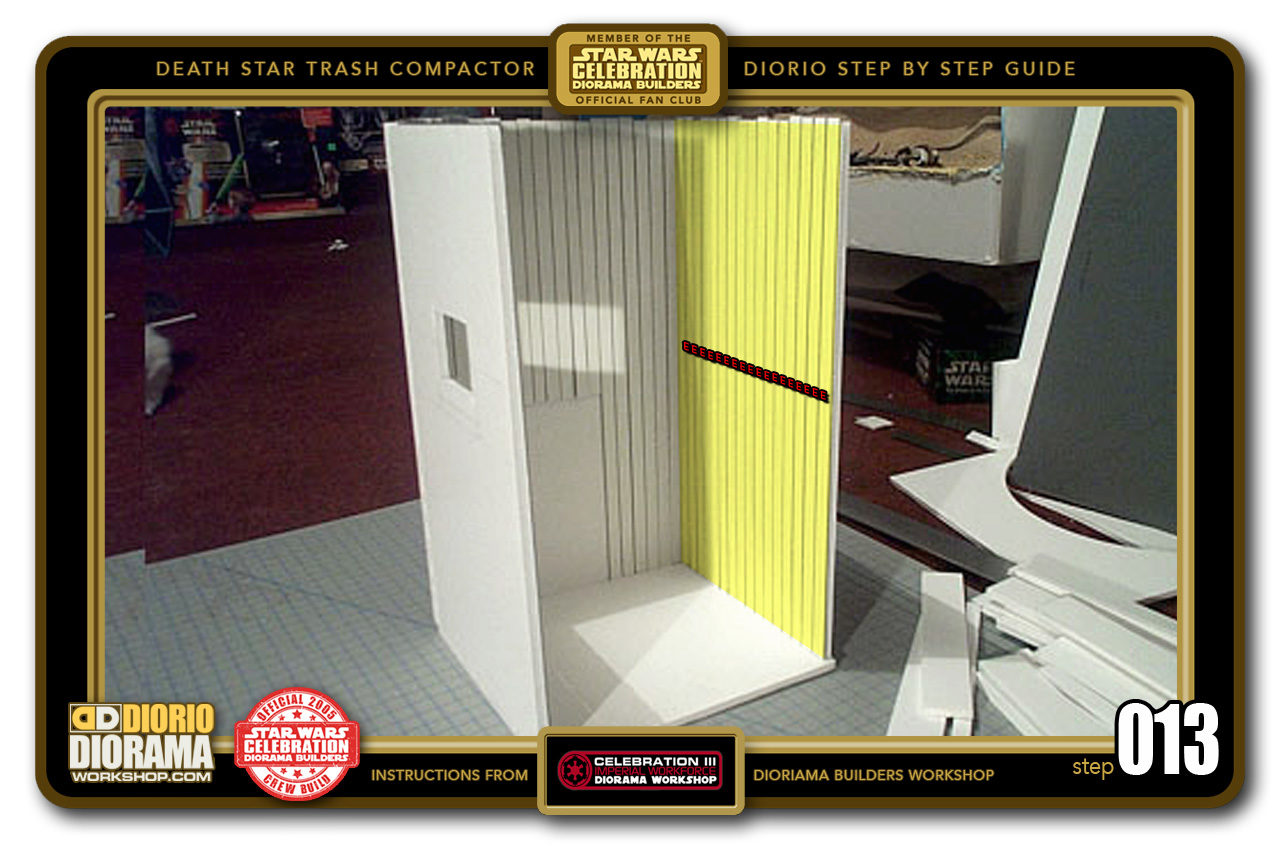
- STEP 013 > The "C" WALL is the easiest. IMPORTANT: You must leave a small gap between each strip, do not hug them one against each other - see my example at Step 014 to better understand. Attach 18 "E" strips from one side to the other. IMPORTANT: Instead of got glue Gun, use UHU gluesticks to attach the strips to the Foamcore. This will harden slower than the 4-5 seconds with hot glue. More importantly, allow you to wiggle, slip and slide the strips in perfect alignment with each other. Plus hot glue causes bumps under the cardboard and can melt the foamie. In other words, a big mess 🙂
-
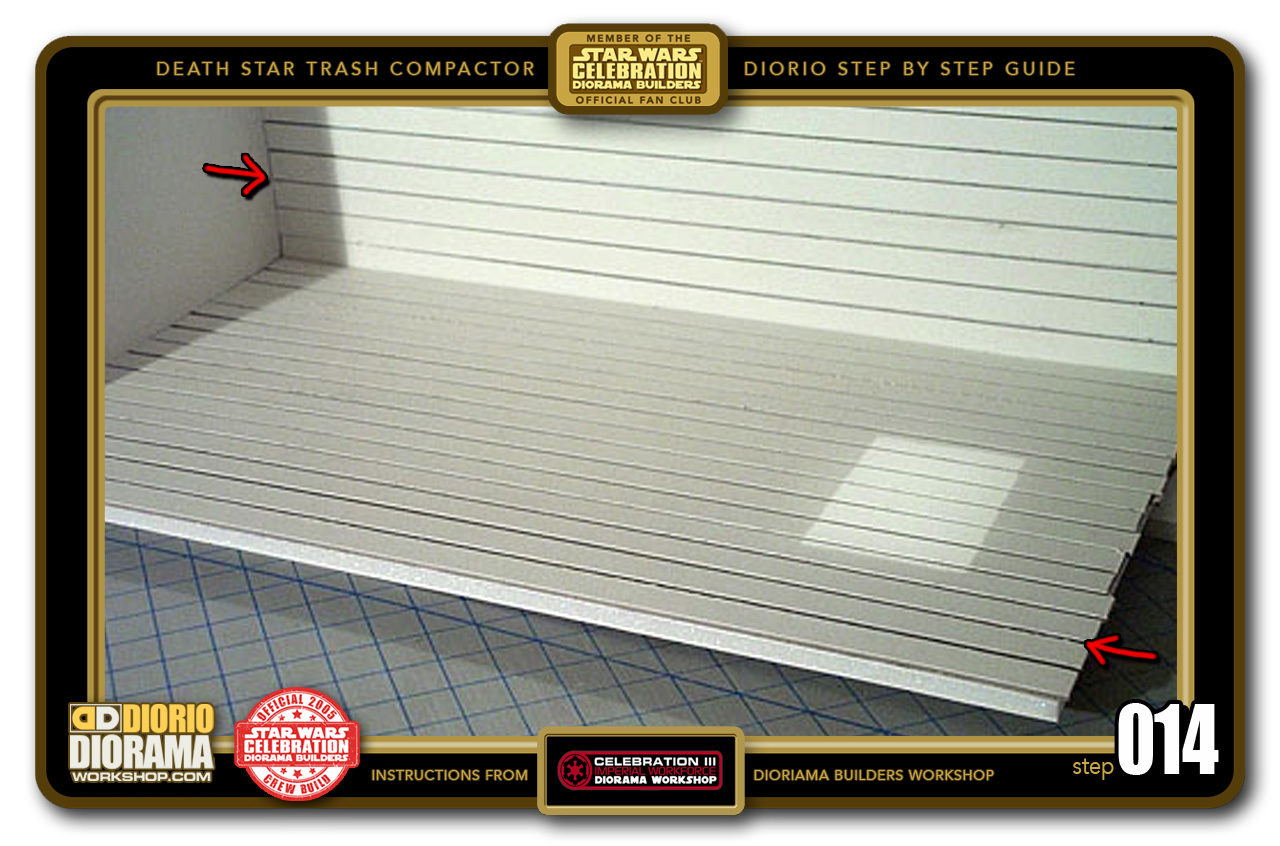
- STEP 014 > Here is a close up view to better see how leaving a small gap between each strip not only adds a cool texture effect but makes your diorama movie accurate. Let your UHU gluestick dry for minutes or so befor you start placing the interlocking foamcore detail strips.
-
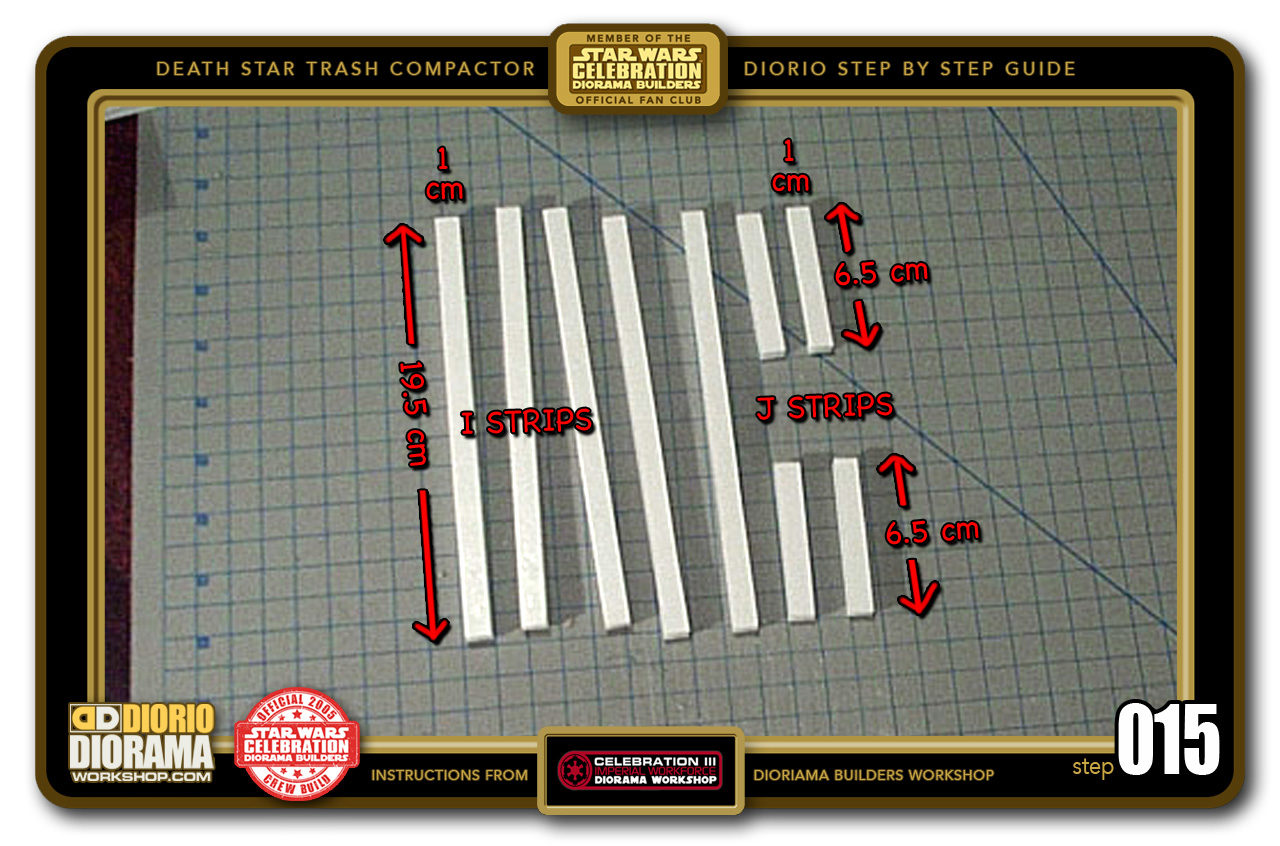
- STEP 015 > Moving onto foamcore beams now that will interlock and give the illusion of a working mechanism and be movie accurate at the same time. Measure and cut 7 strips 19.5cm x 1cm and put 5 of these aside for now. These will be your "i" beams. We need to reduce the width of your remaining 2 pieces to create the "J" beams. Measure and cut 6.5cm wide and repeat again to give you 4 equal beams. You no longer need what is left of the original "i" beams, you can toss those away now.
-
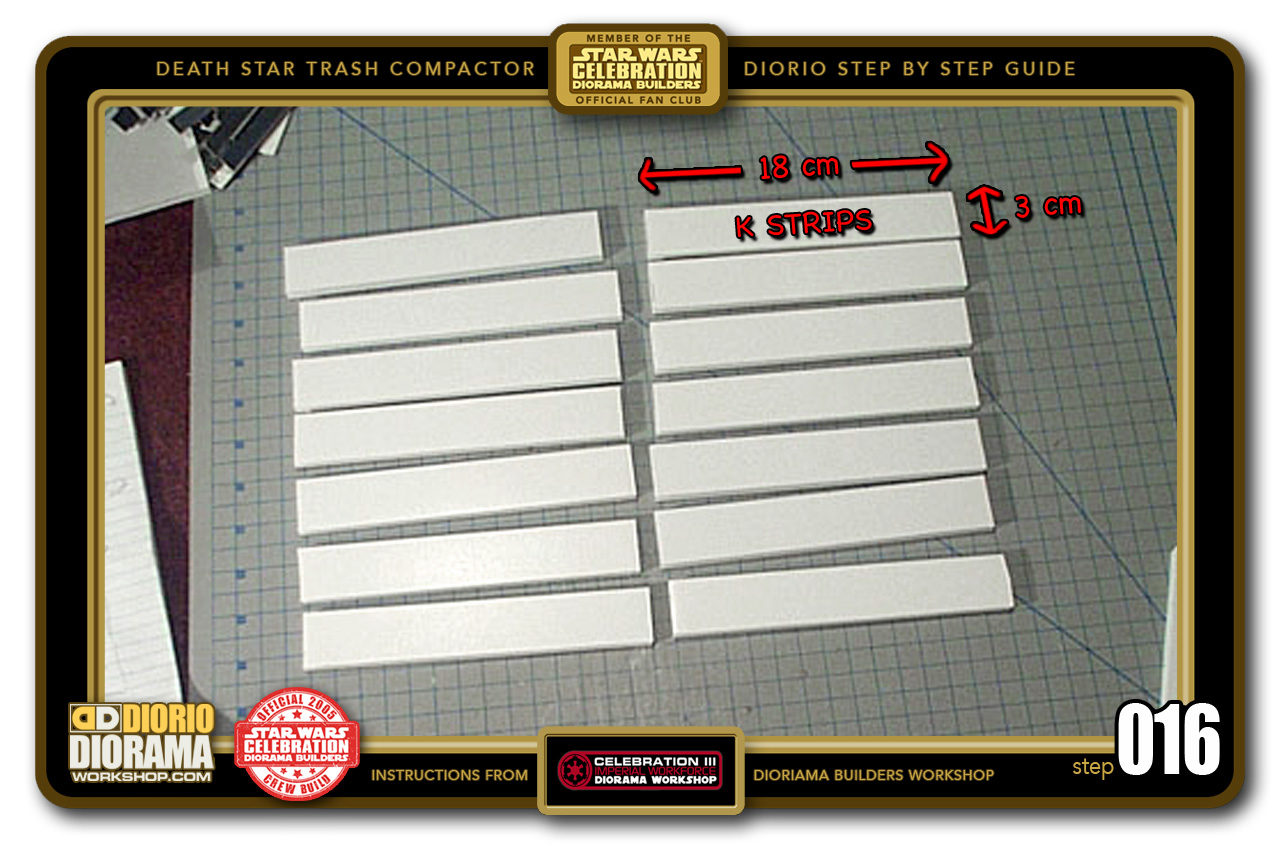
- STEP 016 > The side wall pieces are thicker in size, so you want to measure and cut 18cm wide x 3cm tall pieces that will become your "K" beams. you need 14 of these. IMPORTANT: If you cut a garbage chute hole, you will need to take one of your "K" beams and turn it into 2 equal pieces that fit on each side of your garbage chute hole. Measure 6cm wide and cut, measure 6cm again and cut again. These are your "L" beams. You no longer need the remaining piece, you can toss that away now.
-

- STEP 017 > The taller 3cm "K" and "L" beams fit on your "A" and "C" walls. The thinner 1cm "J" and "i" beams go on the "B" back wall. These pieces will create the illusion of interlocking Grooves that guide the Trash Compactor walls when crucshing garbage.
-
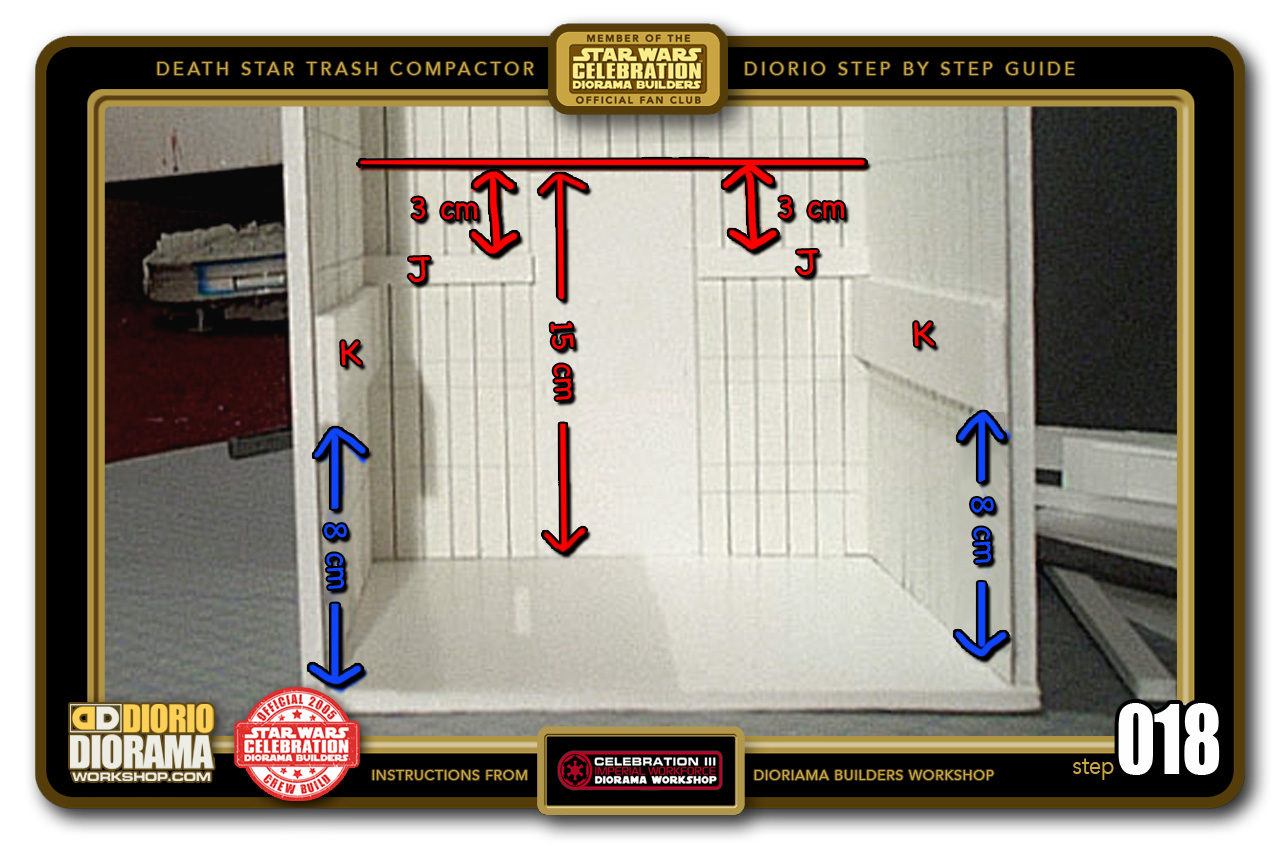
- STEP 018 > Start by drawing a level guide line on the "B" wall at 15cm from the floor (the red horizontal line) Measure 8cm from the floor (Blue Arrows) and hot glue a "K" beam onto each side wall making sure it is pressed against the "B" wall and ends flush with the outer side. Now measure 3cm down (Red Arrows) from your guide line and hot glue 2 "J" beams on each side of the "B" wall making sure one end is pressed againts the side wall and the other ends where the door decal will be applied. You can see how the "J" beams sit on the "K" beams.
-
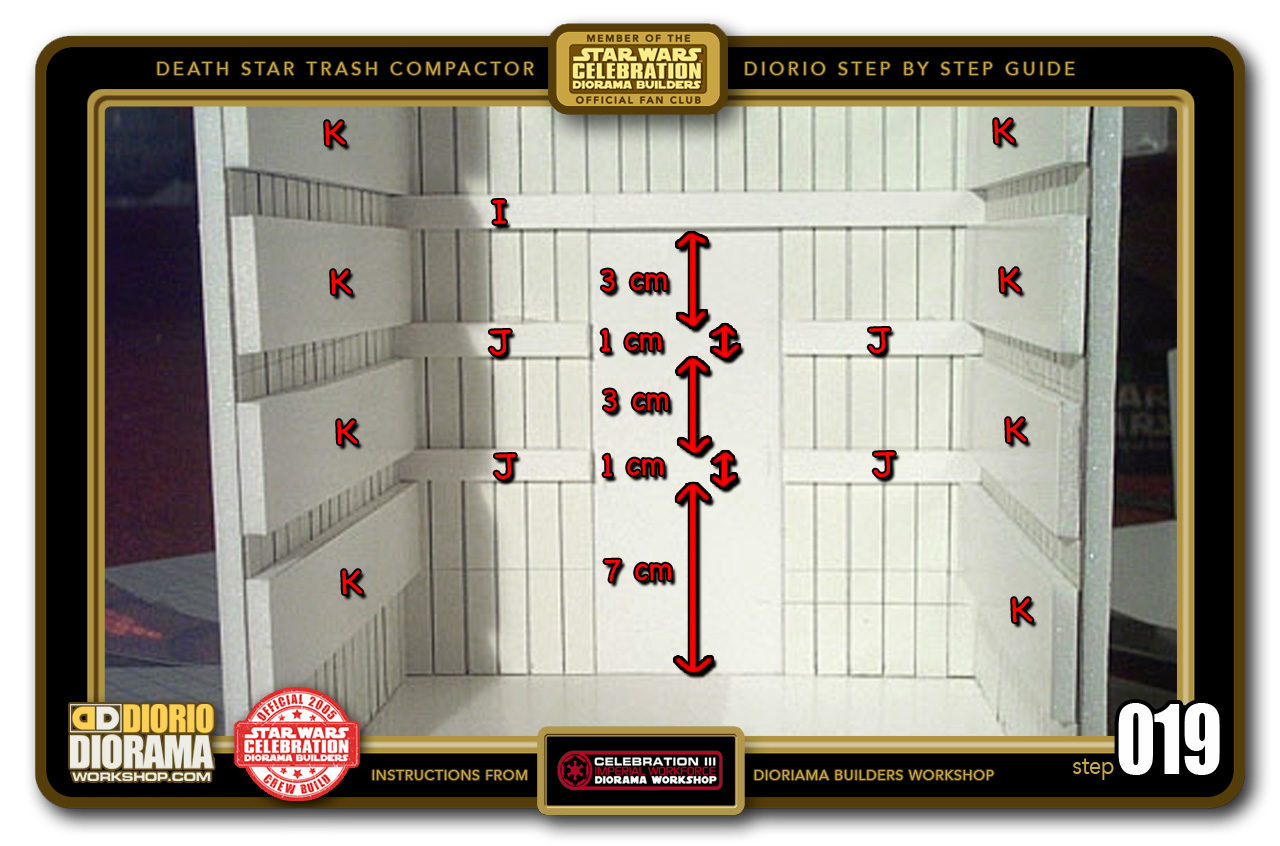
- STEP 019 > Here you see how the beams interlock between "B" and "A" + "C" side walls. Notice how the first 19cm Wide "i" beam rests flush against the top of the Doorway (your horizontal guide of Step 018) Now that you see how the beams fit, hot glue one beam at a time, alternating "K" "J" "K" "J" "K" "i" "K" "i" and so on.
-
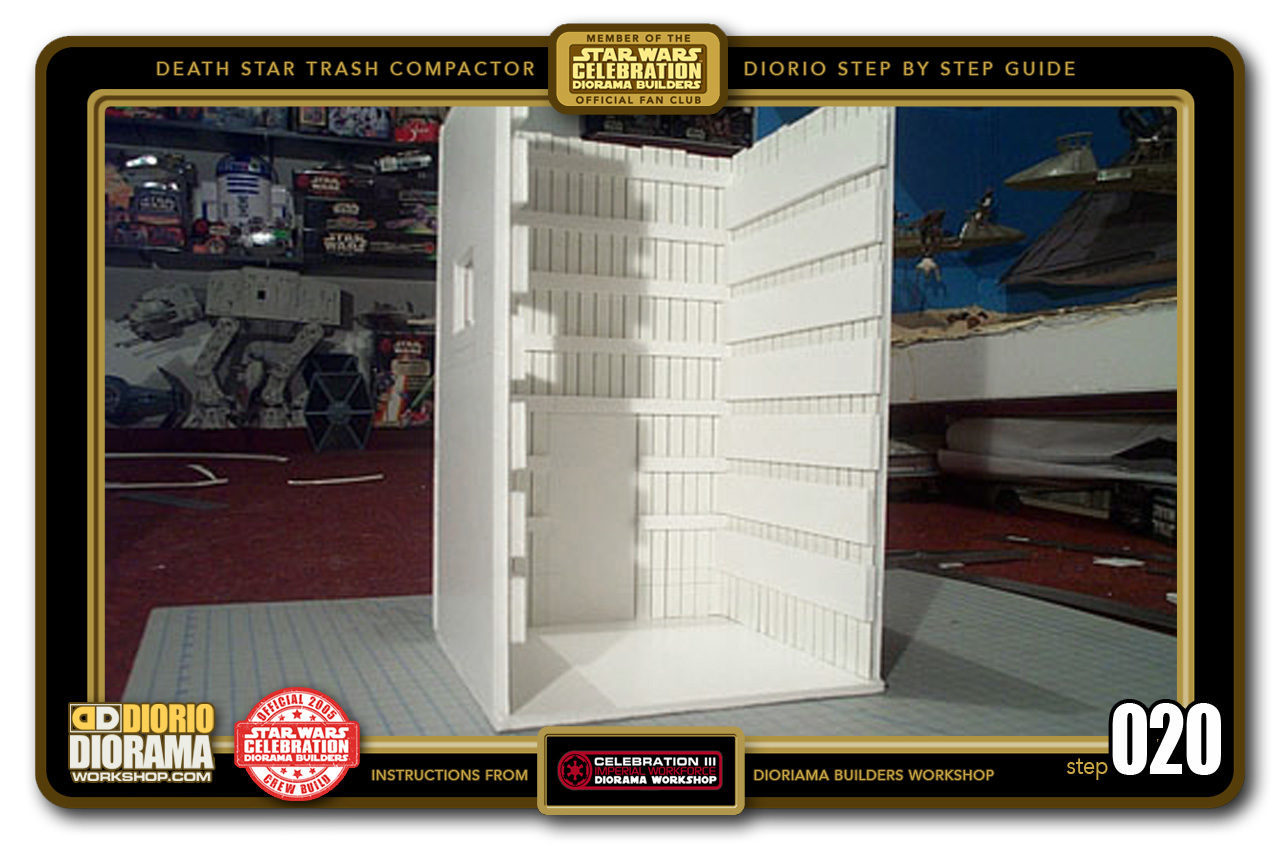
- STEP 020 > The beams now all in place, we can see the finished construction for our Death Star Trash Compactor. Even unpainted it looks cool 😀

.
Did you already build this Diorama ? At home or at our Star Wars Celebration Diorama Builders workshop ? Would you like to show it in the site’s GALLERY VISITORS DIORAMAS section, YES ? That is Awesome !!! You can find out all the details on how to email me your photos on the VISITORS SUBMISSIONS INFO page … When I get your photos, I will create your very own page just like this one. You may not realize it but work does inspire others to join in the fun of making Action Figure Dioramas.
.
NOT FOR RESALE ALL Decals, tutorials and artwork are ©FrankDiorio (dioramaworkshop.com) and offered FOR FREE to the fans – that would be you ? so you can build and display my diorama designs in your very own home. I realize I cannot control what one does with my graphics once I place them on the web, I can only ask you as one fan to another, please respect the artist and do not be that jerk who uses my designs and tutorials to build a copy of my work only to sell it on EBAY or trade/sale groups and forums. Thank You. Frank.
![]() Catch up with fellow visitors and exchange stories, read cool interviews with the crew, exchange photos, fun surprises and grab some FAN ONLY merchandise next year at actual future conventions ?
Catch up with fellow visitors and exchange stories, read cool interviews with the crew, exchange photos, fun surprises and grab some FAN ONLY merchandise next year at actual future conventions ?
.
©2018 Frank Diorio DioramaWorkshop.Com
.
IF YOU LIKE WHAT YOU SEE, PLEASE SHARE WITH YOUR FRIENDS
USING THE SOCIAL MEDIA BUTTONS BELOW