


-

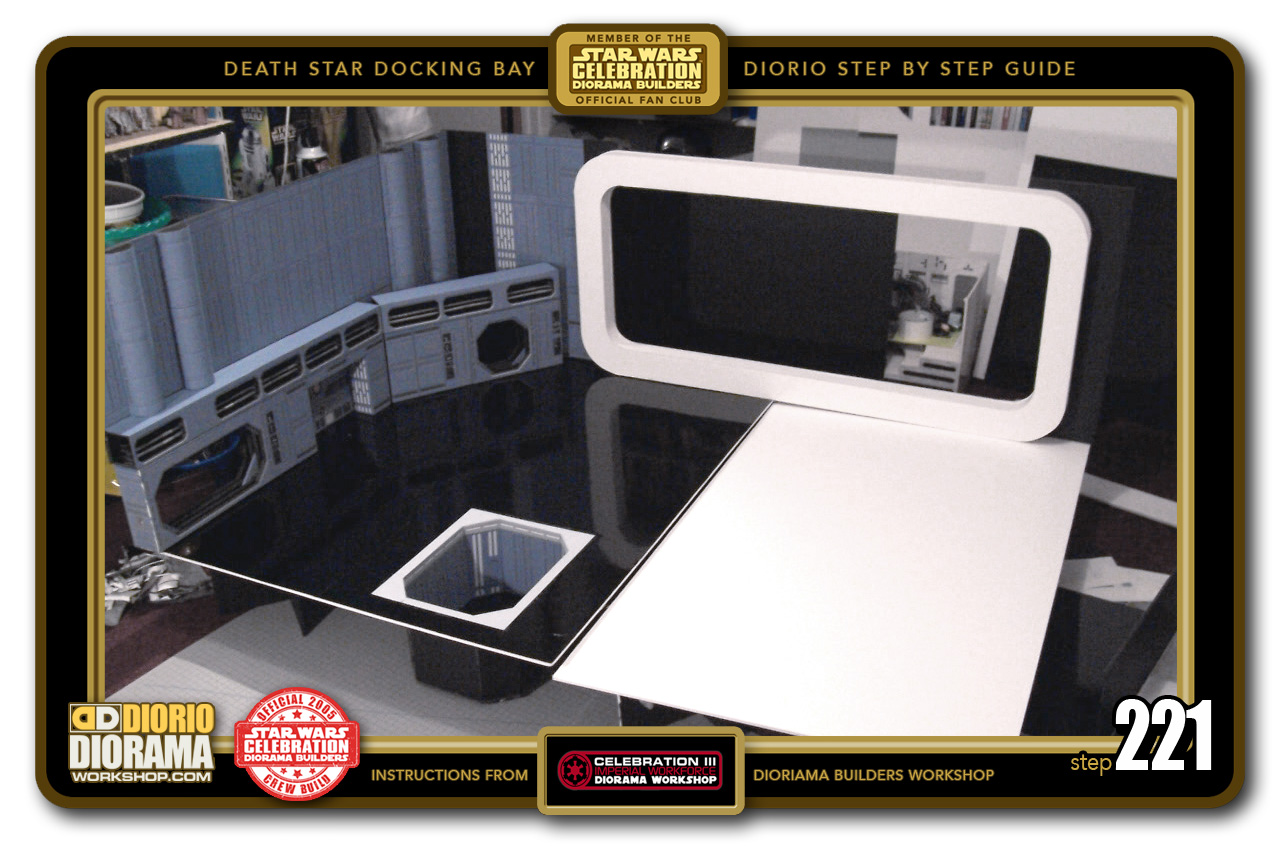
- STEP 221 > This is the only photo I could find that resembled where we are at. Minus the force field wall decals and the right floor piece is not white but covered with the glossy black DC FIX Vinyl.
-

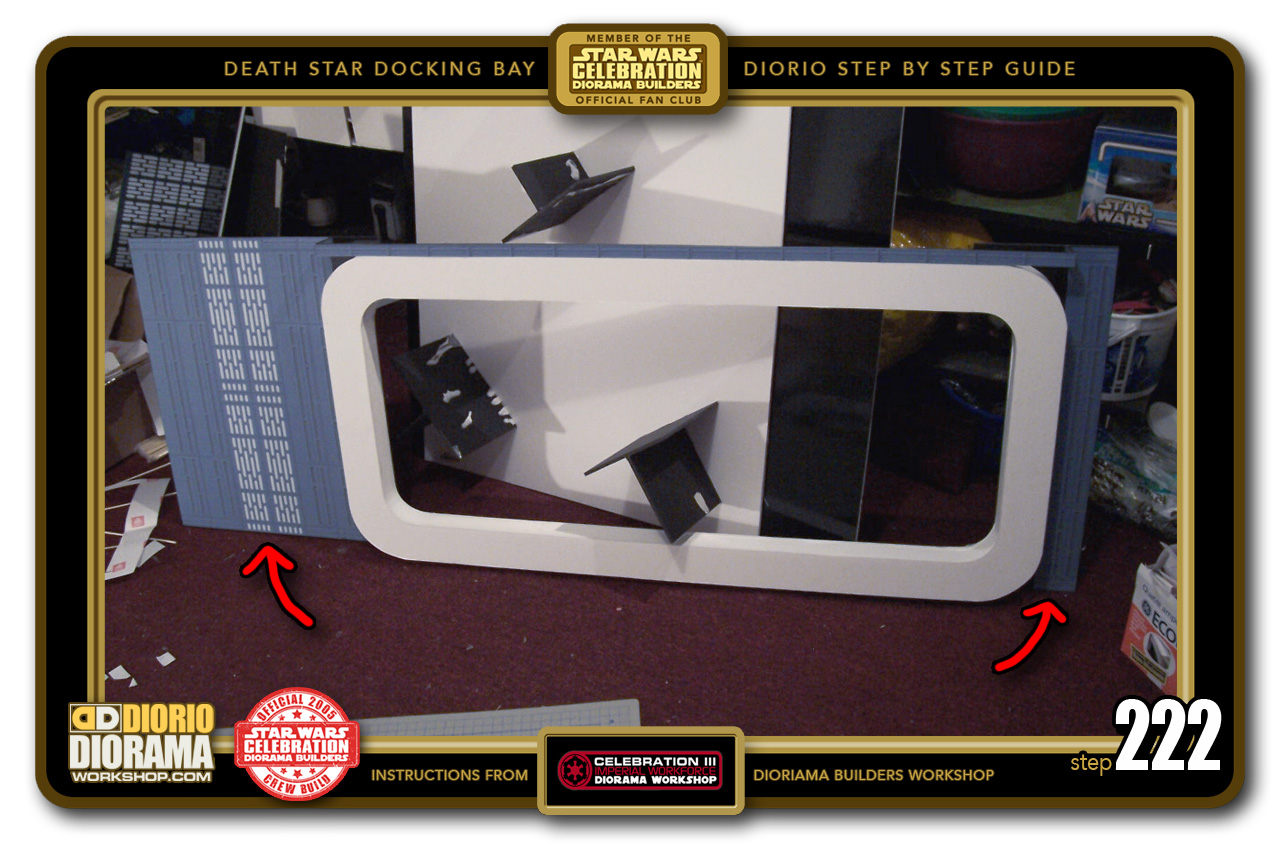
- STEP 222 > Print out and cut the rear wall (page 7) decals and apply 6 rows to the left and 1 row to the right sides of the docking bay wall. You can select ANY of the basic hallway decals if you prefer and use your own imagination and design but If you want movie accuracy you need to place them like I did in the photo.
-
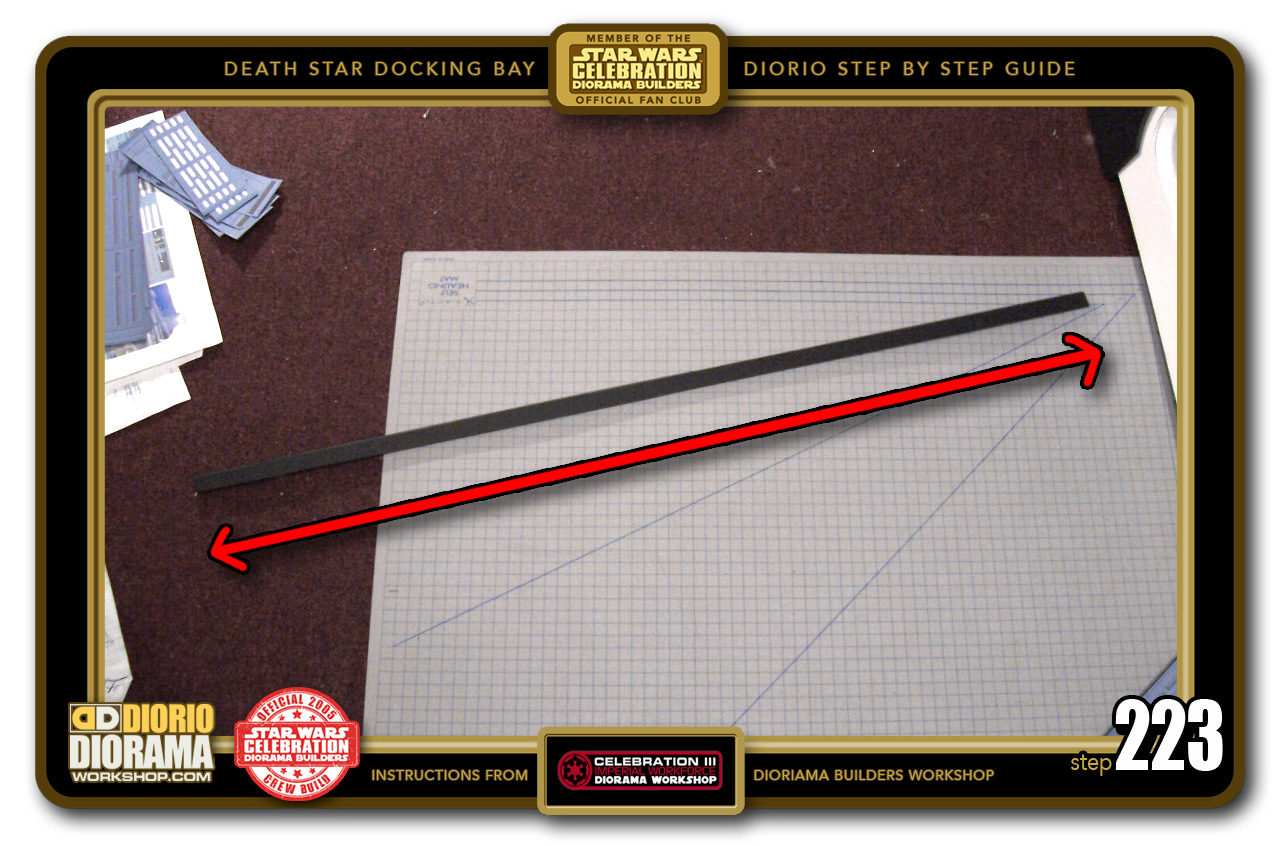
- STEP 223 > Now we just need a small rod to place on the tOP of the neon force field frame entrance to the docking bay. Measure and cut a 102cm wide X 2cm piece of foamcore.

-

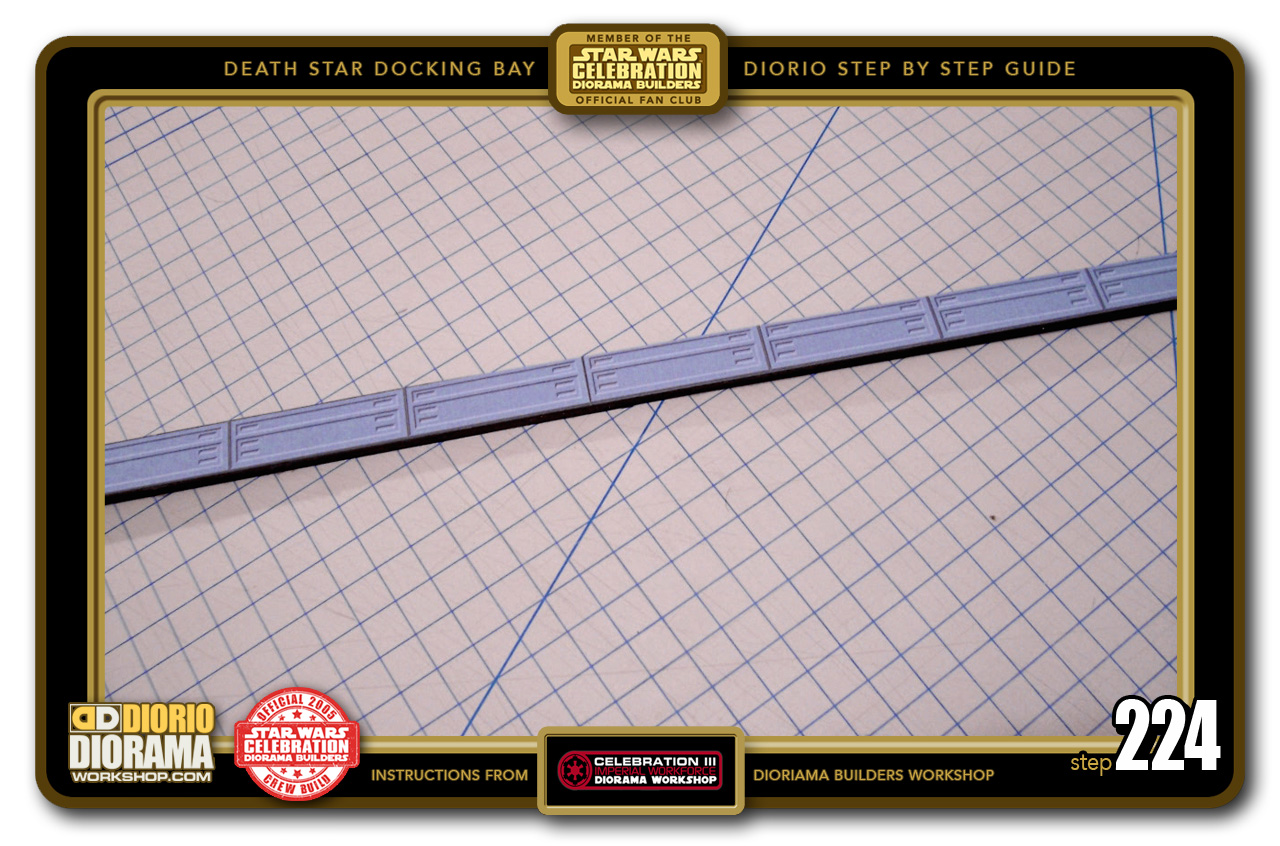
- STEP 224 > This rod is only the height of the TOP Death Star wall decals. Just print out your (page 20) decals and apply the starting at the right end, and carefully align each edge of the next decal till you get to the end of the left side.
-

- STEP 225 > It will take you 17 rows of decals to cover the foamcore rod.

-
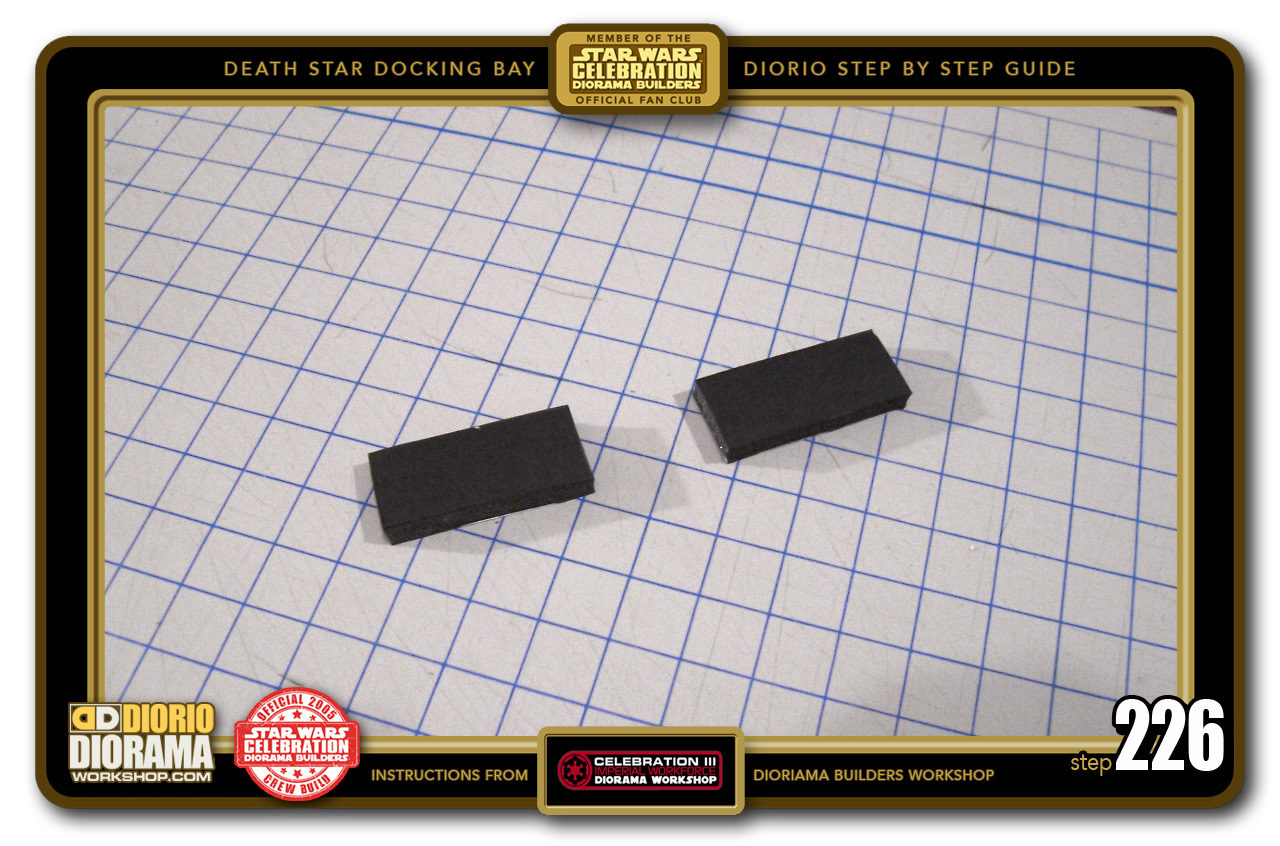
- STEP 226 > Now we make the side extruder supports. Measure and cut out 2 small 2cm tall X 5.5cm rectangles

-

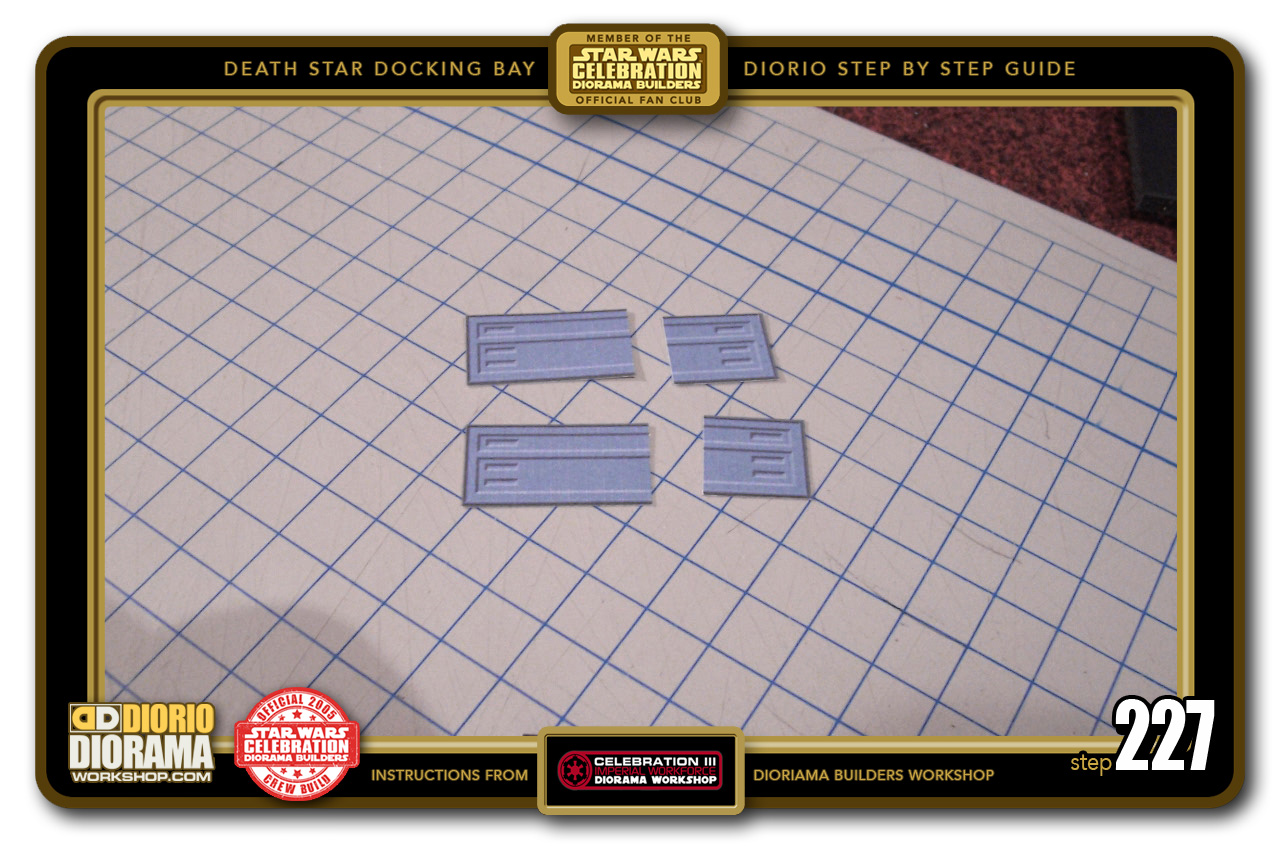
- STEP 227 > The actual decal is too wide for these end pieces so you need to print 2 and cut them in halves. It looks better if you don't cut straight down the middle, just a little past so that the rivets don't get chopped.
-
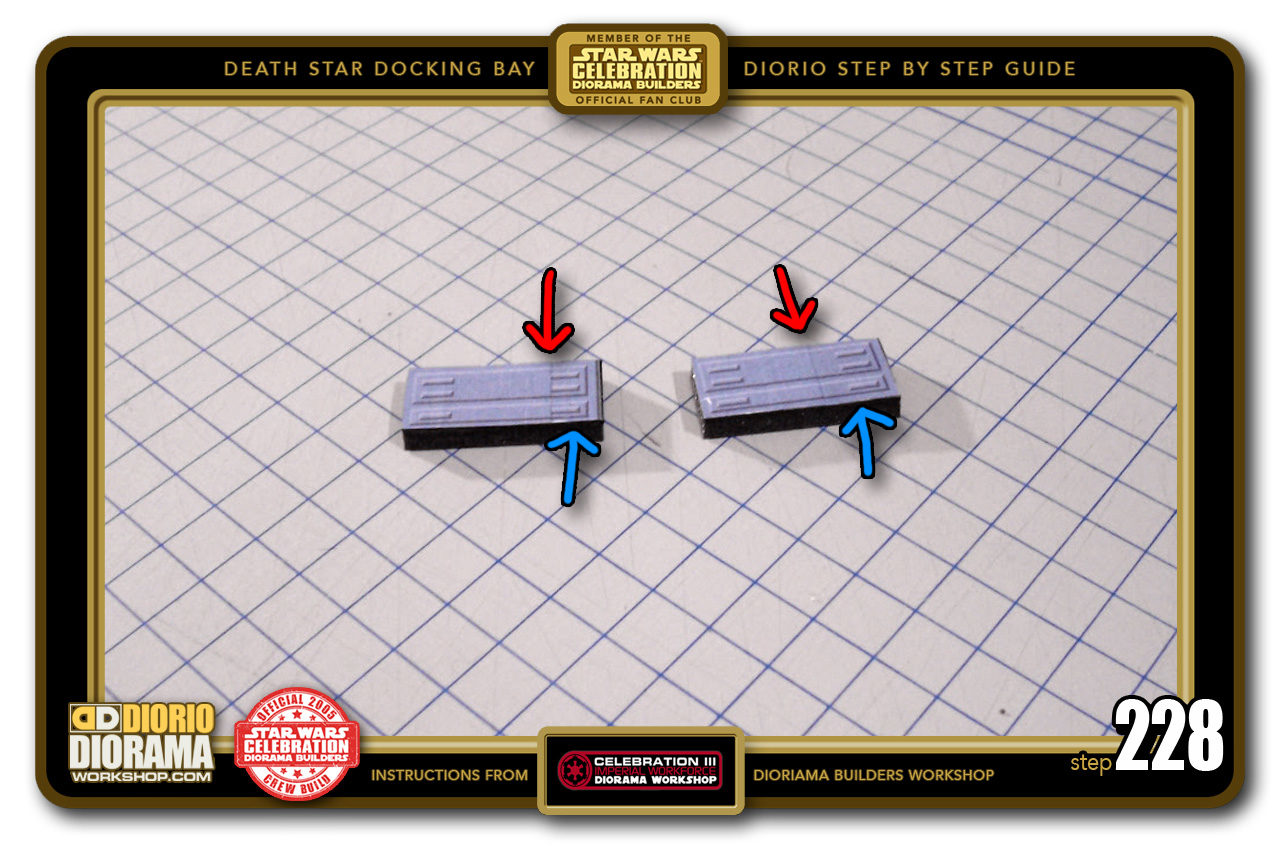
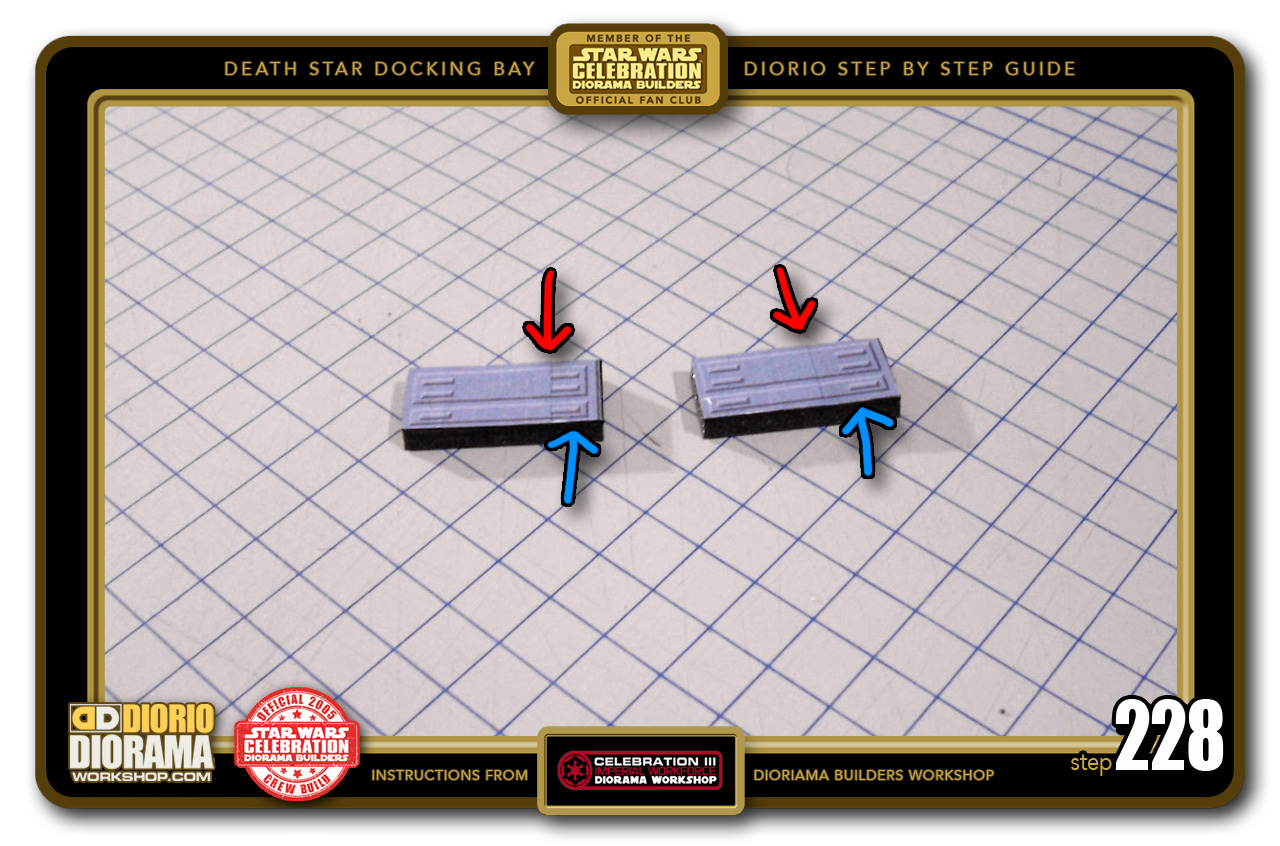
- STEP 228 > Start with aligning and putting your decal on the right side of each piece (blue arrow) followed by aligning your other half decal (red arrows) with the left side of your piece and pressing towards the right until the 2 connect. If you align the horizontal lines you should get the effect that it is one decal.
-
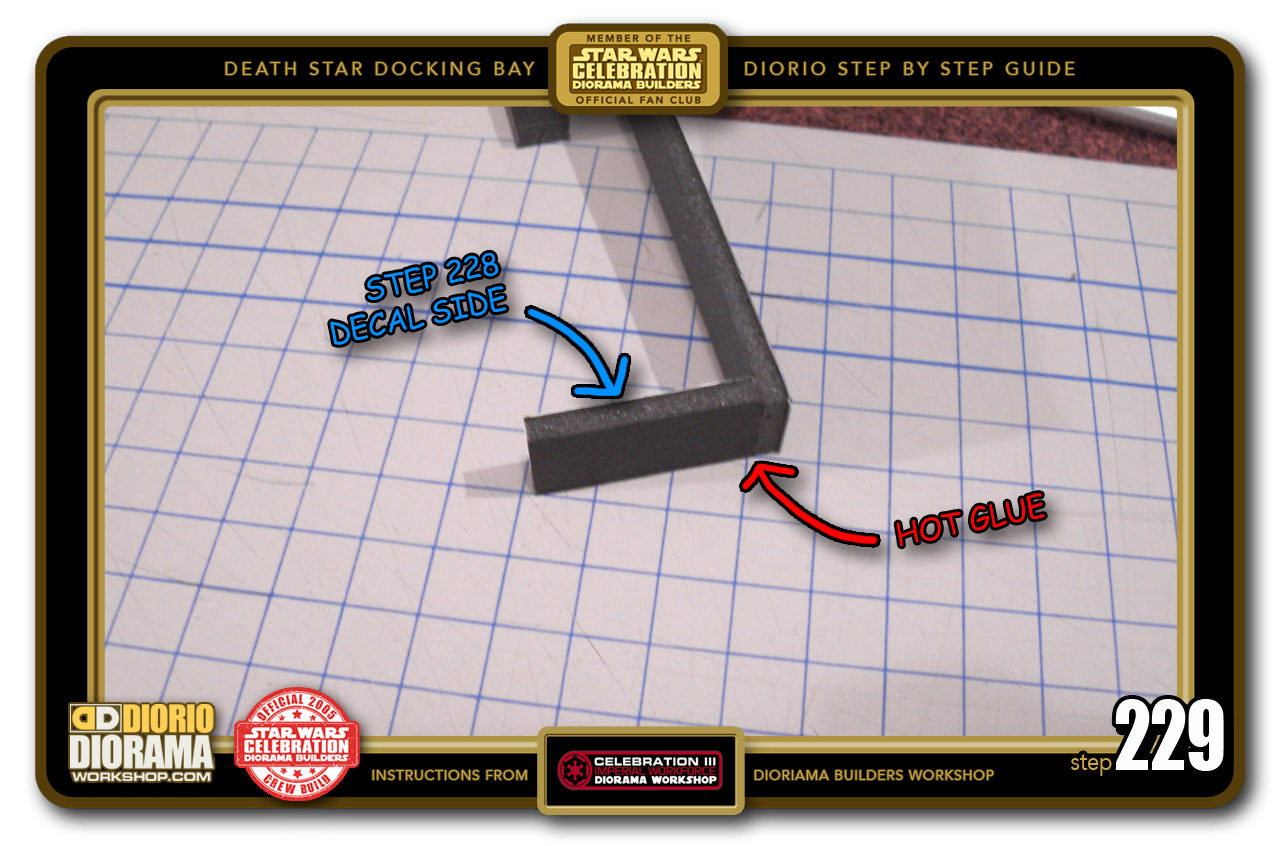
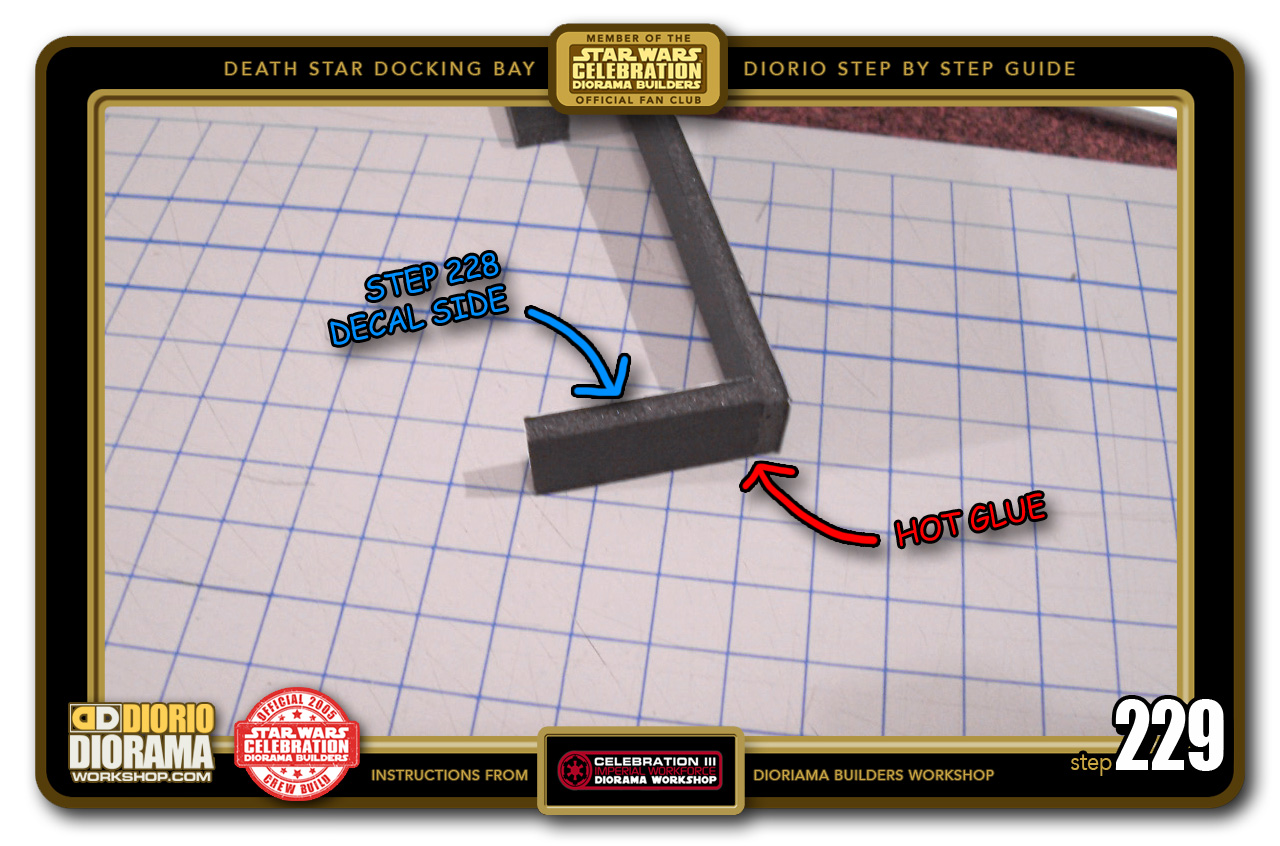
- STEP 229 > Hot glue the pieces to each end of the rod making sure the decals you just attached are on the INSIDE (blue arrow) of your extruder.
-
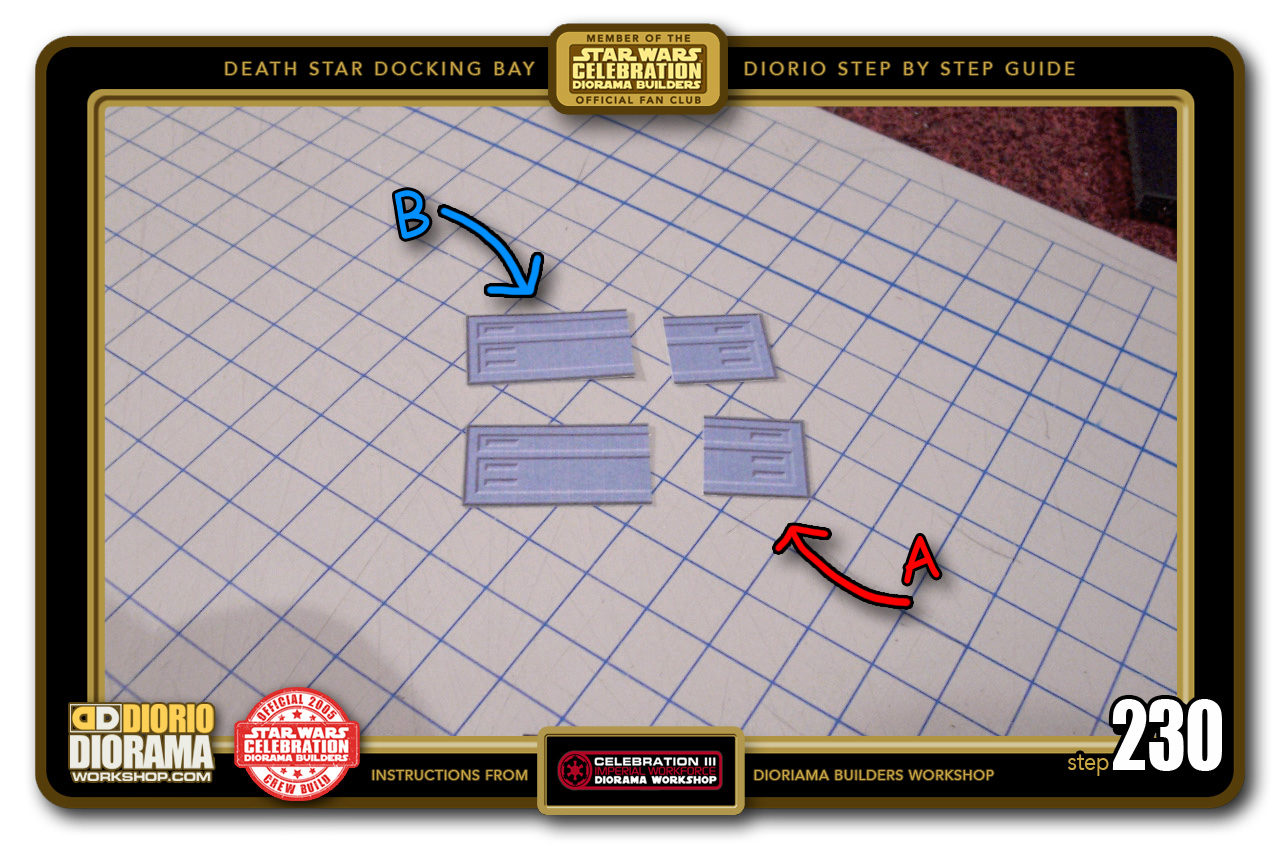
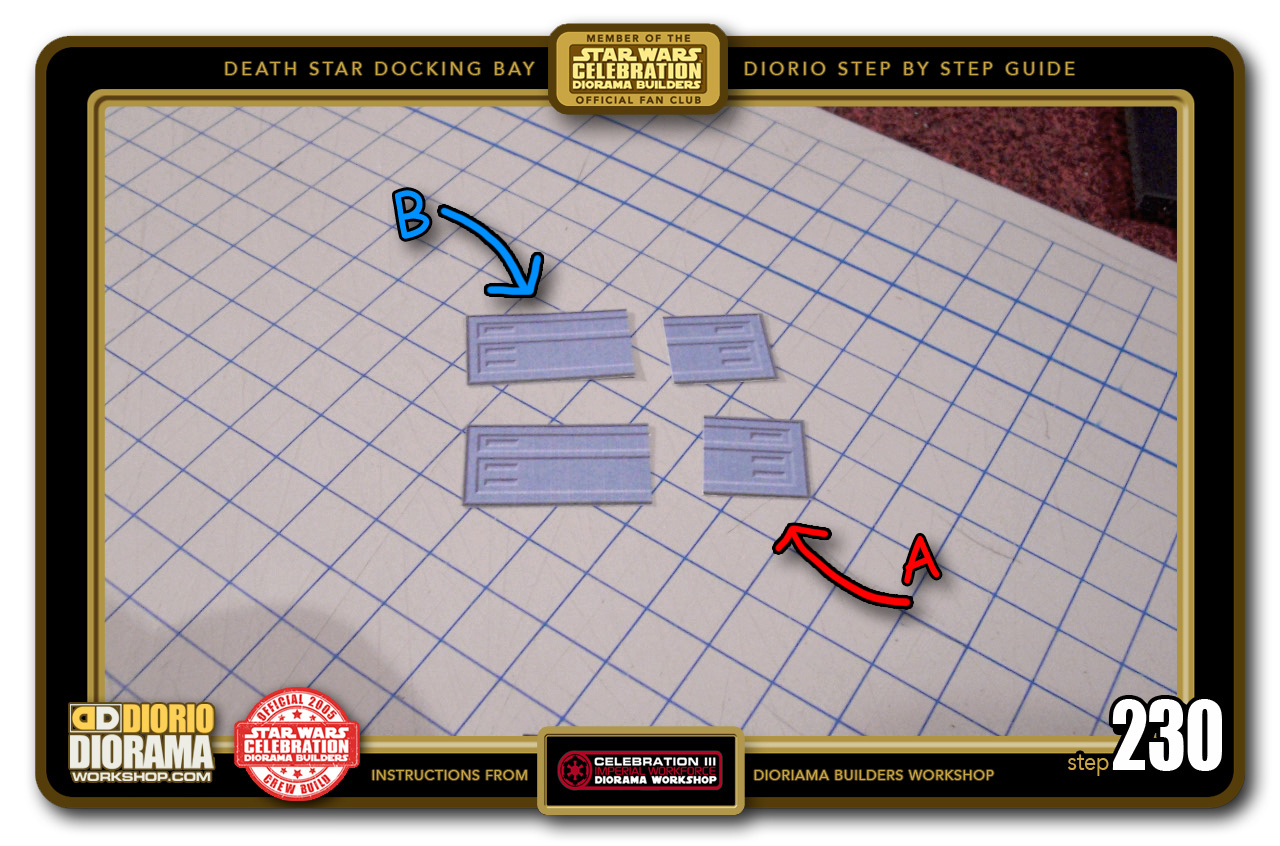
- STEP 230 > When I originally applied these I did the same cutting in half decal technique as Step 227, but you may not have to do this since once glued onto the rod, the outside decal surface should be 6cm, the exact width of your decal piece. If you see your extruder support was cut a little longer and you see some black sticking out, then you can if you like, cut decals and overlap them to give you that clean no exposed foamcore look.
-
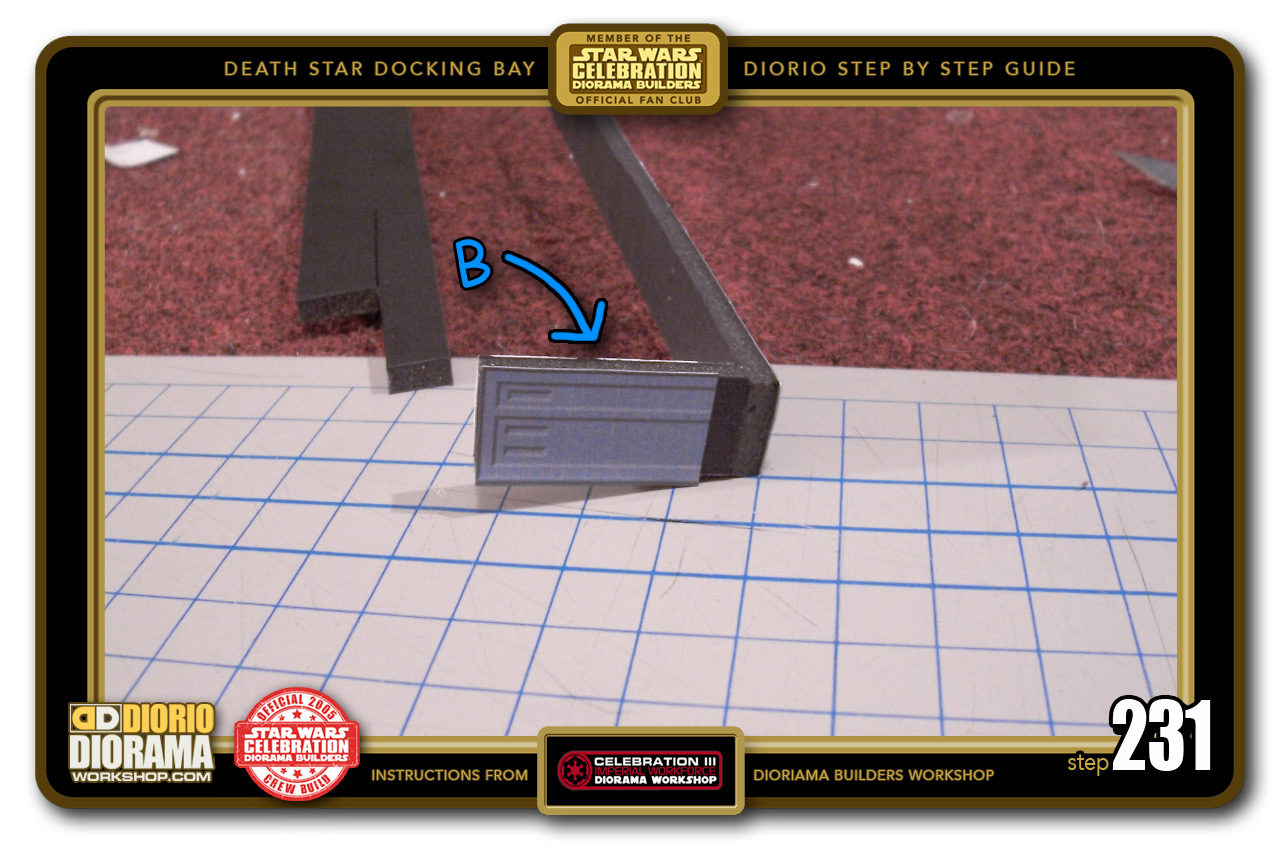
- STEP 231 > If your cuts don't match the decal width perfectly you can again do the cutting technique for the outside. Start with placing the first half of the decal (blue arrow) on the left side of the extruder edge.

-
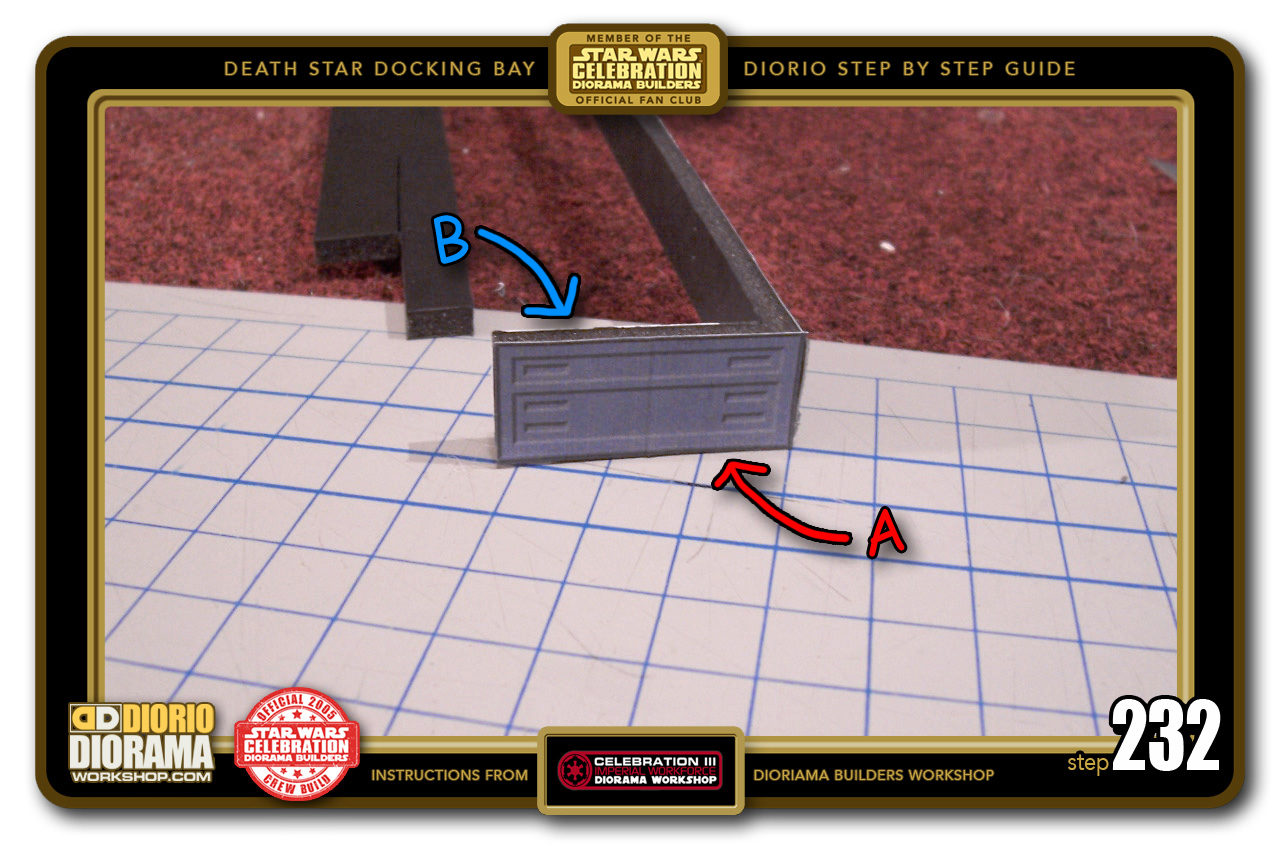
- STEP 232 > Now take the other decal (red arrow) and line it up to the right edge of the rod (not the extruder right edge). You want to hide the connection joint of the foamcore. Align with the first decal (blue arrow) and press onto the foamcore. If the lines aligned properly, it will look like 1 decal. Repeat the same thing with the other side.

-

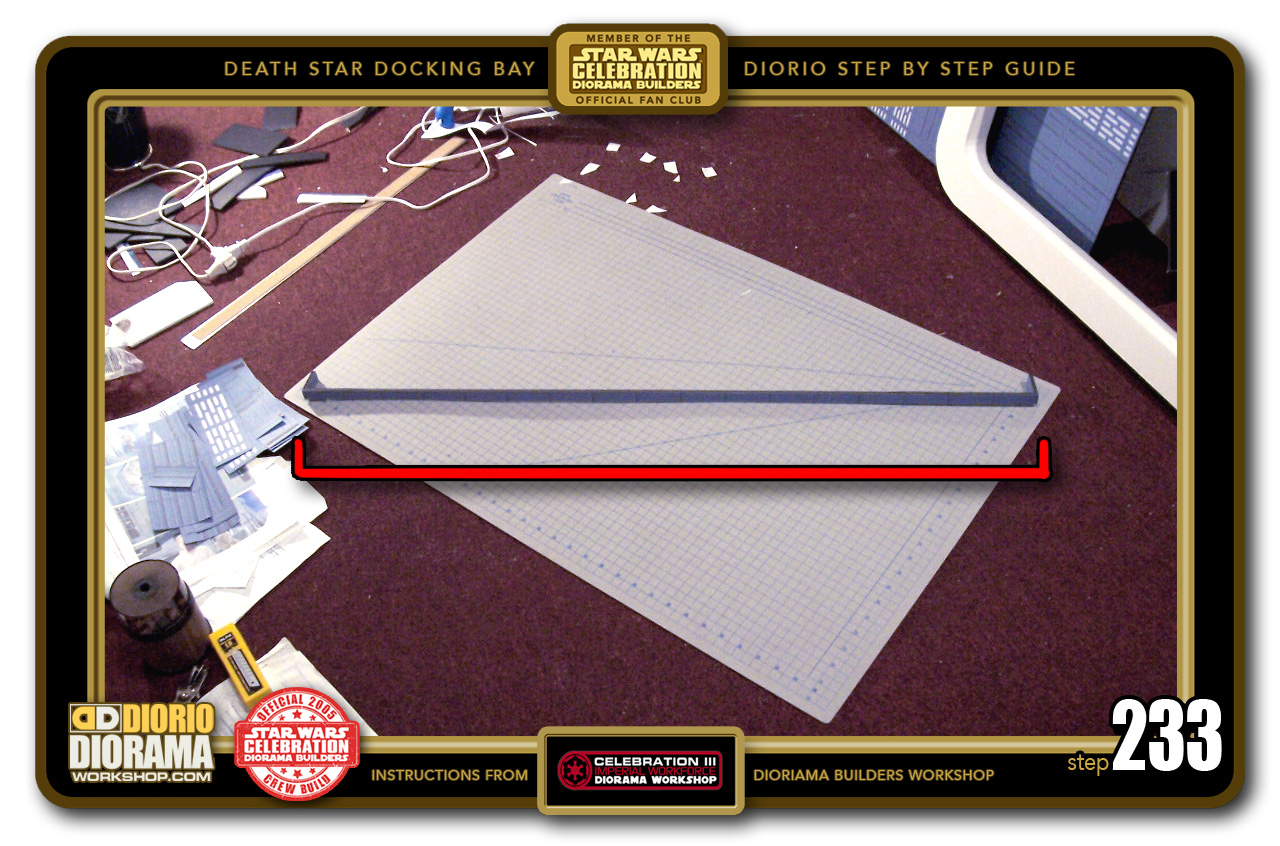
- STEP 233 > You should now have a rod that looks like the shape of red line. You are ready to attach it to the docking bay rear force field wall.
-
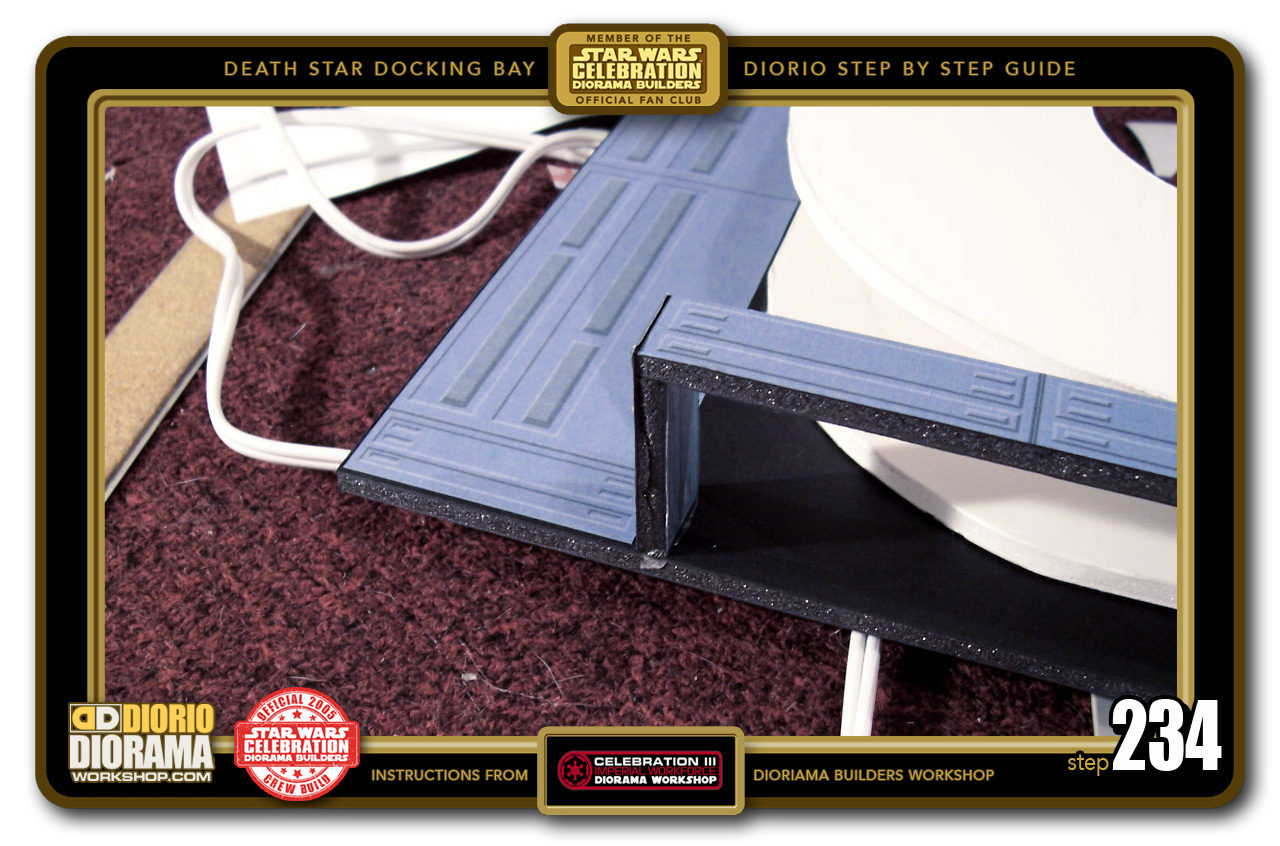
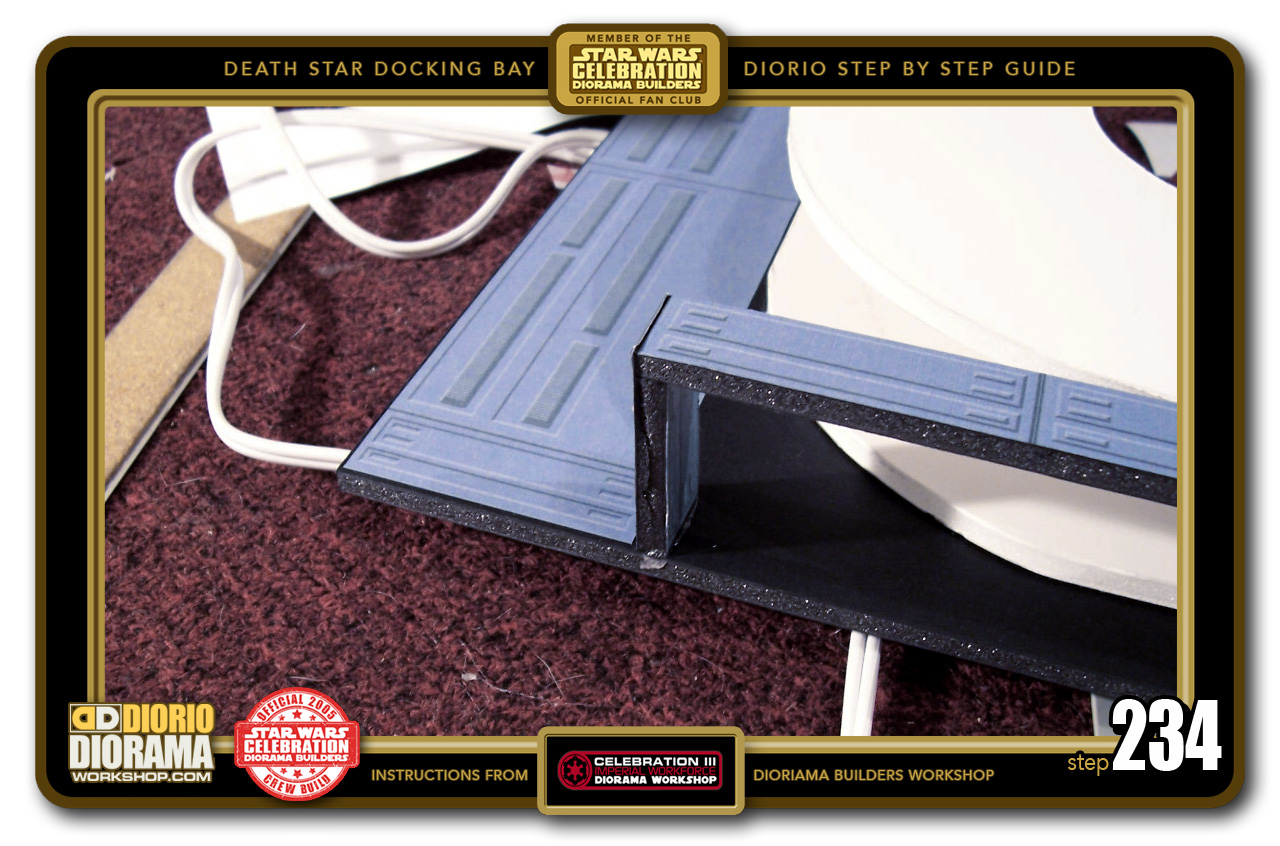
- STEP 234 > Hot glue one end of the rod right against the edge of your decal.
-
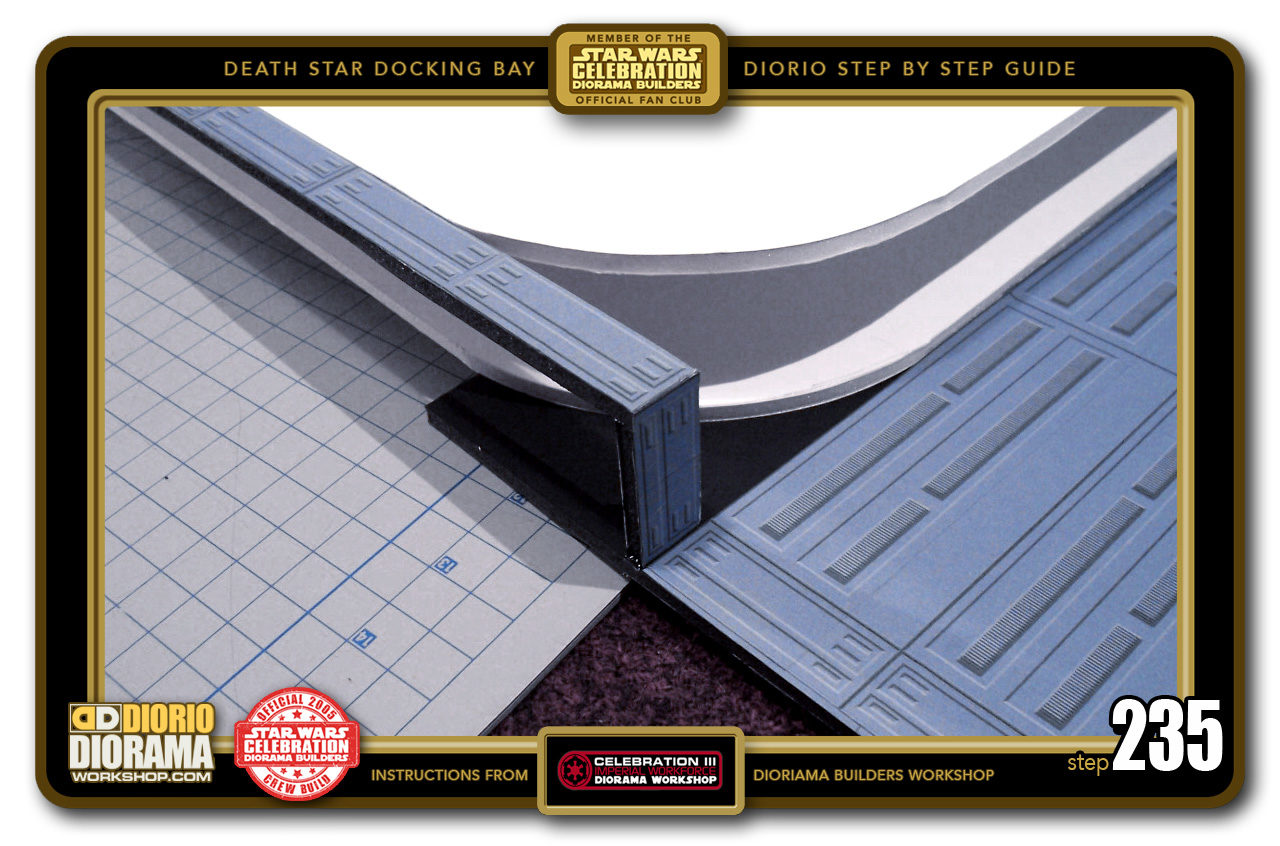
- STEP 235 > Now hot glue the other extruder right next to the other side's decal top. Make sure to align it so that if you look straight down from above, it looks like one giant straight line from one wall top corner to the other.

-

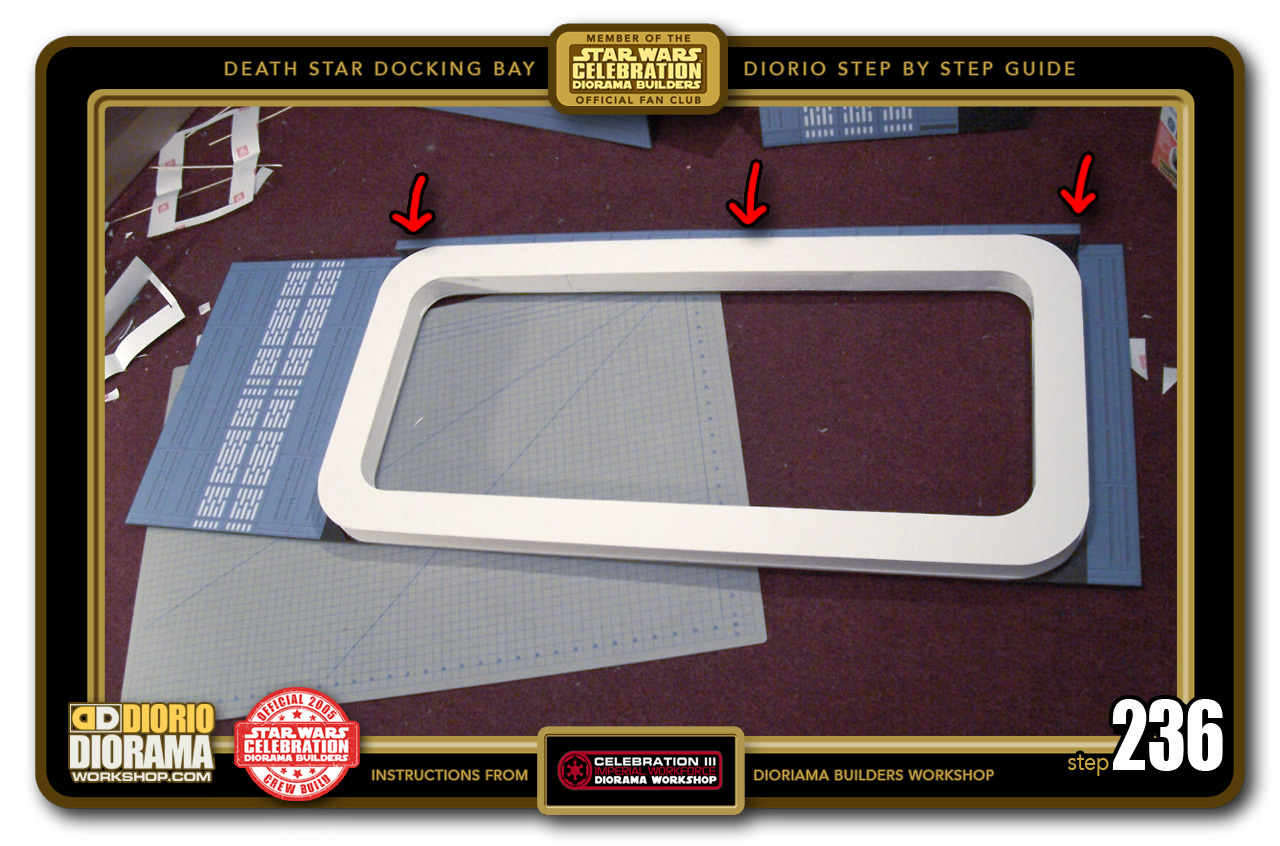
- STEP 236 > The red arrows point to the rod you just added and what your rear docking bay force field wall should now look like. You can now apply hot glue to the bottom edges and carefully attach it to your diorama floor. Once the hot glue cools off, then move on up and place hot glue on the top left edge of your force field wall and press it against the corner of your alcove/large blastdoor wall.
-
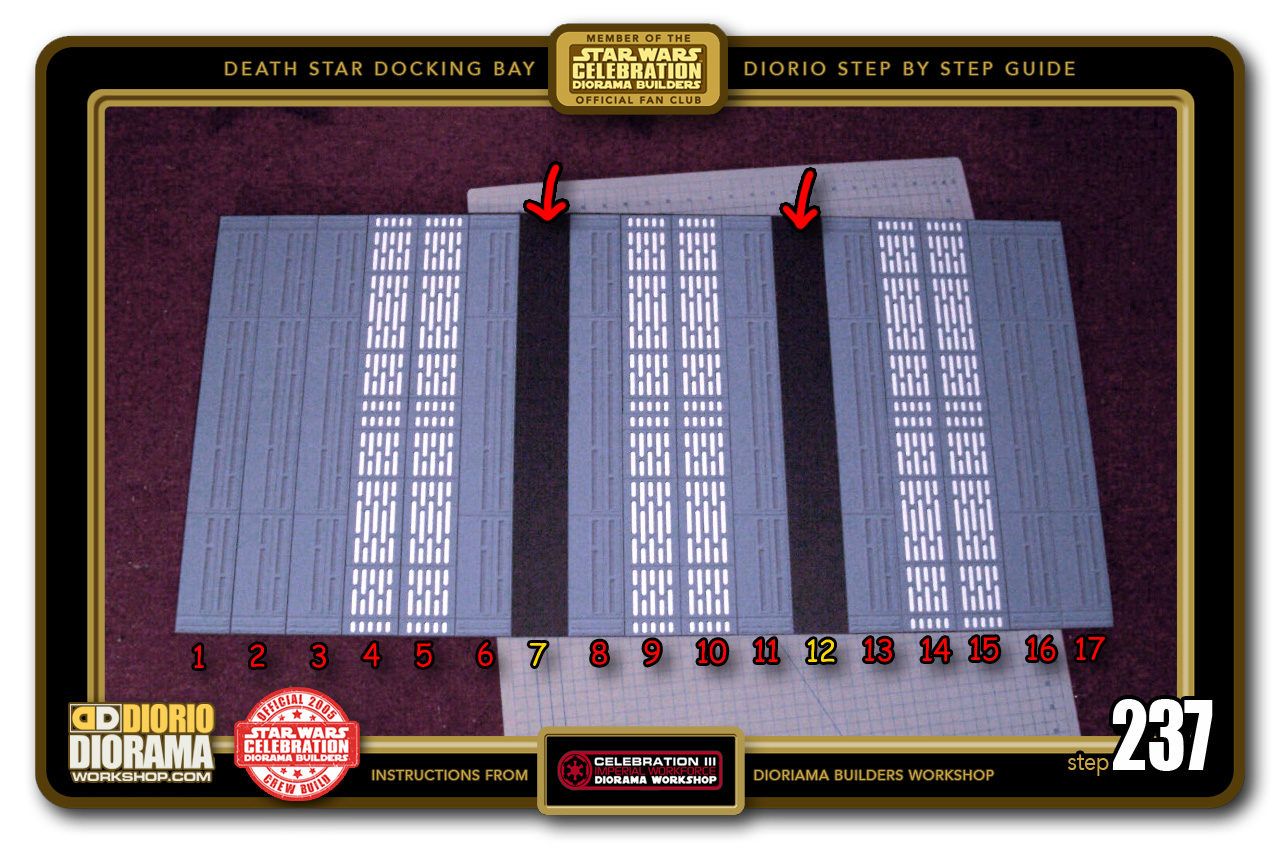
- STEP 237 > Now it's time for the docking bay right wall. Simply measure and cut out a 49.5 tall X 102 wide piece of foamcore. and cover it all with the (page 7) Death Star wall decals 🙂 Leave rows 7 and 12 empty so you can fit 2 3 story tall small round wall columns just like in the movie.

-
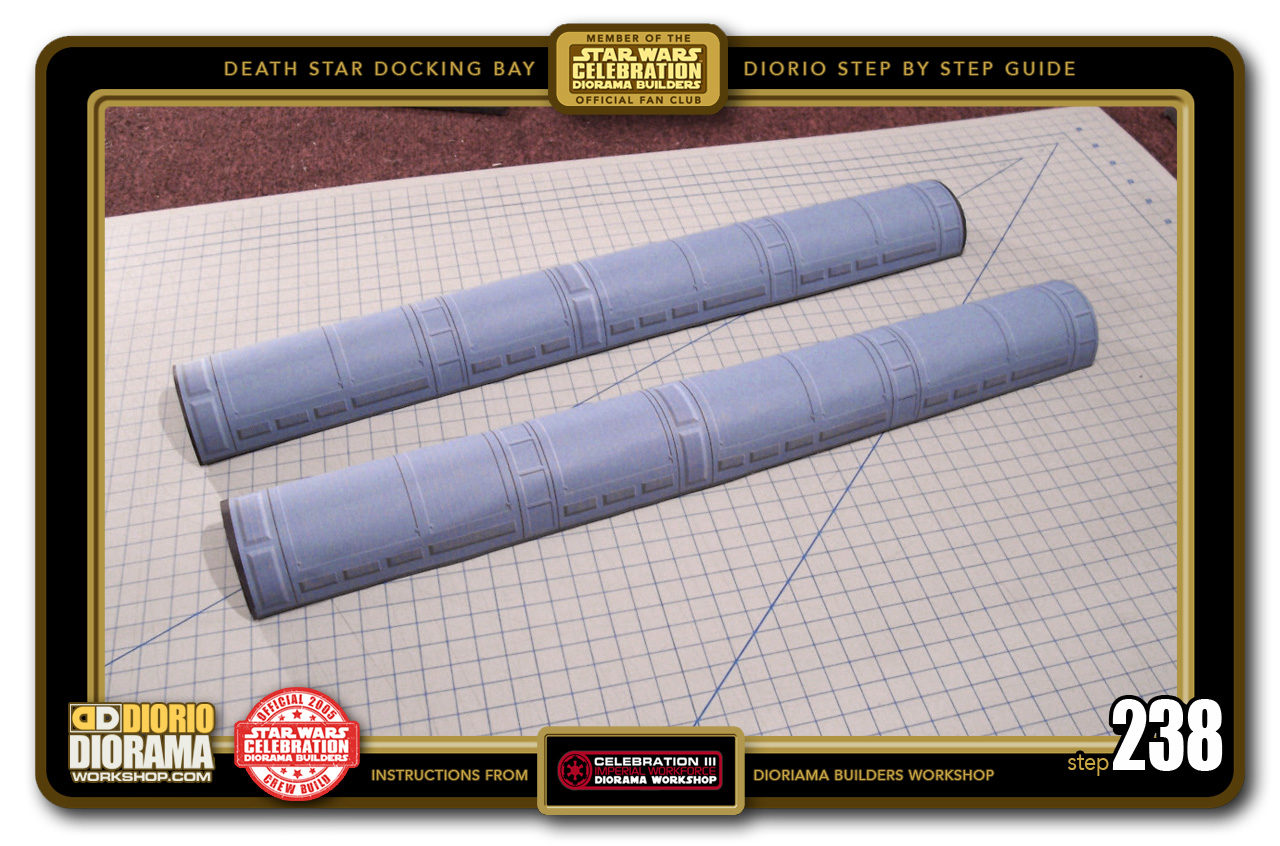
- STEP 238 > You need to make 2 more 3 story small round wall colums as you did in Step 187. Cover them with the small round wall decals.

-

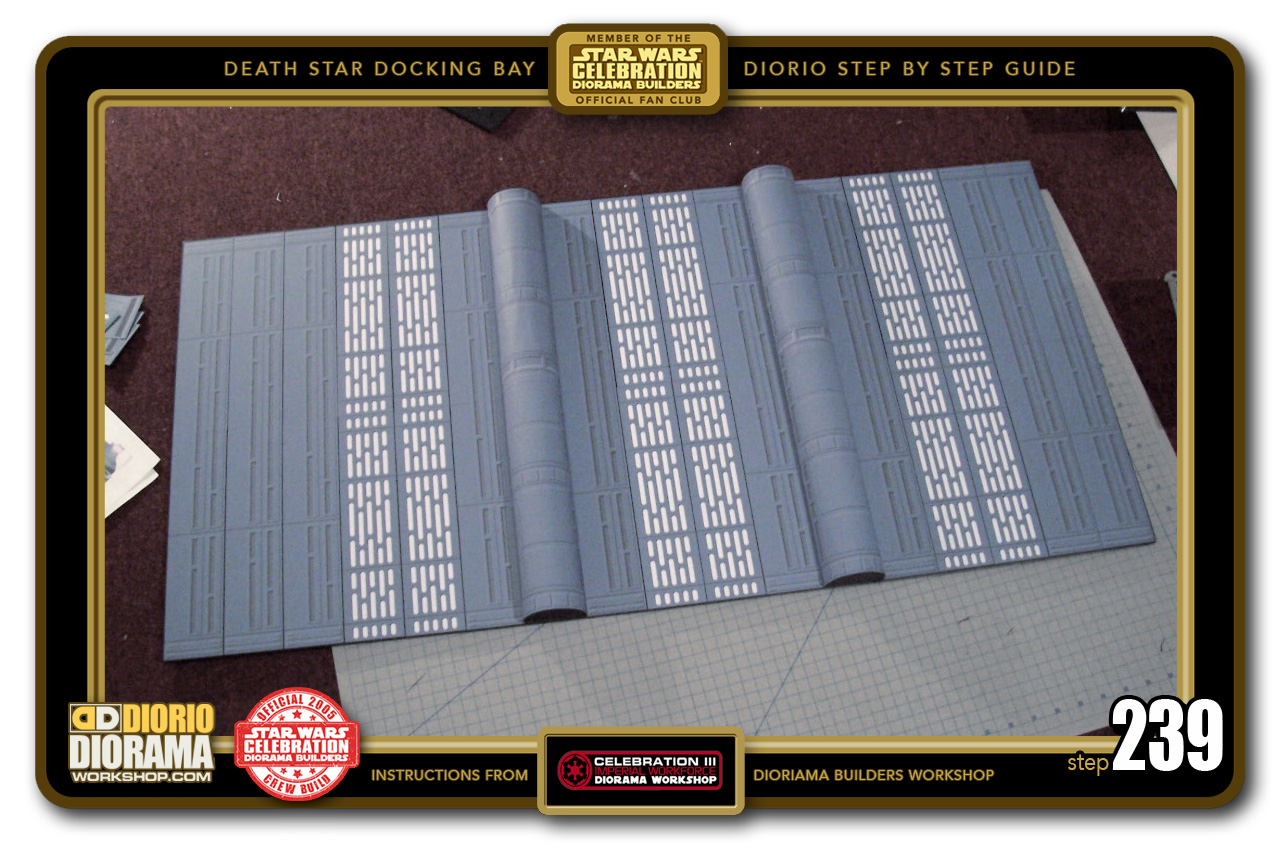
- STEP 239 > Hot glue your 3 level small round walls to rows 7 and 12 of the docking bay right wall surface. It now looks just like the movie and ready to be attached to the diorama floor.
-
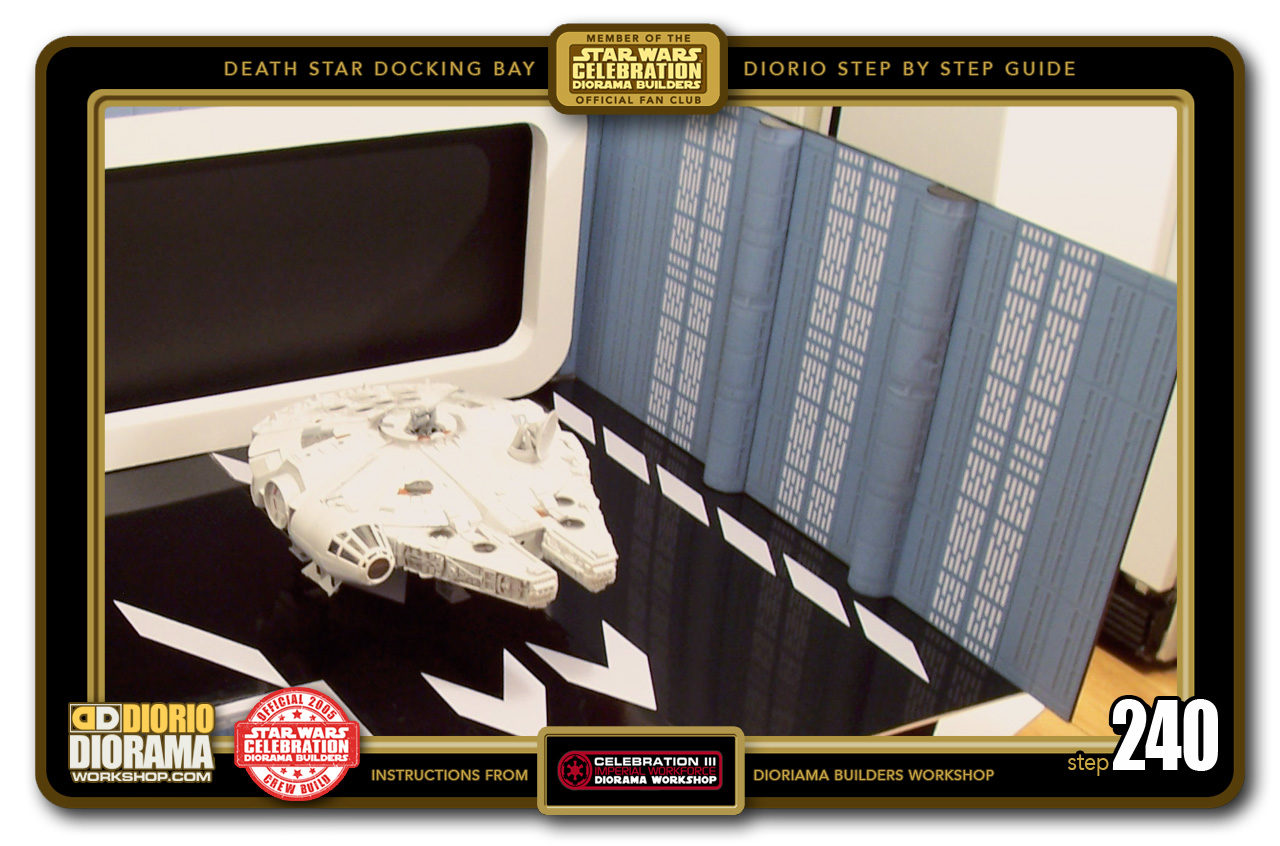
- STEP 240 > Your right docking bay walls are now all done and ready to be hot glued to the floor base. Once the hot glue cools off, move on up and place hot glue on the top right edge of your force field wall and press it against the left corner of your right side docking bay wall.

.
Did you already build this Diorama ? At home or at our Star Wars Celebration Diorama Builders workshop ? Would you like to show it in the site’s GALLERY VISITORS DIORAMAS section, YES ? That is Awesome !!! You can find out all the details on how to email me your photos on the VISITORS SUBMISSIONS INFO page … When I get your photos, I will create your very own page just like this one. You may not realize it but work does inspire others to join in the fun of making Action Figure Dioramas.
.
NOT FOR RESALE ALL Decals, tutorials and artwork are ©FrankDiorio (dioramaworkshop.com) and offered FOR FREE to the fans – that would be you ? so you can build and display my diorama designs in your very own home. I realize I cannot control what one does with my graphics once I place them on the web, I can only ask you as one fan to another, please respect the artist and do not be that jerk who uses my designs and tutorials to build a copy of my work only to sell it on EBAY or trade/sale groups and forums. Thank You. Frank.
![]() Catch up with fellow visitors and exchange stories, read cool interviews with the crew, exchange photos, fun surprises and grab some FAN ONLY merchandise next year at actual future conventions ?
Catch up with fellow visitors and exchange stories, read cool interviews with the crew, exchange photos, fun surprises and grab some FAN ONLY merchandise next year at actual future conventions ?
.
©2018 Frank Diorio DioramaWorkshop.Com
.
IF YOU LIKE WHAT YOU SEE, PLEASE SHARE WITH YOUR FRIENDS
USING THE SOCIAL MEDIA BUTTONS BELOW